Happy Sunday Bread Heads!
I love garlic, I love garlic toast, but I find it is a drag to have to mince the garlic then toast is with butter. So I just make Garlic Bread (Pain D’ail). The thing is that garlic can inhibit the growth of yeast, so we can’t just take a bread recipe and add the garlic, nope, we have to fix it so we get all the garlicy goodness and still have a nicely risen loaf.
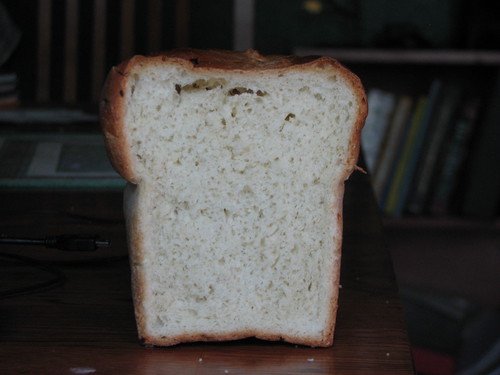
The way to get around it is our old friend butter. By blanching the garlic, then mincing it fine, then mixing it with butter we coat the garlic in a layer of fat that keeps it from killing off our yeast. Bingo! Garlic bread that has a nice open crumb and is a fabulous piece of toast for sandwiches or your favorite pasta meal.
Pain D’ail (Garlic Bread)
Ingredients:
6 large cloves of garlic (yeah, that seems like a lot but there are 5 ½ cups of flour in this recipe trust me it the garlic is a subtle flavor not in your face. If you must, you can make it with 4 cloves but there will be hardly any garlic taste.)
¼ cup butter (1/2 stick) at room temperature
5 ½ cups flour (bread flour preferred but this works well with all purpose too)
1 package (2 ¼ teaspoons) yeast
2 teaspoons salt
1 tablespoon sugar
1/3 cup milk
2 ¼ cups hot water (120 to 130 degrees)
Baking Pans:
Two 8"x4" loaf pans, nonstick or greased
Method:
Peel your garlic. The best way to do this is to place the flat of your chefs knife or a dough scraper on the a clove and give it one sharp hit. This will crack the paper and make it easy to get off. Cut the stem part and the tip of each clove off. In a small sauce pan bring a cup of water to a boil. Toss the garlic cloves in for one minute. Drain then mince or crush into a fine paste (I always do this with my knife but if you have a garlic press it will work great). In a small bowl mix the garlic and butter until they are thoroughly combined. Set aside.
In the work bowl of your stand mixer or your large mixing bowl if you are doing this by hand, measure out three cups of flour, add the yeast, salt and sugar. Whisk to combine. Pour in the water and milk and stir with a wooden spoon or the flat paddle attachment of your mixer for 1 minute. Drop in the garlic butter and stir for 2 more minutes to form a thick batter.
Add the rest of the flour ¼ at a time to form a shaggy mass. If you are doing this by hand, turn the dough out onto a well floured work surface and knead with a strong push, turn, fold method for 10 minutes. This dough might be sticky at first so don’t be shy of giving it a liberal sprinkle of flour if it is. The dough should come alive under your hands, this means it will become elastic and less sticky.
If you are kneading using a stand mixer, attach the dough hook and knead at medium speed for 10 minutes. Check that the dough is not too sticky, if it is, add a good sprinkle of flour.
When the dough is kneaded, place in a large greased bowl and cover with plastic wrap. Allow to stand at room temperature for about 40 minutes or until it has doubled in volume.
Turn the dough out onto a lightly floured work surface and knead for 30 seconds to get out any air bubbles. Divide the dough into two equal balls and cove with a tea towel to rest for 2 minutes.
To form the loaves flatten one ball with your palms and fingers so you have an oval that is a little longer than your pans. Fold the dough over the middle and tightly pinch the seams. Tuck the ends under and place in your pan, seam side down. Repeat with the other dough ball. Cover both pans with wax paper and allow to rise for 40 minutes.
Twenty minutes before the loaves are risen, preheat your oven to 400 degrees. Place on of the racks in the middle of the oven.
When the oven is hot, slip the loaves into it and bake for 40 minutes. You may want to check that the loaves are not getting two brown at 20 minutes. If you want you can tent them with aluminum foil to prevent an overly brown top.
Test for doneness by turning one loaf out and thumping the bottom with a finger. If you don’t get a hard hollow sound return to the oven for 10 more minutes, without the loaf pan.
This bread will spread a lovely garlic and yeast flavor throughout your kitchen and bring lots of folks in to see if they can get a bite.
There you are, real garlic bread, light of crust, fragrant and flavorful, even to those who are garlic phobic.
The flour is yours.
Oh, about next week, anyone interested in learning how to make doughnuts?
