
Happy Sunday Bread Heads!
So, lets start with a little housekeeping. This series is in the process of becoming a book. I am working on re-baking all the recipes from this series and taking new pictures for the book. I am self publishing it through Amazon and have high hopes that it will be ready in the first week of December (we’ll see and I’ll keep you posted if that changes). It is tentatively going to be called "A Liberal Sprinkle of Flour".
But enough of that, you came here to get a new bread recipe and I have a good one for you. It is another version of bread with chocolate. This recipe is similar to Petit Pan Au Chocolate, but it much easier and faster. Instead of individual brioche rolls filled with chocolate, these are actual loaves with of white bread with a rich chocolate center. The bread is made with milk and butter so it is also rich, but without the eggs that make a brioche.
So, let’s bake!
Chocolate Center Loaves
Ingredients:
1 ¾ cups hot water
1 package (2 ¼ teaspoons) yeast
4 cups bread flour
1 teaspoon ground ginger
¼ cup whole milk
1 tablespoon sugar
2 teaspoons salt
2 tablespoons butter at room temperature
½ cup dark chocolate morsels (I like the Ghirardelli but you can use any kind or even semi sweet if you like)
Baking Pans:
Two 8 x 4 loaf pans
Method:
Start the night before by preparing the sponge. In your large mixing bowl or the bowl of your stand mixer, measure out ¾ of a cup of the hot water, the ginger and yeast. Whisk to combine. Whisk in 1 cup of flour. Cover with plastic wrap and set aside overnight.
The next day, remove the plastic wrap and stir down the sponge. Add the remaining cup of hot water, the milk, sugar, salt and butter. Using a wooden spoon or the paddle attachment of your stand mixer stir to combine.
Add the remaining three cups of flour ½ cup at a time until the dough forms a shaggy mass. This dough can be a little wet from time to time so you might need to add up to a ¼ more of flour as you knead it.
If you are doing this by hand, turn the dough out onto a well floured work surface and knead with a push-turn-fold method. If the dough is really sticky, go ahead and give it a good shot of flour. Knead for 8 minutes. By this time the dough will come alive and will be smooth and elastic under your hands.
If you are doing this with a stand mixer, use the dough hook and medium low speed for 8 minutes. Halfway through check to see if the dough is very soft and sticky. If it is give it a good shot of flour.
Place the dough in a large greased bowl. Cover with plastic wrap and allow to rise until it has doubled in volume, about 45 minutes.
Turn the dough out onto a floured work surface and divide into two equal pieces. Form the pieces into balls and allow them to rest for 5 minutes under a tea towel.
Now it’s time for the chocolate! Flatten one of the balls under your palms to form an oval just a little longer than your pans. Spread half of the chocolate in the center of the oval. It will look like this:
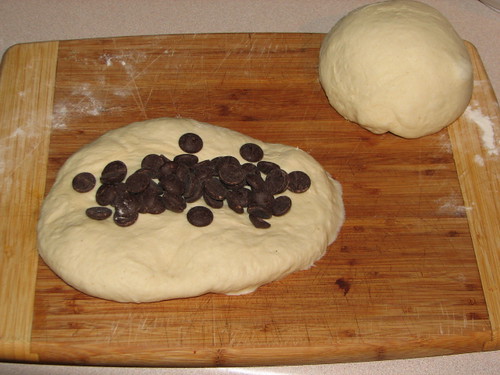
Now fold the dough over and tightly pinch the seams. Tuck the ends under and place in your pan. Repeat with the second ball of dough. Cover the pans with a length of wax paper and allow to rise until they are just an inch above the edge of the pans. About 30 minutes.
20 minutes before baking set a rack in the middle of the oven and preheat to 375 degrees. Slip the loaves into the hot oven and bake for 35 minutes. The tops should be golden brown and the bread should produce a hollow sound when thumped on the bottom. If you do not get a hollow sound, return them to their pans and bake for up to 10 more minutes (five really should be all you need).
Turn the loaves out onto a wire rack to cool. You want to eat this bread warm, with the chocolate still slightly liquid. However, cutting if with your good bread knife is going to be messy, so indulge your inner barbarian and just tear hunks of the bread off and pop it in your mouth.
The flour is yours.
