Crossposted on my photography blog
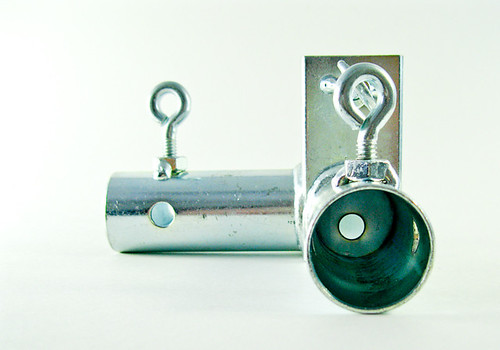
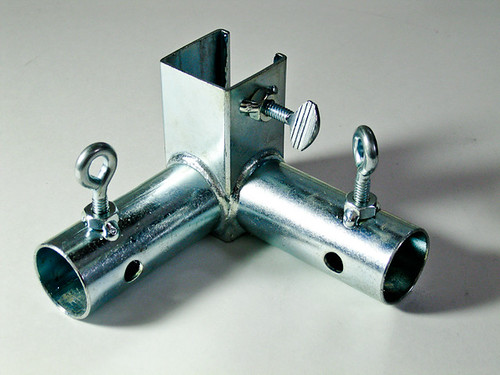
This is the object chosen to illustrate this post. Just in case anyone is remotely interested it is part of a wall kit for Caravan type canopies that are ubiquitous at art fairs. It connects the crossbars to the uprights. The photographs throughout this piece are not great but they should serve to illustrate the points made. I ended up having to set up and shoot in about twenty minutes flat as opposed to the couple of hours I wanted to spend - Christmas chores.
Introduction
In this article I'll be looking at what is called either table top photography or product photography. Some people make a living out of doing nothing but this type of photography. I don't do much of it now but, like many, it is really where I cut my teeth. It is a technical form of photography there is no doubt about it. This photography reallyis 90% technical and 10% artistic. Master this though and the technical stuff will become so ingrained that you will be able to work it on autopilot leaving much more room for the creative side in more artistic projects. I do find that there is a sort of meditative quality to this type of work though, having one object, complete control of conditions, i.e. lighting and a few hours to get off a set of high quality images. This is good work for days when the creative impulse has gone to the beach for the day.
Controlling light really is the key here, if you look at the product pages of just about any shopping websites you'll notice that the images have certain things in common, very soft shadows and often little more than what is called a contact shadow, plain white backrounds with no blemishes or joins, no underlit parts of the object and a very balanced even light. Not so noticeable in these images is the fact that the ISO is always set as low as possible and never over 100. This is to eliminate noise from the final image (I did say it was technical). If this post conveys enough information for all of this to be achieved using a compact camera then it has done its job.
The Setup
There are some options here but the aim is always the same: to provide a soft even diffused light and to provide a continuous background. In the case of the latter the viewer should not be able to tell where the floor ends and the wall starts so to speak.
The easiest method is to buy something called a light tent. These are quite expensive though and building your own contraption is much more satisfying than opening a box. I would however, recommend getting one if you are going to be photographing a lot of highly reflective rounded surfaces as this type of surface will show a reflection of the camera and this is a big no no. I would also get a light tent if someone were to offer me big bucks for photographing lots of product but for the occasional blog picture or ebay photo one of the following methods should suffice. It has to said that if you are doing this as part of a business and are intending to work in an area that clients have access to then the light tent is the way to go - the following methods work great but look like crap.
This is my personal preference:
Take one plastic storage bin place it on its side on a table top or desk.
Get two desklamps with daylight equivalent bulbs or tubes and place one on each side. (I prefer the tubes personally but can be either)
Insert a piece of white card to cover the back and the base of the contraption but, and this is important, curve it between the two and don't be tempted to crease or fold it.
Just in case the plastic storage bin method is a little too deluxe there is a cheaper alternative. Take one cardboard box, cut out the two sides that will be closest to the desklamps - or rather cut very big holes in the two sides with, say an inch of cardboard remaining all around to provide suport. Now cover the holes with parchment paper (Greaseproof paper for those living in the UK). Obviously the sturdier the cardboard box the better. Remember that the contraption can look as ugly as a banker who's been told that he'll have to spend Christmas with poor people as none of it will be in shot. Now put the white card in the same as described for the storage bin and you are good to go.
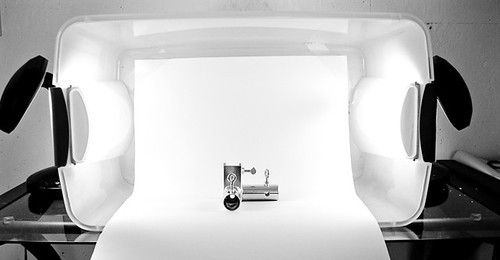
This is the deluxe storage box method with object ready to go. Just for reference the box is around three feet on its long side. The two lamps were originally reading lamps and have a daylight balanced tube similar to the type found in lamps and light boxes designed for dealing with SAD. If you do happen to have one of those lying around they make a really nice light source for photography.
The Act
One thing that I haven't mentioned up until now is the tripod, well worth investing in if you plan to do a lot of this. I would go against conventional wisdom and buy a cheap light one for a compact camera though. If that is not an option try to improvise some sort of camera support. If your camera has image stabilization as most do then you can get away without though.
So lets begin. Take object to be photographed and place it on the white card in the contraption.
Now adjust the lamps and the object so that there is a bare minimum of shadow.
Set the camera to
P (program mode)
ISO 100
White Balance Sunny (see seperate section)
Picture quality- highest resolution and finest resolution settings (we want as much information as we can get in the image)
Position the camera so that it is either at the same height as the object or very slightly above it
Half press the shutter and check the following
Shutter speed 1/8 or above if using tripod (lower than this and a bit of noise can creep in to the darker areas depending on the sensor)
Shutter speed 1/30 or above if camera is hand held and image stabilization is on
f stop number is f5.6 - f12 (I aim for around f8 as this gives about the right depth of field)
If the shutter speed and f stop numbers are coming in too low and the lighting needs to be increased. A room with more ambient daylight or more powerful bulbs would be the way to go. If you are hand holding the camera and have a choice of changing f-stop or shutter speed change f-stop to a lower number. You will lose some depth of field but will still end up with a usable photo whereas if there is camera shake that is it- do not pass go do not collect $200. If using a tripod try lower shutter speeds. You will be struggling to keep the noise manageable at anything over half a second though on most compacts.
Zoom about half way out (this is likely to be where there is the least distortion- though milage can vary on this)
Position camera distance so that the whole object is showing with a small amount of white space around it and is positioned in the center.
Check that there are no light sources other than the lamps and daylight bleeding into the frame (this is explained later on)
Take the photograph using the timed release function if the camera is on a tripod.
and review it as large as it will go on the viewscreen. The aim with this type of photography is to have the image sharp at 1:1 over as much of the object as possible. If none of the image is sharp then it has to be rejected. If it is not sharp and you are hand holding then you'll have to find a way of raising the shutter speed probably by increasing the available light somehow. Failing that you can raise the ISO to 200 or even 400 just to get a feel for the process. The images won't be technically good enough to be used for product photography though.
Once you have one image that you are reasonably satisfied with try to get photographs of different views of the object. You may need to adjust the lamps again.
Post Production (the computer)
Whereas there is great leeway for altering photographs that are intended to be creative using computer software this is not the case for this more technical form of photography. The following are considered acceptable or even desirable though. A small amount of sharpening, noise reduction, exposure compensation or cropping and the operative phrase here is small amount. If there are problems that require more than this then the photograph will probably have to be reshot.
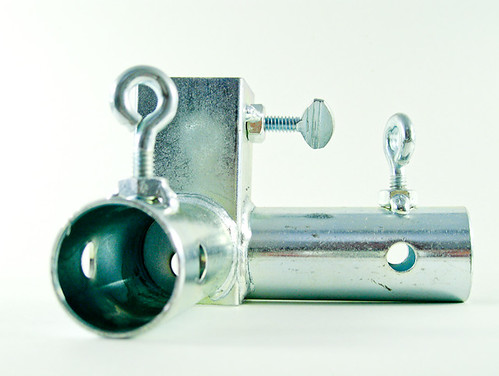
This is the object in all its unvarnished glory. There are small contact shadows which are good, nothing to harsh. There is a very gentle shadow which is barely visible which is OK. I should have had the inside of the tube lit a little more. normally I would have done this using a reflector, an aluminum foil wrapped piece of cardboard would have done the trick.
What a Product Photograph Reviewer Will Look For
If you are taking the photograph for say a magazine or a website and a third party review is part of the process this is what they are likely to look for:
ISO 100 or below
Sharp point of focus- is there one and is it in the right place? Ideally the whole object will be in focus (usually)
Is composition OK
Noise (basically pixels with the wrong color or luminosity value) generally none or sometimes very very little is the acceptable standard.
Shadows must be soft edged, very light if present at all. A soft contact shadow is OK
Exposure must be correct and lighting even
The background has to be clean and as uniform as possible.
It should be assumed that the reviewer will look at the photo at 1:1 or 100%
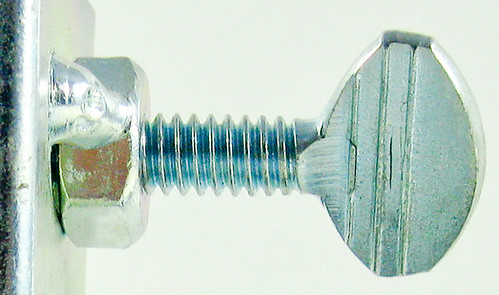
Just to give an idea of what an image looks like in actual pixels, 1:1 or 100% (all those terms are interchangeable btw) this is roughly it. It is a crop of the image immediately preceding it.
A Note About Color Temperature and White Balance
You have probably noticed some symbols on your camera display of things like a sun, a cloud, a lightbulb a different lightbulb and the mysterious initials AWB. AWB stand for Automatic White Balance (not Average White Band which is a reference that no one below the age of about 50 will probablly get).
You have probably heard the term color temperature and white balance bandied around before. Well, that is the last mention of color temperature that you'll see here as it is a little esoteric and serves to confuse more than enlighten unless you are into the geeky side of photography.
The only really important thing to know at this point is that they eye and the camera sensor 'see' light in a different way. We can look at light coming from two different sources and see them both as white whereas the camera sensor may see them very differently, one as say blue and one as yellow. We are not talking subtle difference here as you or I may see with different brands of light bulbs but stark, as if someone has put a colored acetate sheet in front of our eyes.
Now, light from similar sources will have a similar effect so, for example, all tungsten bulbs will cause a cast of one color, all normal bulbs (irridescant) another color, and flourescent another. It doesn't really matter what the color cast is in each case at this stage but it will always be the same for each given light source. The camera can compensate for these casts which, in effect, makes it "see" the light the same way that we do. There is one huge, massive and essential caveat to grasp here though - it can only cope with one of these variants at a time. What does this mean? Well, it means that you should only be using say, daylight or tungsten or irredescant lighting for any one image but it doesn't really matter which one. Now, we are surrounded by daylight so under normal circumstances it is easier to use additional lighting that is similar to daylight which is why I am suggesting daylight balanced bulbs here. If you were working in a space without windows or at night you could use any type of lighting providing that all sources were the same.
To get a feel for the above, set your camera's white balance to sunlight then point it at various light sources, say a flourescent tube then a normal bulb then out of a window. In the latter case the image on the viewscreen should appear normal but the artificial lighting should make it look anything but. Try it and see.
Your camera is quite happy to attempt to work out the lighting for itself. This is what will happen if the white balance is set to AWB. Cameras used to be crap at this but they have got much better over recent years. To get a feel for this set the white balance to AWB and repeat the above excersise. If your camera is earning its corn all images should appear on the viewscreen without a cast.
It is always best if possible to determine your lighting and set the white balance accordingly.
That is pretty much the basics covered, if you can get a feel for this you are way ahead of the game. The following can be regarded as supplemental at this stage as it mainly applies to dSLRs and not compact cameras.
Flash is daylight balanced for all intents and purposes. Now, flash can be used to overwhelm other types of lighting at a pinch. For example you may have a normal irridescant bulb and a flourescent illuminating the same room which is mixed lighting and a very bad thing from a photographers point of view. Now, providing that the lighting isn't too bright flash can be used to, in effect, drown out the two existing sources. If more flash is required to override the existing light the aperture can be made smaller (higher f stop) so that more light is produced from the flash. This method should be regarded as a last resort though, it is always better to balance lighting rather than to use this brute force method.
On dSLRs more fine control is possible. On the Nikon d40x for example, the basic settings can be further refined so there are (I think) three possible settings within each category so there are three cloudy settings, three sunshine settings, three irridescant settings etc. To grasp this we need to think in terms of a scale as opposed to set points and this is where we would normally look at the whole concept of color temperature. Suffice to say though, that each of the basic settings encompass a certain range and the refined settings on the dSLRs are points within these ranges predetermined by the manufacturer. If you need even more control it is possible to hit an exact point, manually controlling the white balance but that is beyond the scope of this piece. Personally I find the broad settings good enough and if I should need to fine tune I do it with software as part of the post production.
You may wonder how RAW files fit into all this? Very well thank you is the short answer. If you use RAW you have the ultimate get out of jail free card as whatever you set on the camera doesn't matter - it can be changes in whatever software you use on your computer. In the case of jpeg files the white balance is baked into the file meaning that if you forget to set your white balance it is a tough to impossible job to correct it after the fact. but if you've used RAW all the white balance options on your camera are available. This is perhaps the biggest argument for using RAW as opposed to jpeg as every photographer I know has forgotten to check the white balance setting at sometime in their career.
Just for fun this is how the image shouldn't look. Although it may be OK as a photo it would certainly fail as a product shot. The lighting is uneven . Also their is no diffusion of the single lamp light which causes the harder shadow. A big part of the reason for using two lamps, other than for the even flat light produced, is the fact that they tend to cancel out shadows produced by each other.
Closing Thoughts
Well, I did say that it was technical! Bear in mind that if you break these rules it doesn't mean that you will have a bad photograph, just one that is not considered top notch by a very demmanding set of technical specifications. The creative stuff such as composition is a much lower priority here than in other types of photography. The aim is an accurate representation not a work of art. So it is perfectly possible to produce an image that fails with regard to the specific yet suceeds overall.
Another thing to bear in mind is that these exacting standards are set very much with print in mind. Working for screen is much less demanding or to put it another way, if an image is just about acceptable for print use it will be more than good enough for screen.
I have concentrated on the technical for a reason, there is nothing wrong with using the setup for much more creative work!
Nowadays most professional product photography is done using dSLR cameras and this is now generally the minimum required for selling work. The buyer knows what camera you've used because it is contained in something called the exif data which travels everywhere with the image file so no fudging that one. That doesn't mean that perfectly acceptable results cannot be obtained with a compact and that it would be nigh on impossible to tell whether a compact or dSLR had been used.
This article was geared towards compact cameras and while most of the information is transferrable there are one or two things that would be better done differently with a dSLR - more than willing to discuss that in the comments if required - this post is already far to long!
And most importantly:
HAPPY HOLIDAYS
Until Next Time....
Previous Diaries in this series:
Taking Good Pics With a Budget Camera Pt 1
Taking Good Pics With a Budget Camera Pt 2
Winter Photography; Fun in the snow
Photographing Everyday Objects
A Photography
Assignment and a Useful Macro Trick
Low Light Photography
