I am often asked if there are any low cost or free online tools for image editing. The best free online picture editing software that I've come across is Picnik. It does all of the important basic stuff such as exposure, color, red eye removal, cropping but it also does a lot more.
Originally posted on my blog:Free Online Picture Editing – Picnik | Minimalist Photography 101

In this example not only were the alterations made, in this case a vignette, noise and desaturation were applied but the before and after split was also handled by the Picnik software. In other words by selecting the before and after filter the software takes the latest version of the image and the original version to get the two images. It is possible to have a gap of any width and any color between the two images and the before and after text can be varied.
The images on this page really just skim the surface but they do show that it is possible to do a lot more than just edit photographs. Working on an image is really straightforward. The editor consists of main categories, the most important two of which are edit and create. The former takes care of the standard photo corrections mentioned earlier such as exposure, cropping and red eye but the latter one does the really interesting stuff.
The Create section is divided into more sections. The best way to get to grips with these is to explore. It is really intuitive. The most important section is Effects this is basically the only one that I used for the images in this post with the exception of the split on the first one. That was done in the Frames section. Text does what it says on the box and does it very well.
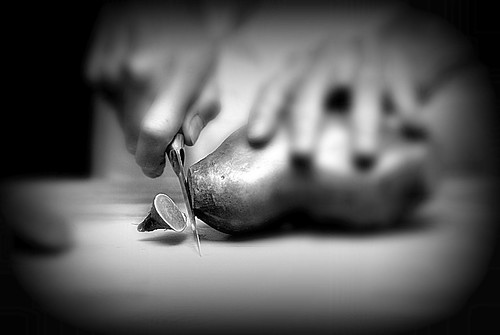
This image has a very strong focal point and that is where the blade of the knife cuts through the sweet potato. I used Picnik to really focus the viewers attention towards this point (a bit different from my normal style which tends to avoid focal points.) I did this by applying a vignette then by making the cut piece of vegetable, knife blade and end of the vegetable pin sharp while reducing the rest of the image to a blur. This involved ramping the unsharp mask up to full and layering the effect which allows part of the image to remain sharp while blurring the rest multiple times. Several of the effects allow for this 'focused' approach whereby only a part of the image is affected.
The principle behind Picnik is very straight forward, the filters can be applied in any order at all or even multiple times. Each effect is controlled by various sliders and changes appear in real time making the process fast and intuitive. The newly edited version can be mixed with the existing version to make the effects a little more subtle (This will make perfect sense when you use the software). The majority of the effects can be either applied globally or 'painted' on to parts of the image as required.
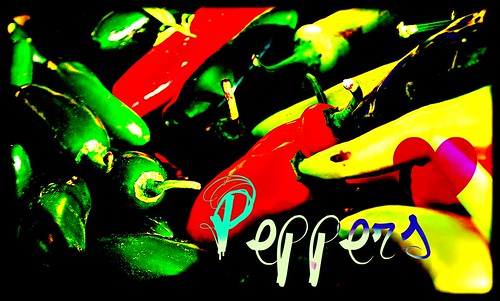
No attempt at subtlety here. There are numerous ways to create a poster type effect within the software. I added the text and used a blending option that caused the image underneath the text to dictate the exact coloring of the lettering. There is also clip art within Picnik including basic geometric shapes and some other stuff. These shapes and text are vector based which means they are scalable without showing rough edges. It is easy to see how some eye catching albeit fairly basic design work could be done using this tool.
To use Picnik
Go to Picnik.com and follow the instructions. You don't have to register. Hit the 'Get Started' button and follow the instructions. Picnik can also be integrated with just about everything else from browsers to photo hosting accounts. I know that it can be integrated with Flickr, Picasa, Google Chrome and Firefox and a load of other things. The photographs her are ones that I accessed directly through my Flickr account. It is also possible to upload a photograph to work on.
Above all the software is fun - approach it in that spirit and you will learn much more than by reading about it. I would go into the effects tab and the edit tabs first to explore and then the text tab but that is just me.
Are the end results high quality?
The short answer is yes. Picnik is capable of the best online picture editing out there. The slightly longer one is that it depends on the quality of the image going in. If you know you are going to be working on an image upload as good a quality version as possible. An over compressed one will start showing jpeg artifacts (unsharp lines and 'tiles') very quickly. Compression is much more an issue than actual size. a 600 pixel jpeg with very little compression will work a whole lot better than a 3,000 pixel jpeg with even a moderate amount. For reference I used Images saved at 83% quality in Adobe Lightroom 3 to work on here. These didn't give any problems. Bear in mind though that Adobe's 83% is likely to be another software manufacturers 99%. When in doubt compress less.
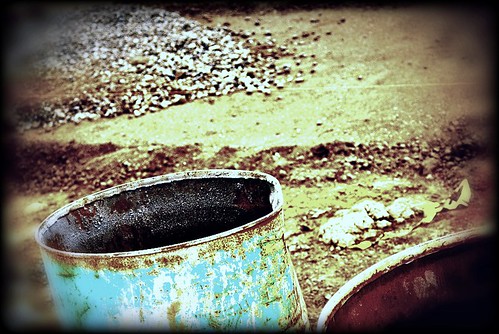
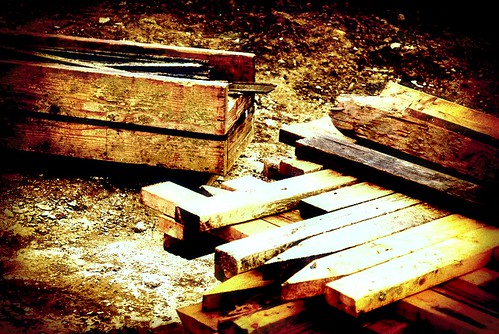
These two images have been altered to produce slightly different end rersults. The top one has a blurred outside and the bottom one is much warmer. In both cases this was done by making use of Picknik's old cheap camera type effects of which there are several. Other filters were used on both including some of the ones under the 'Edit' as opposed to the 'Create' tab.
Is Picnik free ?
Yup. Of course there is also a longer answer. It is possible to pay around $25 a year and get more functionality. This will be very obvious when you start using the software as certain effects and filters say 'Premium' on them. Unlike a lot of software though, the free version is far from useless. Everything on this page was done with the free tools. Hint - if you play around in the edit tab as well as the create tab you can get results that are very close to the premium filters in most cases.
Who owns Picnik?
Google - not a huge surprise there.
