The Saturday Morning Home Repair Blog (SMHRB) is where we gather to discuss the many and varied aspects of home repair. Some here are trained professionals. Some, talented DIYers. Some, hopeless thumb-hammerers. All are welcome. Please feel encouraged to ask questions, share successes, lament sags, drips and cracks and, as always, share any advice that you have for the rest of us.
I'm going to try your patience with a long-winded photo-intensive story of fireplace restoration. If you're in a hurry, skip on down to comments. If you're in a moseying mood, I look forward to your comments about our grand project.
Here Goes
In 1997 we bought our farm. Had it been just a farm, our story would have been pretty generic. But the main house was a plantation house. We knew it was old. It had been there during the Civil War, and had been the home of a Confederate infantry commander. Eventually we found out it was older than we had thought. The house was conveyed as a wedding present in 1788, and had last been renovated in 1850.
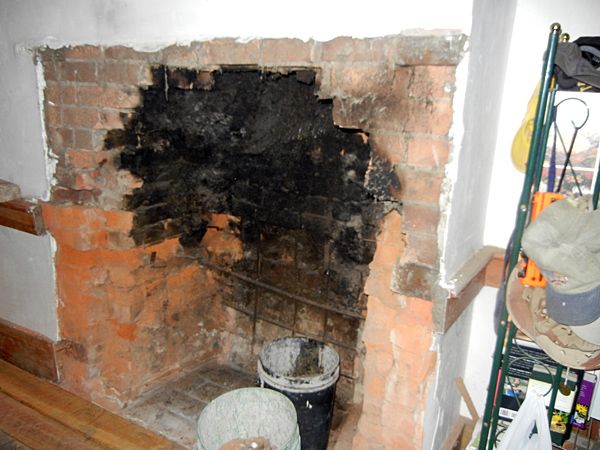
It had also been abandoned for 20 years. This is what the kitchen looked like.
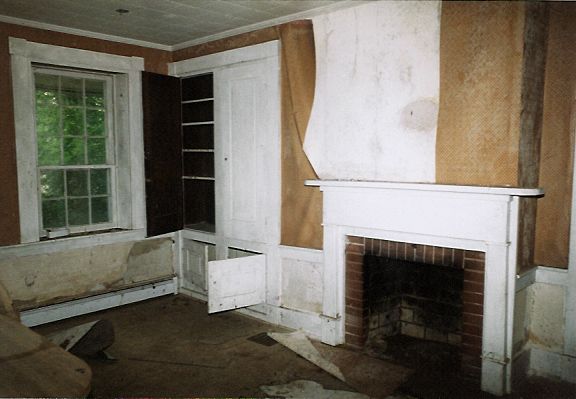
A couple of things to notice, once you get past your "holy crap" reaction. The circle on the wall that looks like a waterspot on the photo is a stovepipe opening that was cemented closed. Once upon a time someone had a woodstove in front of the mantle. You should also notice that the fireplace is modern--a shallow firebox and modern brick surround with a knob in the center, the telltale mark of a damper.
What you can't see is the hearth. The floor was covered with linoleum, but the hearth protruded into the room. It was a red brick hearth that sloped slightly down to floor level. Another thing you can't see is the chimney.
Oh, the chimney! Standing outside, if you looked up at a certain angle you could see daylight where the mortar used to be.
We had no idea what we were in for.
For various reasons, centering most on a spalled foundation that we had to dry out and keep from freezing or the house would fall down, we moved in on November 15, 1997. Without a furnace. Or duct work. Or any chance of a furnace. We put a propane space heater in the kitchen and one in the bedroom, a giant box and banged and hissed and ticked and generally made a nuisance of itself. But we also had been cutting and drying wood, principally box elder, all summer, and decided we would use the kitchen fireplace for our main heat source. People lived like that back then--how bad could it be?
Yeah, we were idiots.
Those first few winters were pretty cold, but we managed and, with refinements, figured out how to stay warm. Well, relatively warm.
In year one we had foundation repairs that took precedence over everything else (when you have the back floor held up only by a long dead water heater, priorities are pretty obvious). A wonderful retired math teacher/master bricklayer saved us. First he rebuilt the collapsed foundation and wall, then he agreed to rebuild the chimney and teach me how to repoint and lay brick.
In the meanwhile, we pulled up the subfloor and exposed the wide board pine floors in all but one room. In the kitchen we cleaned up what we could.
Our lives centered on the fireplace, because it was our main heat. There had once been a damper, installed by someone working for the family who left here in the 1970s, but it had been defunct for a long time. The fireplace throat was huge, but there was nothing we could do about that. But because the firebox was so shallow, Andy knocked out the back wall of firebrick to deepen the fireplace. He installed a grate made of rebar to strenthen the back wall, which was only two wythes of brick thick. Some of the logs we burned were so big he worried about possibly knocking out that back wall if they rolled backward. He also built up the front edge of the hearth and leveled it, to keep said logs from rolling out and onto the floor.
Although, as an invention, the fireplace was an improvement over a hole in the roof for smoke to escape, if you depend exclusively on a fireplace for heat, you'd better have stock in sweatshirts. The radiant heat is about all you get. In fact, wingback chairs were invented in the 18th century in the attempt to capture as much of that radiant heat as possible. Everything else goes up the chimney, along with the air in the room. We figured that, when the fireplace was working, we turned over all the air in the house every 1.5 hours.
For ten years we cut wood and burned the fireplace. As we moved upstairs into bedrooms, we put a big old Sierra woodstove into what had been a bedroom and became in name a living room (it was really our son Jack's media room, where he watched movies and played his Playstation). The first year's box elder, cut in a rush and half dried, gave way to properly cut and seasoned oak. Jack's friends told jokes like, "You know you're in Jack's house when they put the meat in the refrigerator to defrost it."
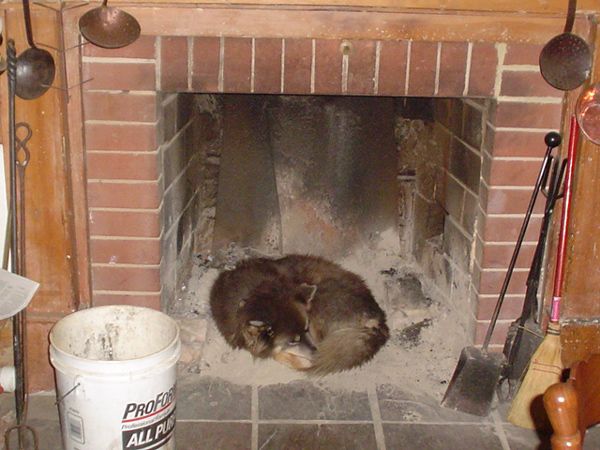
One evening, shortly after we took off the metal sheet that covered the fireplace and cut down on the number of flies that would come down the chimney during the day (that's a major problem during changing seasons), Jack caught his dog Dobbers curled up in camouflage. I picked this photo, not because it's cute, but because it's about the best one I have of just the fireplace, although admittedly it is cute.
For years, we worked on the restoration whenever we could, making slow progress. Andy continued to refine the heating strategy. Eventually he engineered a "tube of heat." He put together lengths of iron pipe with 90 degree elbows and extended it up the chimney about five feet, brought it back down and angled the end out into the room. The other end extended out the opposite side of the hearth and attached to a pvc pipe that ran down into the basement, where a blower forced cool basement air through the pipes. As it ran up into the chimney it picked up the heat and, at around 280 degrees, was blown out into the kitchen. It was a big improvement. When company came, they jostled for the chairs closest to the fireplace and especially the tube of heat.
Over time, we knew when Jack went to college, almost half of our woodcutting team was leaving us. (I don't split wood--I don't have the strength. I can use a chainsaw when I need to, but I don't much like doing it. My specialty is hauling and stacking.) It was time to get a good woodstove for the kitchen. We decided also that it was time to restore the fireplace and bring it back as close to the original configuration as we could.
Philisophical Aside
Any house restoration forces an owner to make a series of choices. Houses are to be lived in; they're not meant to be museums. Having lived here for a while, I got a feel for what life was like in the late 18th century and throughout the 19th century. It took a lot of labor to keep a house going back then, labor I didn't feel we needed to do every day in order to live authentic lives. Running water, electricity, bathrooms, washing machines--all are necessities today, and they free us to pursue other things.
Why, you might wonder, did we not then just get a furnace and be done with it? We did. It's impractical.
The house is three wythes (or layers) of brick thick. On top of the brick is a layer of plaster. It has the R value of a sheet of paper. Add to the lack of insulation the windows that are still awaiting restoration and storms and you have one cold and drafty house. Drafts come up from the basement all the time, welcome in the summer, not so much in the winter.
We put in a high-efficiency gas furnace. And ran it for about a month. It was constantly on, and ran up a huge gas bill. And we weren't appreciably warmer than we were with the small heaters, the wood stove and the tube of heat. Then the cats got into the duct work and brought it all down, and we didn't bother putting it back up.
But back to decision making: you have to figure out just what period, or succession of periods, you want the restoration to target. Do you want colonial-style lighting, paying tribute to the original oil lamps, or early 20th century and the fixtures that would have been put in with the original wiring? Do you hide modern conveniences, or do you stream them in?
Do you replace the damper and firebrick? What to do with the hearth? Do you plaster the surround? Do you knock a hole in the wall and put a woodstove in the middle of the room? Just how authentic do you want to be?
Back to the story, and a lot of pictures
The first thing we decided was to get a good woodstove. We settled on Jotul, and bought two, a Black Bear for the living room and an Oslo for the kitchen. They both have secondary burn systems and burn much cleaner and more efficiently than the old stoves of the 1970s.
With that decision made, we got on to fixing the fireplace, and it held surprises, not all of them pleasant.
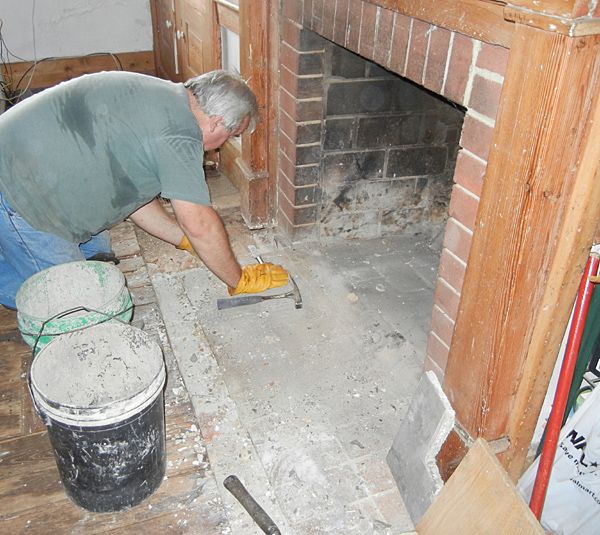
First, Andy removed the leveling materials we'd used for a decade and exposed the sloping brick hearth. He took up the pavers and exposed a layer of rubble that went down about four inches.
Finally, after hauling out dozens of buckets of rubble, we got to a cement slab from the 1960s, and starting chipping through it. We exposed a couple of pieces of rebar that led back into the firebox. There appeared to be a lot of rebar.
All at once, Andy stopped and turned to me. "Do you remember seeing anything that supports this hearth in the basement?"
The other hearths have heavy wood supports that span the joists. Originally they were boxes, filled with leveling sand, to house the bricks that make the hearth lie level with the floor.
I couldn't remember seeing anything significant, so we took flashlights and went down to the basement.
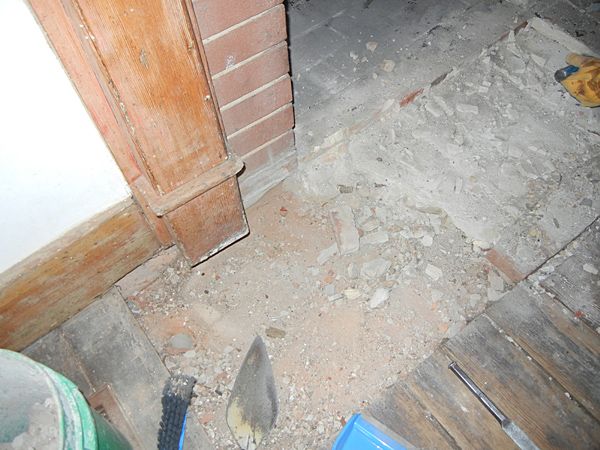
There we found the remnants of a plywood base that had rotted away decades ago. And the underside of that cement slab. No supports. It was hanging in midair, between two original joists, kept in place only by good will and rebar.
Needless to say, all noodling on that cement slab stopped. This was decision time--leave the slab in place and put up supports, or take it down, rebuild a box underneath and go back to the way it used to be?
While we went back and forth over the relative merits of inertia (for the time being we put floor jacks under it and boards over the hole) we continued dismantling the fireplace.
For the next step, we chiseled away the plaster that sealed around the mantle, and Andy and Jack carefully pried it away from the wall.
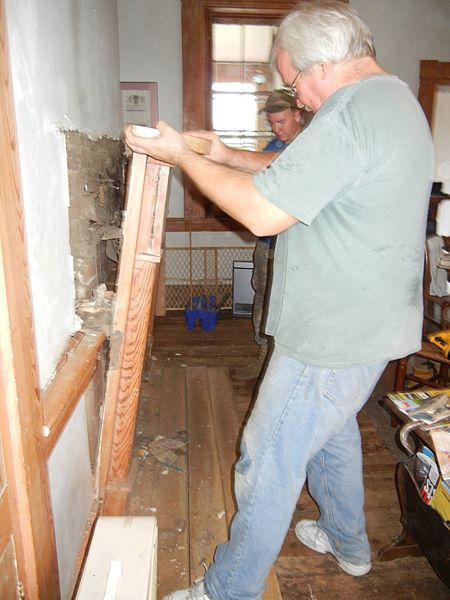
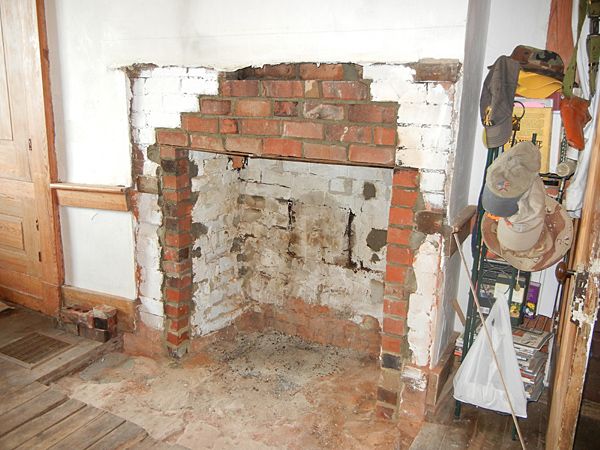
Behind we found decades of papers, photos, and other artifacts from people long-gone. And an additional surprise. The back of the mantle was black and scorched. When the 1960's owners had had the fireplace updated, whoever they hired just shoved the damper into place, knocking loose a bunch of bricks and leaving a hole between the mantle and the chimney throat.

Here you can clearly see the damage. You can also see the rebar grate in the back of the fireplace and the softer interior wall brick that were behind the mantle. Obviously, this wasn't going to be matter of a bit of cleanup--it needed makeover, and another decision.
You see, the length of the hearth confirmed that the mantle was not original to the room, nor was the firebox. Pictures lower down will show how the mantle extended off the left an extra 12-15 inches (keep an eye out for it). So the bricks on the left side of the opening were installed as part of a renovation that dated from 1850.
We had already decided to take the level of the firebox back to its original height--even with the floor. That meant removing the firebrick. And, in fact, in the 1960s the mason had built the new fireplace inside the old one. So now it was a matter of removing the fifty year old material before going any farther. It was obvious that the brick surround, which we'd first envisioned plastering over, was going to have to come out along with the firebrick.
Because we'd settled on the bigger stove, we had to decide whether to put it on the hearth, bring it farther into the room, or recess it into the firebox. Disassembling the newer and the damaged brickwork opened up possibilities we hadn't imagined earlier.
The mantle in the kitchen had taken a lot of abuse over the years. Nicks, nails, cigarette burns, stains, gouges, pieces broken off (not to mention that the whole back was charred). And it wasn't original--it came from 1850.
We happened to have salvaged a mantle from an 1840 farmhouse that was going to be torn down. Actually we salvaged almost all the woodwork and flooring from that house, and we now have a trailer full of old growth yellow pine for restoration work. This particular mantle was more than a foot taller than the old one, and in better shape, too. As we realized that we could swap out the mantles, we had to consider whether it was possible to raise up the firebox. Would it be appropriate? Using the new old mantle would let us put the stove back almost inside the fireplace itself, freeing up a lot of the room. That was an attractive notion, and we decided we would do it.
So for a few weeks I alternated duties between stripping and sanding the mantle and working on the fireplace, as the summer began to wane.
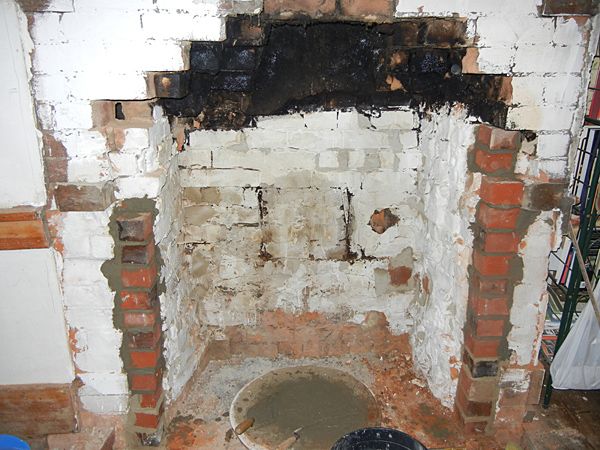
Step one involved taking out the brick surround. Once everything that was modern or loose came out, the scope of the project revealed itself.
The modern floor and rebar back grate are still in place, but they wouldn't last long.
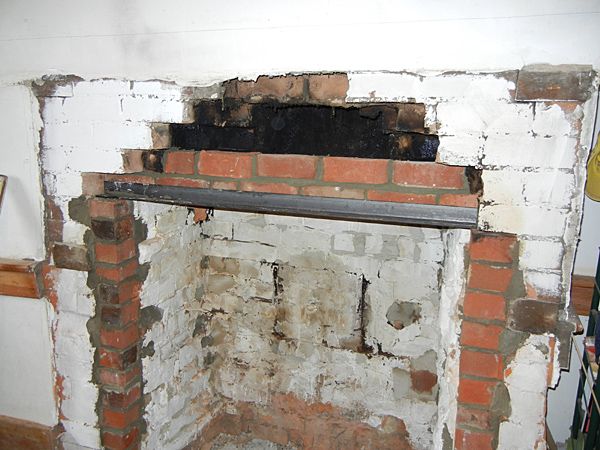
Still, next step: replace the bricks that had fallen out and rebuild the corners that had been cut out to make the modern surround.
I took half bricks to rebuild those corners, but to tie them into the existing wall I cut small lengths of rebar and drilled holes into the bricks of the wall, mortared the rebar into the wall between courses of brick, and alternated between side and back anchors.
I also painted the interior of the fireplace and the surrounding bricks with limewash, lime dissolved in water, applied and let to dry in successive coats. This kept the old bricks, which were soft and crumbling, intact and less liable to spall. It also made it easier to keep track of repairs, because it was easier to see the breaks, cracks and little holes that had been made over the years, and fill them over.
Once the brick pillars that would support the angle iron and the spanning wall were cured and strong, it came time to repair the wall. First came the inner layer:
Something to note, just above the chair rail on either side, and in the upper corners, you see the wooden nail-to's mortared into the wall. When the house was built, masons had to accommodate where woodwork was planned. They're original. Then I laid the outer layer, and the wall was back in place:
I took this picture after removing the floor of the firebox. What you see there is the concrete slab that cantilevered into space. Because it was poured as a single piece, we decided to leave it. Right now it's supported by floor jacks, and that seems to us a better solution than anything we could build between the joists.
Now meet a fireplace restorer's best friend, surface bonding cement:
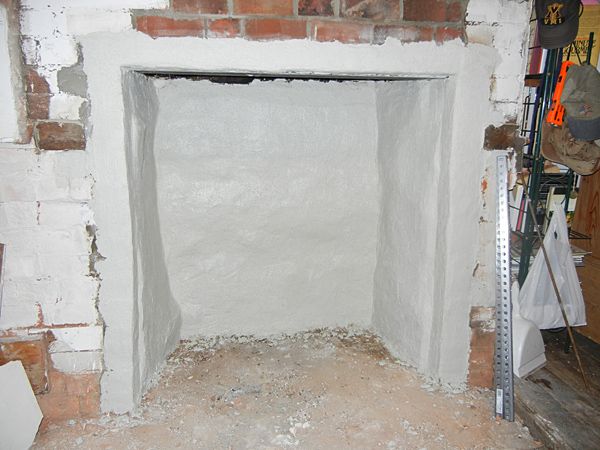
Developed for use in the Third World, surface bonding cement is wicked strong. You can dry lay a cinder block wall and parge it on either side with surface bonding cement, and it will be as strong as a mortared wall. It tolerates heat well and is easy to work, and extremely forgiving. And if you don't like the look of the fiberglass particles (I don't) you can burn them off with a blow torch.
Once the firebox cured, we procured paving bricks that were close in color to the original bricks, and Andy got to work laying the hearth. He chose the same pattern as we found in the original (unmodernized) fireplaces upstairs. Here he is cutting and setting the bricks:
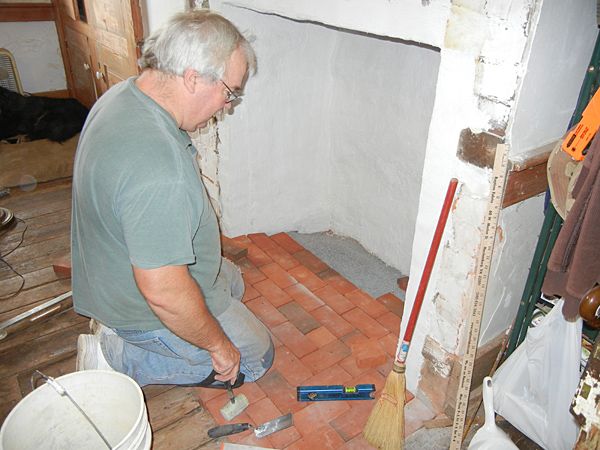
Here is the finished hearth. Note how far the hearth extends to the left. This was the size of the 1778 fireplace. In 1850, the masons inserted a double wall to shorten up the firebox. We decided not to return to the original size, partly because we didn't know how excavation would affect the draw, and the replacement hearth wouldn't be wide enough.
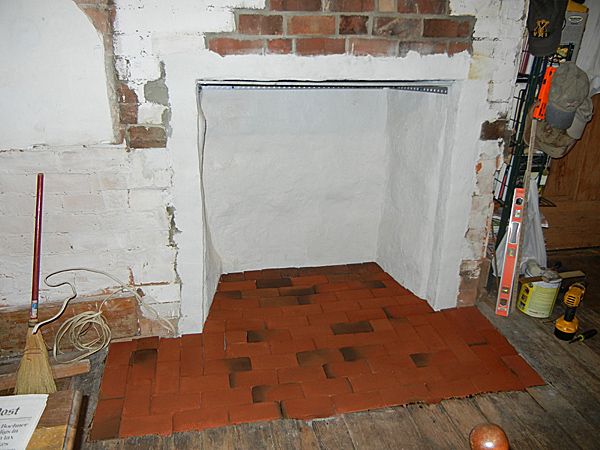
One more thing to note is the condition of the floorboards. That's the next project--fixing the floor.
Here is the semi-finished product. New circa-1840 mantle, restored hearth.
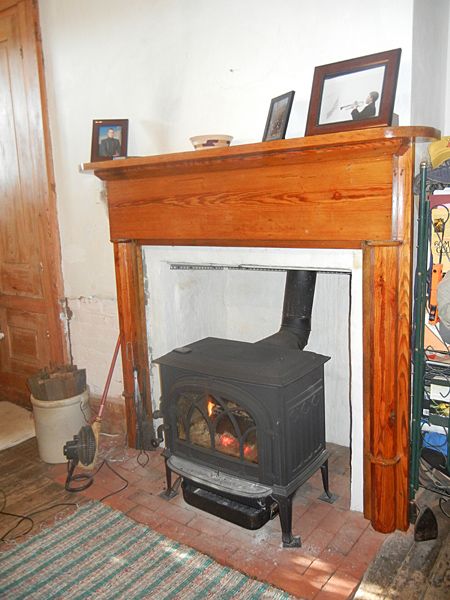
We have more work to do, but cold weather intruded and we had to make the stove functional in time to keep from freezing.
We've been splendidly comfortable with the woodstove, and we've burned between a third and half of the wood we'd burned before. The small fan off to the left circulates hot air through the room. For the first time ever, our company doesn't fight for the seat closes to the fireplace.
When we stop using the stove for this season, I have more work to do. I want to smooth out the lines between the brick pillars and the rest of the firebox. After that, I'm going to smooth-plaster the surround inside the mantle. And the wall off to the left--the plaster fell off, so that has to be replaced, once the chair rail is back in place. I'm also going to add a piece of yellow pine along the shelf off to the side, with hooks, where I can hang all my antique butchering utensils that used to hang on the old fireplace.
The fireplace will still serve as a fireplace if we ever decide to use it that way.
Okay--that's it, a year's work condensed into a single diary. And it's all I've got for today. Floor's open--what have you been up to?

