We are now up to block 24 and 25 this week with only five more blocks to go. Actually these are really fun blocks to have in your pattern box and to have. Both make wonderful scrap quilts or two color quilts. The first one it Birds in the Air a famous known block from a Civil War Quilt. The second block is based on the same technique called Cats Cradle. I have a wonderful video that explains how to make Birds in the Air from the Gourmet Quilter that shows how easy this technique is. Lastly I am posting a corrected instructions to the Feathered Star. I made a mistake when I went to edit and the edit didn't post.
DK Quilt Guild: A place for quilters to gather, share ideas, projects, and to make the world a better place, one quilt at a time. Join us and share your thoughts, projects, questions, and tips. Quilters here are at many different levels of skill. Beginners and non-quilters are welcome, too!
Let me introduce you to Gourmet Quilter from New Zealand. This is one of the best video on how to make Birds in the Air block. SusanClair Mayfield is the creator of Gourmet Quilter. You can find her blog here:
http://gourmetquilterblog.wordpress.com/...
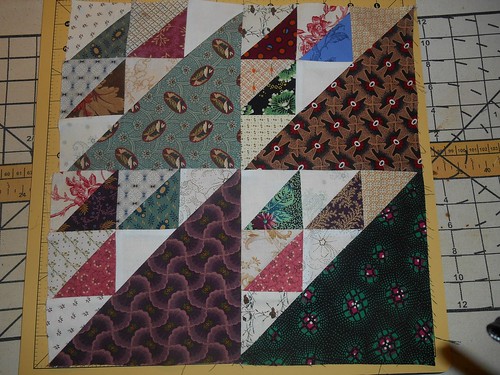
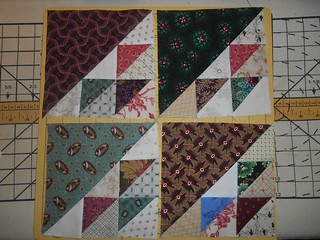
I followed the Gourmet Quilter’s instructions but I didn’t have 10 inches squares or what they call in this country layer cake bundle. I used my scraps and made it scrappy. In this picture I still had a few places to fix. That was just on the sewing the four squares together. It made a nice 12 1/2 unfinished block for the 18th century sampler quilt. A well know civil war quilt made by Debra Coats was made from this pattern. You can see the quilt and read the history at this link: http://civilwarquilts.blogspot.com/...
I started with a selections of fabrics that I cut in half square triangles.

I didn’t have any color theme in mind. I just looked for fabrics that I thought would look nice mixed together. I made sure the large pieces had a medium print that was interesting so fabric would be the feature of the block.
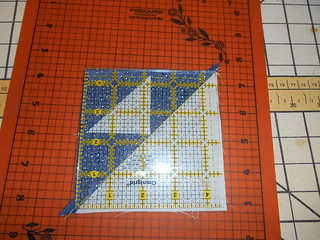
I played around with the pieces until I got the look I wanted. All the points on the birds face the same directions. I started by sewing the small half squares first.
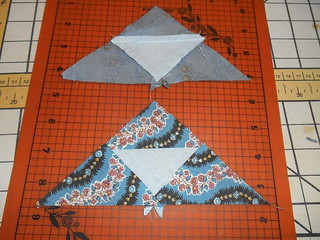
Then I sewed the little birds to the large half square. You have to be careful not to stretch the bias as you sew.
You can see it makes a nice 6 1/2 inches square. I always over size my half squares triangles so I can trim down afterwards.
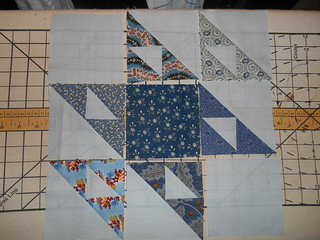
Sew the four 6 1/2 inches blocks together to make the 12 1/2 inches unfinished block.
This is really a fun block to make.

Cats Cradle
I found this pattern on McCall’s Quilting web site. It is a free pattern that you can copy.
http://www.mccallsquilting.com/...
The pattern is for a 12 1/2 inches block. They offer it in the traditional layout in a quilt. I chose to do an all blue block because blue and white quilts were often made because indigo was die that didn’t fade that easy. Many everyday dresses where made from indigo prints.
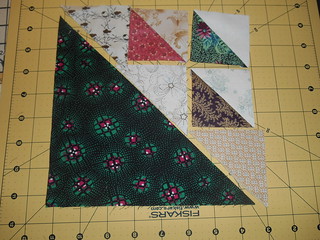
I cut my half square triangles according to the pattern from assorted scraps. I would be making 4 1/2 inches square unites for this block. The half squares went together the same way as birds in the are. In fact these little units was easier because you sewed less 2 1/2 inches squares together.
You can see in the above picture how you press the seams.
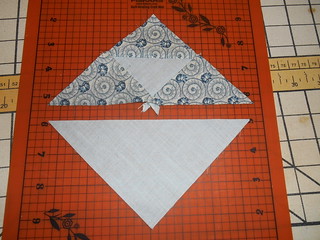
Sew the smaller half squares to the larger half square.
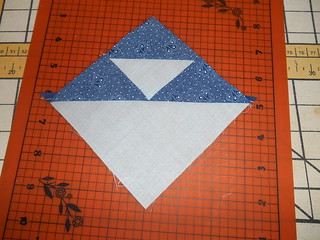
You will get a 4 1/2 inches square unit.
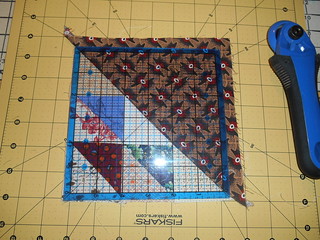
Square up paying attentions to the quarter inch seam allowance so you don’t sew your points off.
The lay out of the block is based on a nine square block. You do not have many intersections to line up. This is a great block for a scrappy quilt. I didn’t find any history on this block. But the string game was played by children that was brought from England as they settled here.
Feathered Star correction.
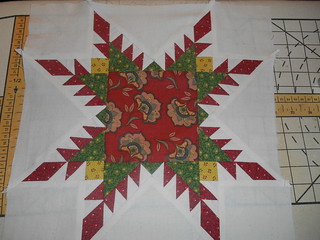
My 19th Century Sampler Quilt would not be complete without a Feathered Star. This block is 14 1/2 inches unfinished and since I am using sashing on my 12 1/2 inches blocks to bring them up to 15 1/2 inches. I am going to sash with unbleached muslin. I used this as the background fabric for this star. This will be in the center of my quilt. I chose the unbleached muslin for a couple of reasons. It was the choice of many antique quilts that were samplers and because Kona Cream is too heavy to work with in a pattern like the feathered star that has one inch half squares. The feathered part of this block was papered pieced. Kona Cotton was just too bulky. I have used this brand of muslin for years and have been happy with it.
I still have some work to do on this block. I need to go back and fix some intersections. I was rushed for time to get this done for another blog and just left it as it was. I haven’t pulled the paper off of it yet so I can reline things up a little better.
The feathered star was one of the few named quilt blocks in the 19th century. It was a very early pattern and was copied by many quilters for good quilts. The pattern took some skill to draft this block and to sew all the tiny pieces. It was also a good way to use up tiny scraps of expensive printed fabric. Good dressmakers could show off their skills on their beds when company came. When guests would come to visit they would spend the night because travel took awhile. The best quilts and bed lines would be used for the company. We see some excellent examples of this quilt in museums to day and this pattern is highly prized by quilt collectors.
https://www.pinterest.com/...
Many of the complicated patterns were paper pieced using newspaper or wrapping paper in the 19th century. Patterns was usually copied on newspaper to share and drawings and templates. Many times a quilter would see a quilt at a fair or raffle and take time to draw the pattern or would reproduce it from memory. Not many patterns were published until the last 2 decades of the 19th century. Collectors today know there are regions in this country that are known for certain patterns. That was because that pattern was shared among neighbors.
I found this feathered star on line at McCall’s Quilting. It is a free PDF file that you can down load. The pattern is called Tribute to York County. York County Pennsylvania is were many of the very early patterns and quilts have been found. They used to publish a Vintage Quilt Magazine and this pattern came from their Spring Issue in 2005. I have some of them and kept them for reference. Here is the link to the pattern:
http://www.mccallsquilting.com/...
In my next blog I will give you the cutting instruction and how I paper pieced it. It isn’t that difficult of the block when it is papered pieced.
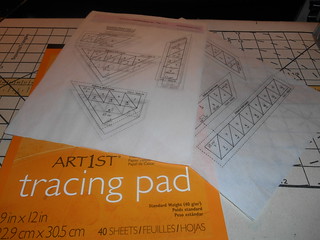
After I made the decision to use the paper pieced pattern from McCall’s Quilting web page, I printed out the PDF file. I gave the link to the free pattern in part one of the feathered star. I looked to see if I had any paper piecing paper left. I could not find any in my stash. I don’t like to use printer paper. I like vellum paper for this but settled on artist tracing paper. You can see through it and it is holds together when you sew on it. It also works in my printer. When you can see through the paper you don’t have to flip it over as much as you add pieces.
It is better to watch how it is done. Paper pieced patterns always have the sections numbered so you start with the first section. They usually tell you what color of the fabric so you know. The thing is to remember that you put together the wrong side of the fabric with the wrong side of the paper. Then add the second piece of fabric right side to the first piece. That is why I like to be able to see through the paper to line it up. You use a little pine that is flat to hold it in place and sew on the line that is marked on the right side of the paper. You then open the two fabrics up to make sure you have covered the second section with fabric. But before you make the next section bend the paper on the seam you just made and trim to make a 1/4 inch seam. There is always extra fabric in the way to trim away at the seam. You need a generous piece of fabric to make it easy to work with. Now you repeat the process until you have the whole section completed.
I chose the same color scheme as was in the pattern because it was a traditional colors that was chosen in the 19th century.

For the background I chose unbleached muslin to stick with the fabric choice that was often used then.
It was confusing at first because the pattern gave the cutting instructions for the whole quilt. I was only doing one feathered star. I finely figured out that I would only need page 5 of the PDF for the star. The rest of the pattern was for other parts of the quilt.
You will need to cut for one feathered star:
One 5 1/2 inches square for the center piece. (Red medium print fabric)
Sixteen 2 1/4 inches squares small print fabric cut in half square triangles to make 32 pieces. (Red small pint fabric)
Eight 1 3/4 inches by 3 1/4 inches rectangle for the feather points. (Red small print)
Four 3 1/4 inches square in contrasting fabric cut in half square triangles to make 8 pieces. (Green small print)
Four 1 3/4 inches squares of accent color. (Yellow small print)
Twenty-five 2 1/4 inches square of background fabric cut in half squares triangles to make 50 pieces.
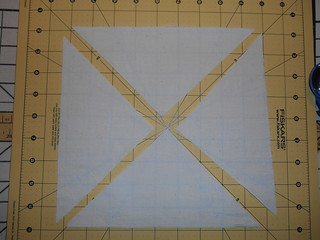
One 8 3/4 inches square cut into four triangles in background fabric. (see picture below)
Four 4 inches square of background fabric.
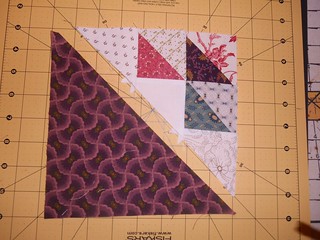
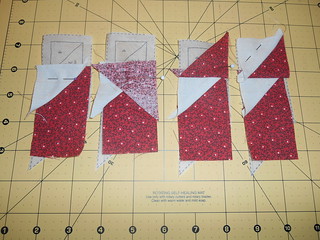
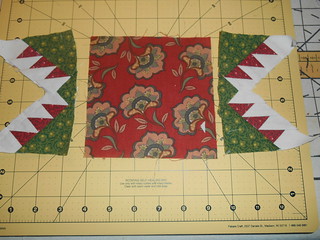
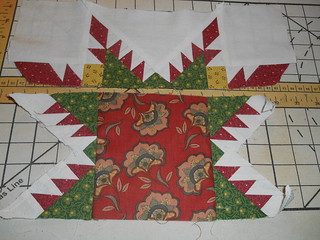
In this pattern you have four sections that you will be paper piecing. I started with section 1 and followed the order that was marked on the pattern. I only needed 4 of these sections. Line up the rectangle for the feather point like in the picture below. Then when you are finished making the section. Trim off the excess fabric on the dotted line to shape the point.
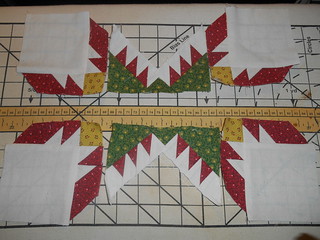
The next step was to do section 2 all four pieces and add to the four corners of background fabric that is 4 inches square.
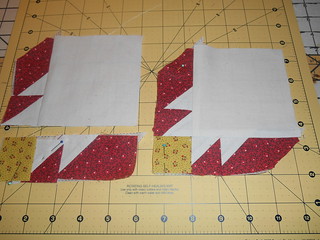
Now that the four corners of the block is finished you take section 3 and 4 of the pattern and complete the piecing. The colors are marked on the pattern so it is easy to follow. All the fabric pieces are very generous so they are easy to place on the back side of the pattern.
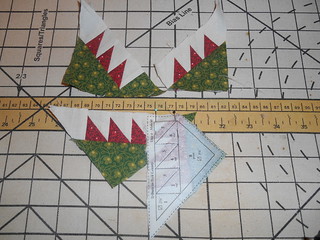
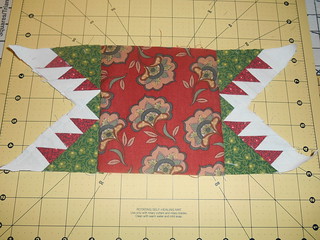
Now sew sections 3 and 4 together like the picture. You can see how I trimmed the the excess fabric on the dotted line. I lined up the intersection with pins and then sewed just on the line locking in the stitch at both end of the seam. When you have all for of these sections completed you add one on each side of the center block.
Now you add the corner blocks to the other 2 sections.
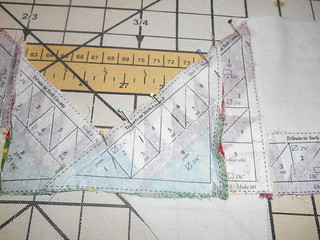
This is the hard part, adding the the background fabric triangle into the block.

After I did one, I realized that I was to sew the first seam on the side that had the seam folded under and then make the second seam to the section that the seam was not folded.
The next step is to sew both of these section on the center block.
The final step is to add the last two background pieces to finish the block. When you are finished with that you will be an expert on paper piecing and setting in right angle blocks.
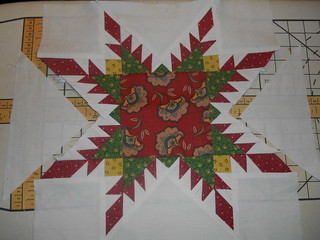
It is a impressive block to make and it looks harder then it is. This is something you can make to get your quilt guild to sit up and notice your quilting skills. Just don’t tell them you followed an easy paper piecing pattern.
I have all 25 blocks that I have done in this series posted at my blog. I have them in easy reference so anyone can find them quickly. There are plenty of other quilty and cool things located there. http://trkingmomoe.wordpress.com/
Part 9 will be how to make a Mariners Compass. I have also planned to cover how to sew curves with the block Drunkards Path in the following weeks. The total blocks for this quilt will be 30 and will be large enough for a queen size bed. Then we will learn to quilt them in sections and sew them together.
