This post was conceived as a way to deal with leftovers, but Muse visited.
Now the possibilities are unlimited. Of course leftovers will be covered, but the fullness of the season will be given first shift.
Here in the Bluegrass, nuts are ripe. Not just any nuts, like the filberts and almonds (I happen to love almonds, by the way, so not to slight them), but the hickory nuts and the black walnuts are ready now. Mmmmmmmmmmmmm!
Hickory nuts are of the same family as pecans. Both are of the Carya genus, and there are lots of them. I got lucky to find a hickory tree nearby that has good nuts, fallen to the ground. I picked up enough for a quart of cleaned nut meat in less than half an hour. These hickory nuts are small, but so thin shelled that a nutcracker rather than a hammer can be used to crack them. I got many half nutmeats out of this batch, unusual for hickory.
I was going to cook and photograph the process of making persimmon hickory nut bread, but all of the persimmons that I found were still too astringent to use. When I find some ripe enough, I will post it as a comment in a future issue.
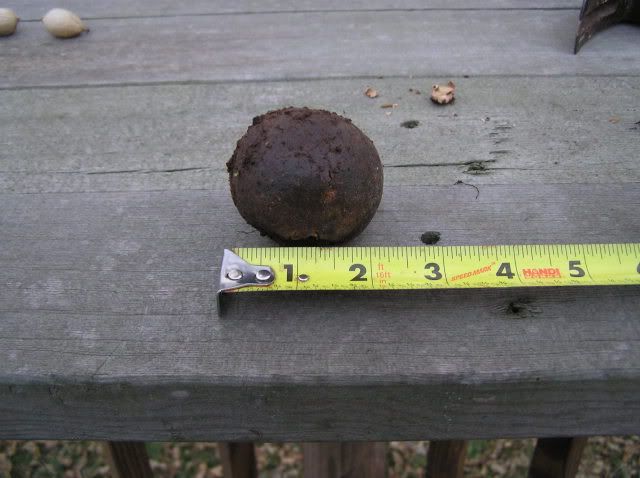
Unfortunately, pecans are not wild here, so I had to buy some. They were in the shell (I have found that shelled ones in the store do not taste as well), so I have been taking some time to crack and shell them. If you start to shell your own, note that there is a very, very bitter woody bit that sometimes stays in the crevasses in the outer part of the nut. If you do not remove it you will not be happy. Here is a picture of the bitter part, and is is easily swept away with a nutpicker, or as I usually use, a piece of shell.
The best nuts, and in abundance right now, are the ones from the Black Walnut Julgans nigra). These are the best of the best, especially for cooking, because the flavor does not bake away from the food. Unfortunately, they take a lot of preparation.
I went to where I knew were a lot of trees, and in under half an hour had picked up around 70 pounds, including the husks (half or more of the volume of the nut). This husk has to be removed before it dries out or it becomes impossible. The easiest way is to dump them in the driveway and run over them with the car. I did this and washed them with a high pressure water hose to clean them.
Walnut husks and wet nuts have an intense and fast dark brown stain associated with them, and doing this on a concrete driveway will stain it for months. Another way to husk them is to put on an old pair of heavy boots and grind them underfoot. Be sure and wash off the boots before you wear them in the house. Yet another way is to put them in a burlap bag and pound them severely with a wooden paddle. In any event, it is a good idea to was the nuts off with high pressure water after husk removal. Here is a picture of a walnut with the husk on it:
Black walnuts need about a week out of the husk to cure, or the flavor is weak. I took the washed nuts into a room in the house and laid down a piece of plastic upon which I put newspaper. Then I spread out the nuts in a single layer to cure. It is good idea to wear gloves while handling walnuts until they are dry unless you like the goth look with black semicircles at the ends of your fingers.
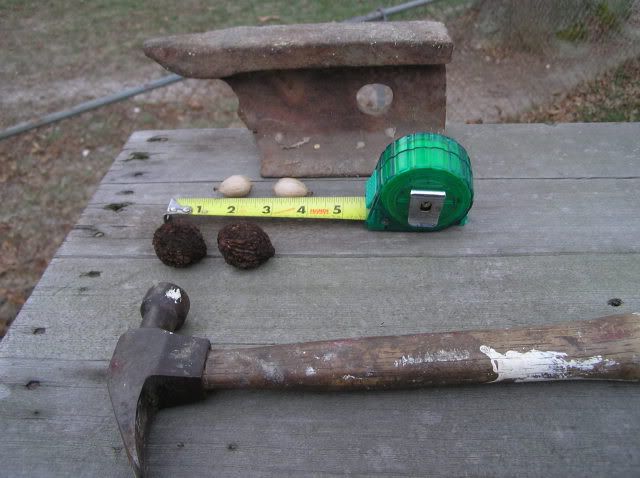
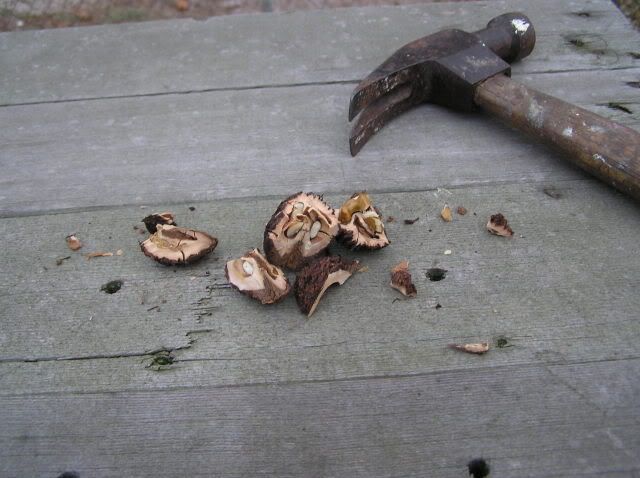
Cracking black walnuts is a challenge. I have heard many ways to do it, including putting them in a hot oven, but nothing works as well for me as a hammer. Stand the nut up on its stem end (the other end is pointed) and strike the pointed end with a hammer, not letting go of the nut or it will fly away. With some practice you will get it to split in half, and that you can split the halves into quarters the same way. Then turn each quarter on its side and hit it hard enough to crack again but not to mash it. Then take the nutpick and go to it. You will find that some will have to be hit another lick, so just put those aside and hit them later, unless you are working outside. It is too cold here, so I crack a bunch at a time and bring them in for picking. They are too much of a mess to crack inside. Here are pictures of walnuts and the tools and process to crack them. The small, light colored nuts are hickory nuts for comparison.
I take all of the walnuts to Mrs. Translator for her to work her magic with them. I'll post a recipe or two of hers in future. She makes an apricot black walnut bread that is just fabulous.
Shifting gears a bit here, I will give two of my favorite holiday foods. The first is the Coronado Sandwich (named after the Coronado Hotel where my dad used to stay when he traveled - its restaurant made them). This is a really good way to use up leftover turkey and ham, and those extra dinner rolls as well.
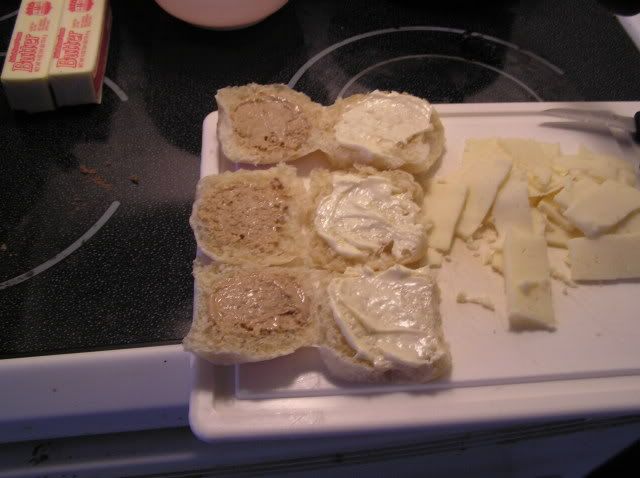
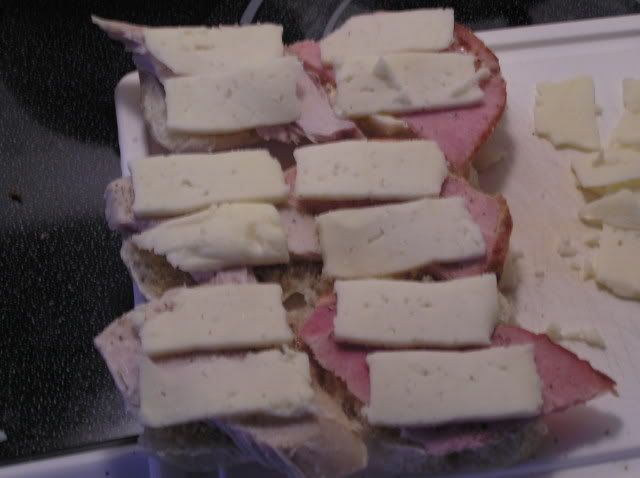
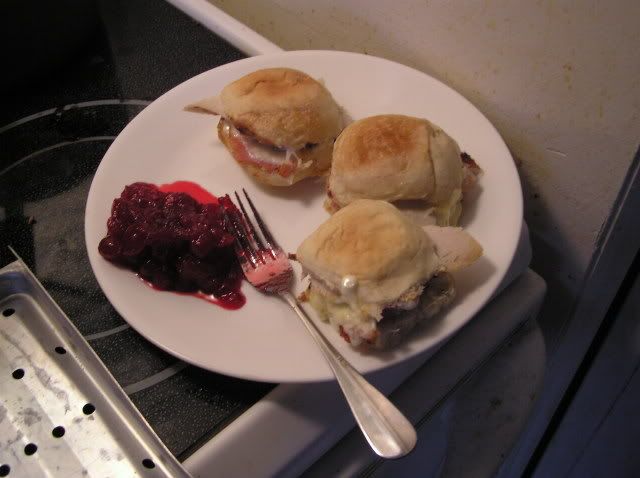
Take a good home made dinner roll and split it. Put mayonnaise on one side and some grey mustard on the other (Mrs. Translator prefers just mayonnaise). On one half put a nice slice of turkey, and on the other a nice slice of ham (Mrs. Translator prefers bacon to ham, but both are good). I add a little salt and freshly ground black pepper here. Then put thin slices of Monterey Jack cheese on both halves. If the sliced meat is just out of the refrigerator, warm the sandwiches in the microwave oven to knock off the chill, but not enough to melt the cheese. Then put it under the broiler until the cheese melts and gets brown and bubbly. Fold the halves together and serve immediately with cranberry sauce and watch them disappear faster than you can make them.
You can use other kinds of cheese, but Jack seems to have the best melt properties for this particular dish. Sometimes I supplement it with a little very sharp cheddar. My favorite mustard for this is Zatarain's Creole Style, but any is OK. Yellow mustard is not quite right for them, but that is a matter of taste. Sometimes I even put a little prepared horseradish on them. Here is what they look like during various steps:
And here is What's for Dinner!
Here is a recipe that my mum made every Christmas, and it was lost after she died. After lots of research and many failed batches, I recreated it, and Mrs. Translator assures me it is identical. The spice balance was hard to get right, but I finally got it. They are a fruitcake-like soft cookie called Lizzies, and there are recipes on line for them. None is remotely close to the kind that she made, and one of the secrets is to candy your own fruit. The store candied fruit and citrus peel, to me, is about horrible.
Lizzies
1 cup light brown sugar, firmly packed
1 stick butter (do not use margerine)
Cream the butter and sugar well, then add
2 eggs, blending well after each one
Sift around 2 cups all purpose flour with
2 teaspoons ground cinnamon
1/2 teaspoon ground nutmeg
1/2 teaspoon ground cloves
Dash salt
1 1/2 teaspoon baking soda
Work the flour mixture into the butter and sugar, adding flour until you get a very stiff batter. I mean an arm exhaustingly, wooden spoon handle breakingly stiff batter.
Next add 1 pound coarsely broken pecans
1 pound candied pineapple tidbits
1/2 pound candied Maraschino cherries
1 pound raisins plumped overnight in 1/2 cup bourbon whiskey,
mixing after each addition.
You will end up with a very thick, sticky batter. Drop as balls by the tablespoon onto a greased cookie sheet. In my oven, 12 minutes at 325 degrees does the trick. You may have to cook them slightly shorter or longer, depending on your oven. You do not want a dried out cookie, but a soft one.
Let them cool completely before you try to take them up or they will tear. I use a metal pancake turner. Place in tins and let ripen for at least a week before eating, other than for quality control purposes, of course. If they seem to be a little dry, put a couple of slices of bread in the tin with them overnight.
To plump the raisins, I put them in a glass quart jar, add the bourbon, and put on the lid. Give them a shake when you think of it. I use half dark raisins and half golden ones to add color.
To candy the fruit, take canned pineapple tidbits or cut slices or chunks to the appropriate size. Put in a large, heavy pan (use glass, stainless, or nonstick, as there is a lot of acid in the fruit). Cover with a syrup of 2 parts sugar to one part water and simmer until the fruit is clear all the way through. It took about an hour and a quarter for the pineapple and about 45 minutes for the cherries. Drain, but do not roll in sugar like you often do with candied fruit.
Here are some pictures of the various stages of making Lizzies.
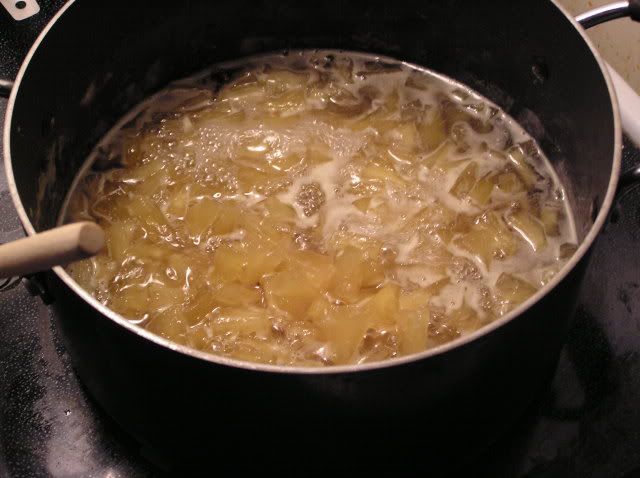
The pineapple during candying
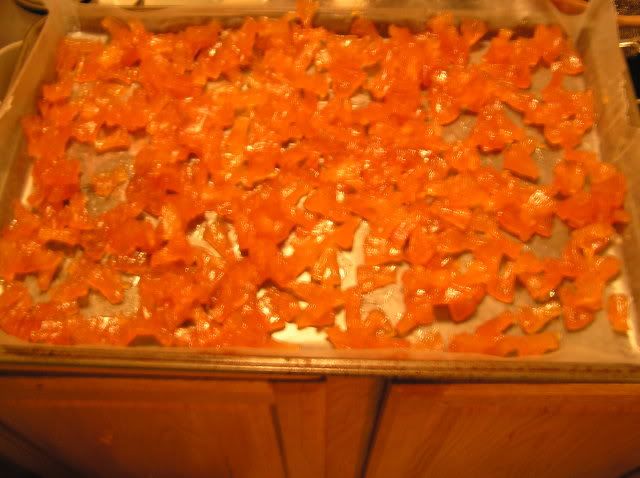
The pineapple after candying
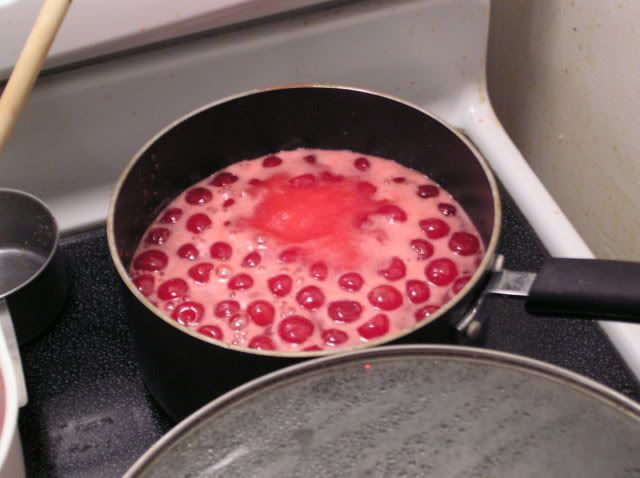
The cherries during candying
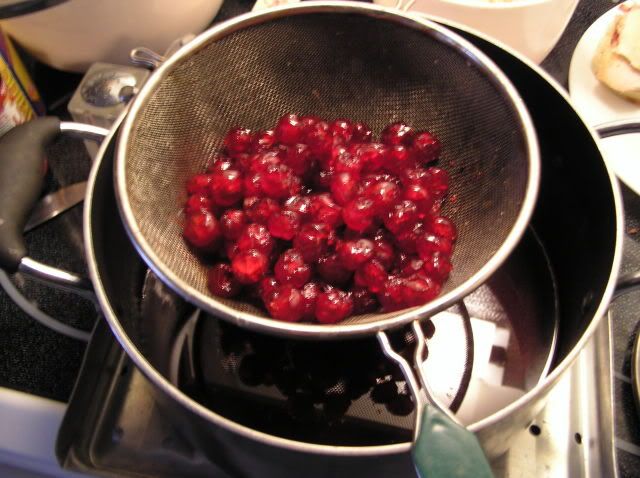
The cherries after candying
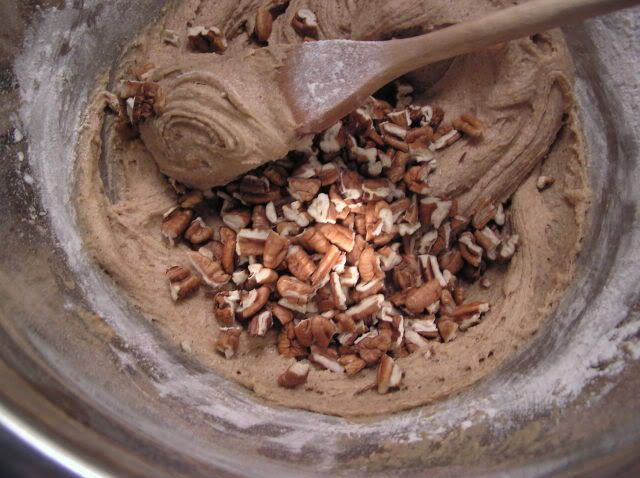
First addition of pecan pieces to get an idea of size
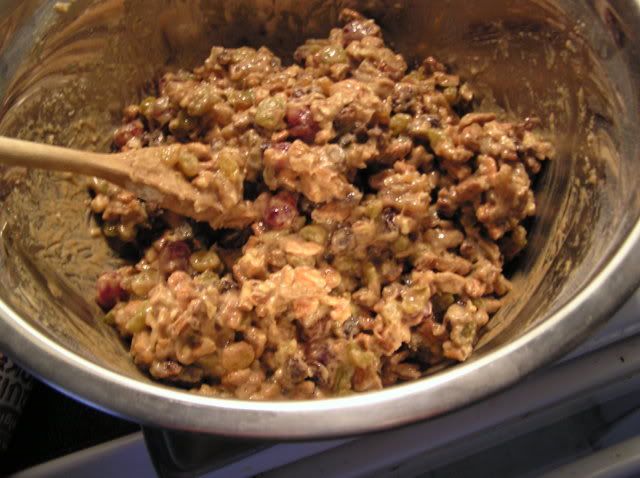
Batter is ready
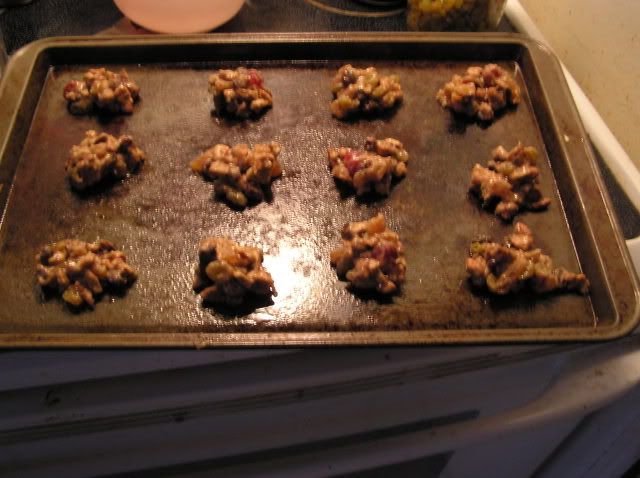
Ready to bake the first batch

First batch out of the oven. These are a little dark. The later ones were just right. Three minutes less cooking did the trick.
Well, here are some of the goodies that I like during the holidays. Coronado sandwiches for dinner tonight for me!
Update: I will post the latest schedule after the dust settles in the comments for the next couple of installments.
Schedule Update: According to Ek, here is what we have now. If anything changes, I will do another update.
December 13 raines- co-hosting common dinners
December 20 Asinus Asinum Fricat
December 27 fireflynw- Party Food
January 3 ek hornbeck- Hangover Food
January 10 MaskedKat- Indian
January 17 indigoblueskies- Π
January 24 ???
January 31 ???
Last Update: Folks, I am tired and have to rest. I appreciate all of the comments. Tomorrow at seven PM Eastern Pique the Geek will finish the series on cooking vessels by discussing plastics. Thanks for all of the interesting information!
Warmest regards,
Doc
