Today we are going to talk about free motion quilting how to sash our quilt blocks for the sampler quilt. Also there are three more patterns for quilt blocks to make. I have included a challenging pattern that can be out of your comfort zone called Godey's Block.
Click on picture for larger view.
Godey's Quilt Block
DK Quilt Guild: A place for quilters to gather, share ideas, projects, and to make the world a better place, one quilt at a time. Join us and share your thoughts, projects, questions, and tips. Quilters here are at many different levels of skill. Beginners and non-quilters are welcome, too!
Some of you are ready to start machine quilting your blocks for the sampler quilt. I have selected a series of short videos that covers setting up your machine, the tools that you will need and how to free motion. I thought these were the best that I watched because it is very basic and she is not pushing any particular product. She also stress there is no rules when it comes to quilting and just be patient. There is 14 videos that you can watch by just clicking on the right box at the end of the clip to start the next clip.
Some of you will want to try the spray adhesive that are offered at the quilt shops so try to find the type that washes out in water. I have never used spray adhesive because I live in a trailer and don't have the space to do that. I like to quilt in sections if the pattern will let me. Dividing your quilt in sections and sewing them together after the quilting is easier on my back and arms.
I am going to add sashing to my blocks so that it doesn't show the intersections that are not perfect when you sew the blocks together for the quilt. This sampler has a lot of points that can end up pointless when sewing quilted squares together. Then you end up using a seam ripper and fiddling with the seam to correct it. I would rather fiddle with a seam that don't have batting in it. Also it is more traditional to do this and it takes less blocks to make a quilt. The blocks when we are finished will measure 15 inches square in the quilt with sashing. The sashing strips should be at the minimum 2 inches wide but since I am not a perfect quilter I am going with 2 1/4 inch strips and squaring down to 15 1/2 inches after I am finished quilting. The backing and batting should be cut 16 inches square. This gives you added insurance to be able to square up the block. I am also only going to quilt the pieced block and leave the sashing unquilted so I can use the walking foot to quilt it after the pieces are joined.
For the sashing, I picked Kona Snow because Kona Cotton die lots always match. So if I need more yardage I can easily buy more to match. Snow is a light cream color that has a vintage look that will work with my quilt. You can use what ever fabric and color you wish that will tie together all your scrappy blocks. This is a utility quilt so you don't need to go to a big expense. To figure out how much yardage you will need isn't that hard to figure out. The top and the bottom will be the short pieces at 12 1/2 inches and the sides at 16 inches long. That comes to 28 1/2 inches and round up to 29 inches or 30 inches because I never get a perfectly straight cut of fabric from the store. So 29 inches will give you enough for 9 blocks if your fabric is 45 inches wide. You have to figure in salvage. It takes 4.5 inches for 2 pieces. You will cut from salvage to salvage a 12 1/2 wide piece and also a piece that is 16 inches wide. You will cut your 2 1/4 wide pieces from both of those cuts. You still have about 6 or 7 inches left of a yard so you can get at least one more. A yard will give you enough sashing for 10 blocks.
Quilt math is not that difficult. If I get stuck I will draw it out on paper to help me visualize how to cut the strips out to get the most out of the fabric. I also draw grids to help me draft a pattern to fit the size of the block I want.
I like the back of my quilt to look as nice as the front when I am using different fabrics for the backing so I won't be layering or quilting until I have all 30 of my blocks made. I spend time laying the blocks out until they look nice and planned. I just shuffle them around until I have something that pleases me. I try not to bunch up all the blue in one corner but scatter then around in a balance of color. I do the same with the different fabrics on the back. If I was using the same fabric on all the blocks in the back I might quilt them as I go.
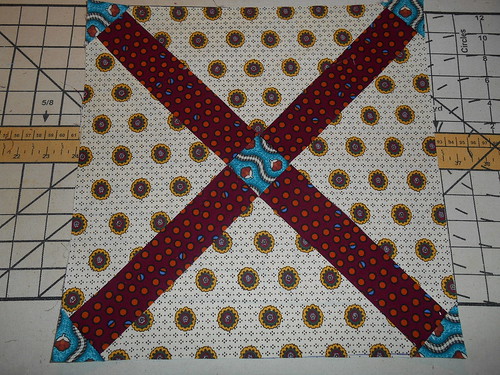
Crossroads Quilt Block
Click on picture for larger view.
This wonderful block is often seen in antique and vintage quilts. Cross Roads has many names and variations. It is a simple block to make and I was too tired tonight to draft it so. I cut out the pattern for a 14 inches block that I had and the original pattern size from Ladies Art Co was 18 inches. It is block number 24 in the 1898 catalog. So I figured out as I went what size the pieces need to be cut for a 12 1/2 inches square unfinished block. Traditionally the corner pieces are the same fabric as the back ground fabric but I wanted to bring out the blue contrasting circles in the other two fabrics. All these fabrics are 19th century reproduction fabrics and true to color. Placing the blue in the corners works the same as framing a picture with a double mate which the inside mat of thin color to draw out a color of interest that is in the picture. Otherwise the eye would not notice it at first.
We always think of 19th century fabrics as mostly browns, greens, chrome yellow, madder red and cheddar. But they also had bright colors too that faded and turned to beige or disappeared all together. Textile researches look carefully into the hidden seams to see the true colors that have not faded. Also there are still salesman catalogs with swatches of fabric in textile collections. These swathes has been carefully copied for their color and design. Old photo graphs also help in determining print patterns that were popular and what time period they were in.
To make this block you will need to cut:
One 11 1/2 inches square of background fabric. To cut it in 4 triangles you fold it in half from corner to corner and press then fold it one more time in half. Then press again and open. This will mark the piece with a X for you to cut on. That will give your the four triangles of back ground fabric.
Cut four 2 inches by 7 1/2 inches rectangle out of a second fabric.
Cut one 2 inches square for the center from a third fabric.
Cut two 2 1/2 inches squares that is then cut cross wise corner to corner to make four corner triangles from the back ground fabric.
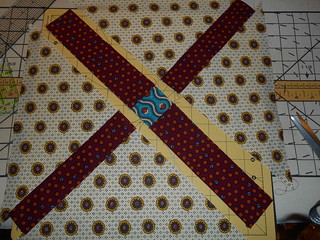
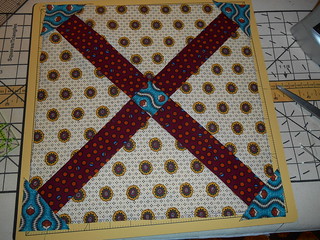
Follow the picture below on what order to sew the sections together with a quarter inch seam. Your block after you are finished will be slightly larger then 12 1/2 inches square. This gives you a little to trim to a perfect 12 1/2 inches square.
Click on picture for larger view.
After joining the pieces to make the X then you add the corner pieces. If you use the same fabric as the background pieces the X will not go out to the edges.
Click on picture for larger view.
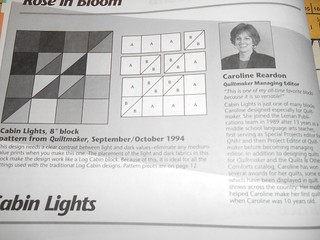
Cabin Lights Quilt Block

Click on picture for larger view.
Cabin Light Quilt was featured on the front cover of Quiltmaker Sept/Oct issue in 1994. The pattern was also included in a year end special pamphlet of that year’s favorite patterns by Quilt maker. The pattern is attributed to Carolline Reardon who was the managing editor at the time.
Click on picture to see larger view.
This is one of my all time favorite scrap patterns. It is has all kinds of layouts like the log cabin quilts. The contrast from the darks and lights really catches your eye. Here is a link to Kathy K, Wylie quilter’s blog that has made this quilt. In fact it was her first quilt she made.
http://kathykwylie.com/...
I added this quilt to the sampler because it is a pattern that every one should have on hand for a scrappy quilt. It also is a modern version of the log cabin lights and darks scrappy quilt. This is also a variation of a split 16 patch quilt block that does appear in vintage and antique quilts. The split 9 patch and 16 patch was popular at the end of the 19th century and the beginning of the 20th century.
The original block pattern is for a 8 inches block. It is based on 16 square grid so it is easy to graft for a 12 inches square block. We are working with 3 1/2 inches unfinished pieces. The half squares start out as 4 inch squares and after sewn are squared up to 3 1/2 inches.
Click on picture for closer view.
In order to make this block you will need:
Cut five 3 1/2 inches squares from various dark fabrics.
Cut five 3 1/2 inches squares from various light fabrics.
Cut three 4 inches squares from various dark fabrics for half squares.
Cut three 4 inches squares from various light fabrics for half squares.
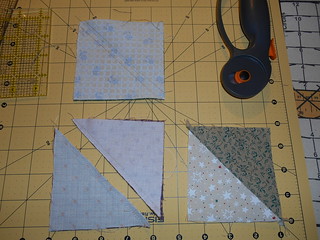
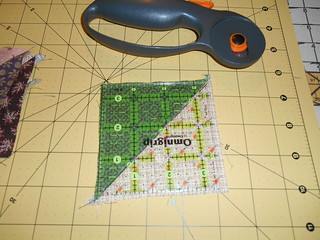
Put one light 4 inches square with one dark 4 inches square right sides together and mark from corner to corner with a line. Sew a seam one quarter inch from the inside line on each side. Cut on line to separate. See the pictures above for details. Now press seam to dark side and square up to 3 1/2 inches square. Follow the lay out and sewing order in the picture below.

After you make the block you will see how easy it is to do. That is probably why the split 9 and 16 patch was so common. Traditionally the split 16 patch only had 4 half squares with the light side pointing to the lights and the dark side pointing to the darks.
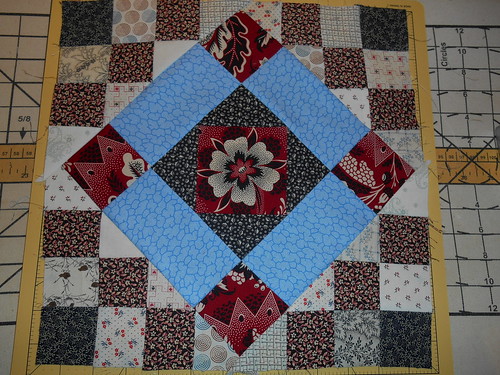
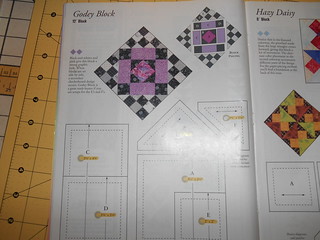
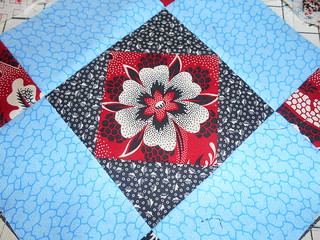
Godey's Quilt Block
Click on picture for larger view.
In my search for block patterns for this sampler quilt, I found this pattern in a special edition magazine published by Quilter’s Newsletter in 2005. I had put this magazine in a sleeve in a binder that I have all my reproduction notes and clippings. Actually I have 6 of these binders. I have been quilting for a long time. The name is what caught my eye and it looked like it would be a challenge because of all the small blocks set on point. I also wanted to use up more of my small scraps. When I finished the block and had all my notes and pictures ready to write the instructions, I went looking on the internet for some history on this block. What I found was that Quilter’s Newsletter featured this quilt in their June/July issue 2013. They are offering the pattern for free on their site as a down loadable pdf file.
http://www.quiltersnewsletter.com/...
Click on picture for larger view.
I don’t buy many quilt magazines now that I am retired. I would not of remembered it from glancing through the magazines at the store. The only really new thing going on in quilting is the fabric the patterns have already been around for a long time. I didn’t find any other information on the block so I am not sure if this was a block from Godey’s Magazine. I do know they did publish some quilt patterns but I don’t think they named any of the patterns. Godey’s would have been featuring in fashion plates the red, black and white Garibaldi fabrics when they were being worn.
I chose a Garibaldi reproduction print that had a large flower for the fussy cut center. The red, black and white Garibaldi reproduction print is from about 7 years ago. I just have this scrap left from then and now don’t remember who did that series. The red, black and white was the colors of the uniforms of Italian soldiers that Garibaldi led in the mid 19th century. That color combination became very fashionable during that time and was named after Garibaldi.
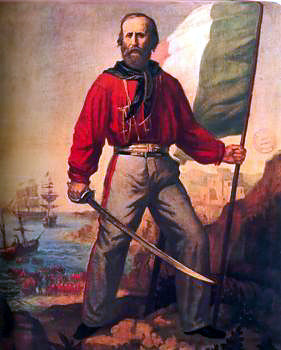
Photo from Wikipedia
Click picture for large view.
The important thing to do when making this block is to keep checking your size with a ruler. Make sure you are sewing a quarter inch seam and the finished parts are exactly the size they should be. Or later in adding the checker board the block will be off by a country mile. Here is a tutorial on making the center part of this block:
http://trkingmomoe.wordpress.com/...
You have a bias edge on the checker board pieces that you will need to fiddle with until it all matches up. It is important to have that first round of pieces perfect.
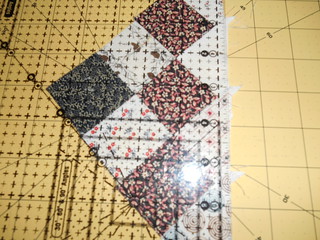
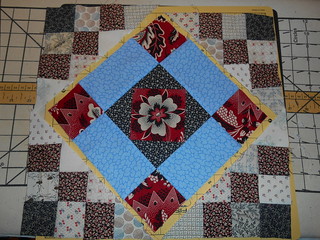
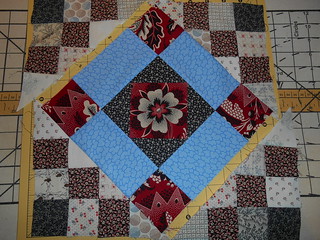
You can click on the pictures to get a closer look at the block and how the points line up. It will take some patients and is very challenging because the checker board blocks are 1 1/2 inches square finished. The pictures don’t do it justice because it is a very striking block with it light and dark contrasts. It does use up many little bits and pieces of fabric. This is one of those quilt blocks that is “sew worth it” to add to a sampler quilt. I have further instructions on making this quilt block on wordpress. Instructions for all thirteen blocks that are in this sampler block is posted there for a quick reference while you work on the blocks or decide to make the quilt blocks at some future time.
http://trkingmomoe.wordpress.com/
I will be back in March with part 5. I will continue to post quilt blocks on wordpress as I make them so you can continue to work on them.
