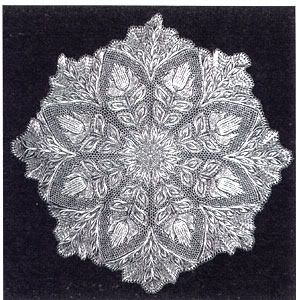
 Last week I posted Annals of Anality: Knitting Lyra, about my discovery of the lace knitting* patterns of Herbert Niebling and my plan to knit one of his most infamous patterns, Lyra.
I've passed the first hurdle, so here's an update, along with some of the tricks I've learned over the years.
*Speaking of anality, did you know there is a technical difference between "lace knitting" and "knit lace"? In "lace knitting", every-other row or round is knit plain: a pattern or chart will only have odd (or even) numbered rows. In "knit lace", every row is a pattern row.
 The most difficult part of knitting a piece like this is starting. The patterns are knit in the round (even if they're square!) from the center.
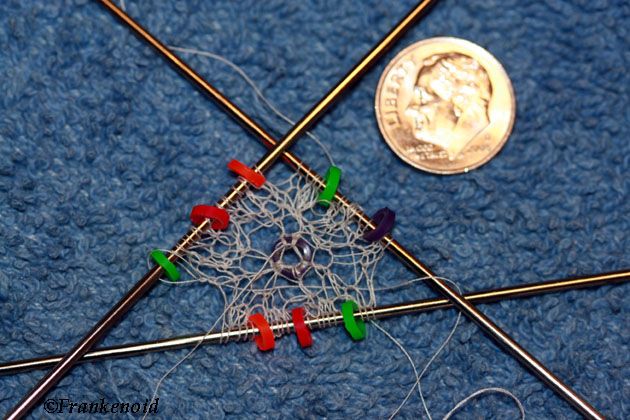
Which means that one is trying to knit on just a few stitches (Lyra starts with 8 stitches), spread over 3 or more double-pointed knitting needles. The pattern books direct that one should crochet a chain equal to the number of stitches required, join it into a ring, then do a single or double crochet for each starting stitch. That's fine in theory — and if one is using a heavy enough thread one can pull it off, with reservations. Even when I have gotten it to work, it tends to leave me with too large of a hole in the middle.
The other problem is that when working with very fine thread, the thread is too light to support the weight of the needles, the needles twist such that one doesn't know which way is forward or back, it's almost impossible to keep the tension tight enough, and one ends up with a tangled mess.
There have been a couple of times when I have become so frustrated in trying to get a good start that, after several days (yes, that's right: days) of frustration, I've resorted to knitting the first few rows straight, joining the circle after the stitch count has at least quadrupled (in Lyra that would have been 6 rows), then sewing the circle together after the piece is done. Not an optimum solution.
 I am not the only lace knitter who has had this problem. I discovered on the web someone who developed what she calls the "belly button start", which entails knitting flat in a larger sized thread for an inch or so, joining the piece into the round, then knitting a couple of rows with the project thread before starting the pattern and cutting the "belly button" away afterward. I can see how it would work — but, again, it's something that would work with a larger sized thread, not the size 100 lace thread I'm using. I know: I tried it. No go.
After many false starts, I figured out a method that worked with the lace thread. If you look at the first picture, you'll see the brightly-colored stitch marker rings on the needles, and a purple ring in the center. I use orthodontic elastics as stitch markers — they're cheap, flexible, and smaller than any available "normal" stitch markers on the market. I got the hot idea of using one of the elastics as the center ring to support crochet stitches for the first round. And it worked — it kept the center ring small, while being heavy enough to support the needles while I got the piece started. I've since used a needle to thread the "tail" from the initial crochet stitch through the eight double-crochets which constitute the first stitches and can now carefully snip away the orthodontic elastic.
 Whoo hoo! Once I figured out how to do that (after a couple of days of frustrating false-starts), it actually was a very easy start.
The discovery of the orthodontic elastics for stitch markers several years ago was a godsend. For years I'd been making do with small slip-knots of sewing thread, but they were a pain in the ass — they'd gradually loosen and come off at the most inauspicious of times, or I'd drop them and then have to make more. I hated them.
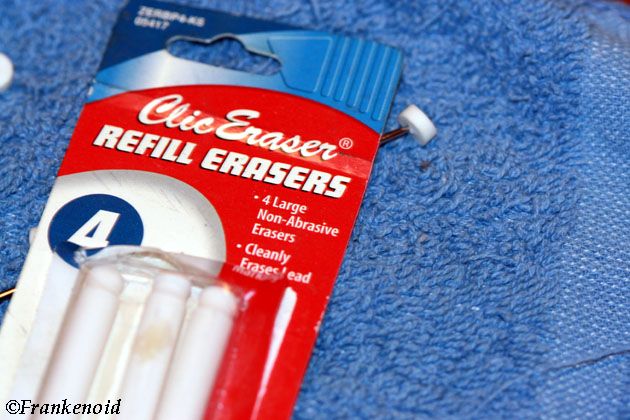
When working so small, one generally has to improvise equipment — very little of what one finds on the market is small enough. Point protectors are a necessity when working with double-pointed needles, especially when working with just a few stitches of fine cotton thread on slippery steel needles. Without the point protectors it's far too easy for the needles to just slip out of the stitches, while one is working with two other needles. The problem: no one manufactures point protectors for needles smaller than size 0 (or at least I've yet to find them!)
I discovered early on that pieces of mechanical pencil erasers make great point protectors. Plus they're cheap, so if you drop one along the way, it's no big deal — you can make dozens out of one package of refill erasers, cut to length with a utility knife.
Next time: never handle more than one stitch at a time, and making a life-line.
