I made the above tutorial video back in July to help people get oriented on the beta, and to show off some of the features of the new DK5 editor. It’s slightly out of date, but it holds up fairly well, so I’m just going to keep it for now.
The video is about 10 minutes and may clarify some things for people. It covers the basics of making a diary, using images, embeds, copying and pasting from word, making a table, and publishing, and editing a published diary. (The finished diary shown in the video can be viewed (for now) here: Very Few Mostly Uninteresting Facts About Chickens.)
Something I should have added to the video, but didn't, is to point out that clicking the toolbar isn't the only way to do things - your operating system and browser come with nifty tools that Just Know Stuff. So for example, the usual keyboard shortcut for italics -- command-I or control-I -- works right here in the DK5 editor. Similarly for bold. Much easier than typing the angle brackets, and you don't have to mouse for it if you don't want to. If you mouse over the buttons, you’ll see the key command for each one.
Spell check - your browser probably has one built in that will polllitely reminde you about misspelled words. Ctrl-click on the misspelling, and the built-in spell check will make suggestions.
 Ctrl-click on the word to bring up your native spell check.
On a Mac, press a key and hold it for related special characters: ô ö ò ó œ ø ō õ. Or, there's a menu item at the bottom of File for "special characters." PCs have a popup help that works too.
Undo works! Ctrl-Z is your friend ever so often.
“But elfling!” you say. “10 minutes is long and boring! I only want to put a picture in a comment!”
You’re in luck. I made a couple of short videos just for you!
This is a 3+ minute video showing you how to insert an image into a comment and place it left, right, or center.
The video may make it more obvious what I mean when I say “select the image” and will show you that after selecting it (the image turns blue) you can choose from the left, right, and center justify to move the placement horizontally. Left and Right justify are smaller, center upsizes the image. In addition, you can drag and drop the image to place it higher or lower with respect to other text in the comment. Be aware that different screen widths will affect how text will flow around the image. I’m demonstrating this in a comment, but it works the same in a diary.
This is a 1+ minute video showing you how to insert an image from Flickr.
The video may be helpful for finding the right Flickr embed code and for showing you what will happen when you paste it — you get the tidy DK image format with a nice space to add a caption, if you wish. Plus, there’s pie.
This is a 3+ minute video showing you how to use the new key commands to navigate to new comments in a comment thread.
This video may help you understand how comments are marked as read and show you a new way to navigate them using keyboard shortcuts, if you so choose.
Anyway, I hope those were helpful, and I’ll make more videos as topics come up.
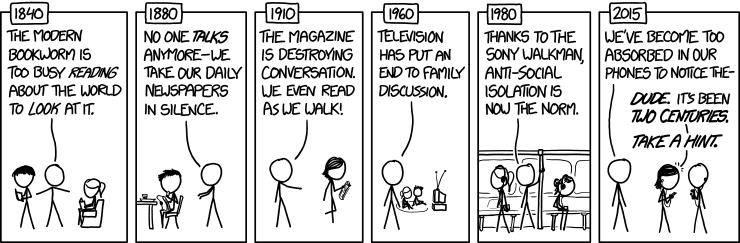 XKCD #1601: A webcomic of romance, sarcasm, math, and language.

