Happy Sunday Bread Heads!


Okay, this week’s recipes (yeah there are two) fall into the category of "only make a couple of times a year". They also are the kind of knowledge that once you have it you will never be the same again. I am talking about being able to make great doughnuts at home.
Now, these recipes are the way doughnuts are supposed to be. You don’t need pastry cream filling; you don’t need sprinkles or coconut, or even nuts on top of a well made doughnut. At most you need a little glaze or powdered sugar, but really if you have done it right you could skip those as well. Crispy on the outside, tender on the inside and just slightly sweet, homemade doughnuts will make wonder why you every paid the exorbitant prices for Krispy Creams.
So, let’s bake! Or more correctly fry. You will need some specialized gear for these recipes, there is no getting around it. First off and most importantly, you will need a good thermometer. You are going to need this for Solstice time when I teach you how to make candy, so go get one now in any case. It should have a clip to keep it on the side of the pan and will run you about $20. The other thing you will need is a doughnut cutter. You can make all the doughnut holes you like without one, but to get the right shape you really need on. You’ll find it at your local restaurant supply store (every city has at least one) and it will run you about $3, you can also use it for bagels if you like.

Before we get into the how to of this, we have to talk safety. Deep frying can be dangerous. My Mom managed to burn up our kitchen when I was 10, trying to make French Fry’s. There were two reasons that this fire happened and one reason that it was worse than it had to be. First off she did not use an oil with a high smoke point. DO NOT attempt to deep fry in any old oil that you have in the house. Use peanut oil. It is a little more expensive, but it has a very high smoke point which means it is less likely to burst into flames if you let it get too hot.
Which brings us to the second thing that Mom failed to do; she did not have a thermometer. It is very easy to let your oil get too hot, and if you don’t know what the temperature is you will not only have badly cooked food, you will risk a fire.
Lastly, once you start the oil heating you are going to be in the kitchen. No excuses no leaving. Mom went outside for two minutes while there was hot oil on the stove. When she returned the kitchen was on fire. It can happen that fast. If you stay there, and keep your eye on the oil you won’t have this problem. If at any time your oil gets hotter than 390 degrees, put on oven mitts and move the pot off of the burner until it cools down to 365.
It is always a good idea to have a fire extinguisher in the kitchen, but if you don’t have one that does not mean you can’t make this recipe (I did not have any fires) but you should consider getting one just in case. We had to throw baking soda on the kitchen fire at Mom’s, you never want to try to put a grease fire out with water!!
Okay enough of that, let’s make some doughnuts!
Risen Ginger Cinnamon Doughnuts
Ingredients:
1 package (2 ¼ teaspoons) yeast
½ cup hot water (120 to 130 degrees)
½ cup milk
½ cup (1 stick) butter
¾ cup sugar
2 eggs (at room temperature)
2 teaspoons vanilla
1 teaspoon salt
1 teaspoon ground ginger
1 teaspoon ground cinnamon
4 ½ to 5 cups all purpose flour
2 quarts peanut oil
Icing Ingredients:
1 cup confectioners sugar
1 tablespoon milk
1 teaspoon vanilla
½ teaspoon cinnamon
Equipment:
1 4 quart or bigger heavy pot
1 frying thermometer
1 spider or metal spatula
2 greased sheet pans
1 wire cooling rack
Method:
Mix the yeast and water in your large mixing bowl or the bowl of your stand mixer. In a small sauce pan scald the milk (heat it until it just boils) then remove from heat and stir in the butter until melted (if you cut your butter into four pieces this will go much faster). Combine the milk mixture with the yeast, then add the eggs, vanilla, salt, ginger and cinnamon. Whisk or use the paddle attachment of your stand mixer to combine.
Add the flour a ½ cup at a time until it forms a soft dough that is not too sticky. You’ll have to test this, as it seems to be different every time. Once the dough forms, shape it into a ball and put it in a greased bowl. Cover with plastic wrap and allow to rise until it has doubled in volume. This will take about an hour to an hour and a half depending on how warm your kitchen is. Since we didn’t knead this dough there is less gluten and it will take longer.
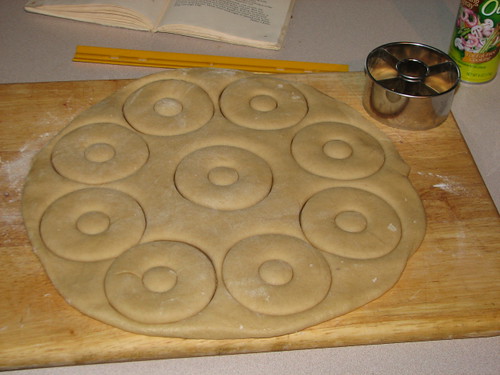
When the dough is risen, turn it out onto a lightly floured work surface and roll it out until it is ½ thick. Cut into your doughnuts, and place on the greased pans. Quickly knead the scraps together and roll them out. Cut and repeat until all the dough is used up. Depending on the size of your cutter you’ll get between 16 and 24 doughnuts.
Cover the doughnuts with wax paper and allow to rise for 30 minutes. They will just be puffing a little bit. While this is going on, get your oil ready. You want to fry the doughnuts at 375 degrees. Turn the heat to medium high and be ready to hang out in the kitchen while it warms. Don’t use high heat as it will sneak up on you too fast. I use this time to clean up.
Put some paper towels down on a sheet pan and then cover it with a wire rack. This will be the landing place for your doughnuts and will let any excess oil drip off.
When your oil is hot (it’ll take about 30 minutes) slip two of the doughnuts into the hot oil and cook for 1 minute. Using your spider or spatula, flip them over and cook for another minute. Remove from the oil, but hold over it for a few seconds to let any excess oil drip off. Then place on the landing place and repeat until you have fried all your doughnuts.

Remove the oil from the heat and allow to cool. Don’t pour it down your drain as you will be really unhappy. If you have a yard, you can pour it in a secluded corner and it will bio degrade. If you live in an apartment you can double bag it in two one gallon zip top bags and through it out in the trash. Or you can look for a recycling center.
Make the icing by mixing all the ingredients in a small bowl. Now you have a choice. If you don’t have enough people to eat all the doughnuts in a day, you can pack them in a zip top bag and they will be good for about a week. Ice any that you intend to eat today and enjoy!
If you like warm doughnuts you can always reheat these in an 325 degree oven for 5 minutes then ice.
Classic Buttermilk Doughnuts
Ingredients:
2 eggs
4 tablespoons (1/2 stick) melted butter
1 cup buttermilk
2 teaspoons vanilla
1 teaspoon backing soda
1 tablespoon baking powder (I usually will tell you to cut this down by half over 5000 feet but not in this recipe)
1 teaspoon salt
4 cups all purpose flour
2 quarts peanut oil
Equipment:
1 4 quart or bigger heavy pot
1 frying thermometer
1 spider or metal spatula
2 greased sheet pans
1 wire cooling rack
Method:
The night before you want to make these, combine the eggs, butter, buttermilk and vanilla in a large bowl or the bowl of your stand mixer. Whisk to combine. Sift the dry ingredients together. Using a wooden spoon or the paddle attachment of your mixer, add the flour in four roughly equal portions, allowing the developing dough to absorb the flour before putting in the next portion. It will form a soft dough.
Lay out a long length of plastic wrap and then scoop the dough onto it (you might need a spatula or scraper to get it all out. Wrap tightly in plastic (you might need a second piece) and chill overnight or for at least 6 hours.
Start your oil heating and remove your dough from the refrigerator. Roll the dough to ½ in thickness and cut into doughnuts. Set the cut doughnuts on the greased pan. Quickly knead the dough scraps back together and repeat until you have used up your dough. You will get between 16 and 24 doughnuts depending on the size of your cutter.
When your oil is at 375 degrees, slip two doughnuts at a time into the hot oil. Cook for one minute then turn over. Remove them to the landing pad and continue to cook until all the of doughnuts are fried.
Allow to cool, then right before serving dust with powdered sugar. These doughnuts are also great the second day. Cut them in half and butter each half lightly. Then toast in a 350 degree oven for 8 minutes. A horribly bad for you, but incredibly tasty treat.
This recipe is great for when you have a lot of canvassing volunteers coming over early. You can send them out with their lists and a doughnut. It keeps them coming back, trust me.
So, now you know how to make homemade doughnuts anytime you get the itch. They are nothing like you will get in the store, they are much better than that.
The flour is yours.
