The first part of this diary, posted yesterday, can be found here. The first part was 'rescued' way after my bedtime yesterday and I'll check in on the additional comments as soon as I've posted this - I'm not ignoring anyone promise! Thanks to the rescuers - you all do a wonderful job - seriously, I read more stuff on the second go a round than the first.
This part is crossposted on my own blog Minimalist Photography 101
I use terms like compact camera, budget camera and point and shoot interchangeably in this post.
For an excellent diary about free software for photo editing and related stuff check out this diary by Eddie C
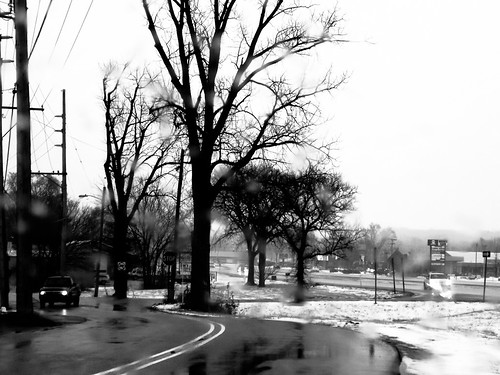
My wife was driving on a rainy day, I was bored and had my camera in the cup holder and though I've driven past here a hundred times it was only this time that it seemed to contain a sort of run down beauty. No tricks here at all, literally point and shoot. The reason that I include this shot is bacause if I didn't have the cheap compact the shot never would have happened. It also shows that composition is composition regardless of whether the camera costs $50 or $5,000. The eye and the brain are the important thing. Even if you don't like this particular shot the principle really does apply.
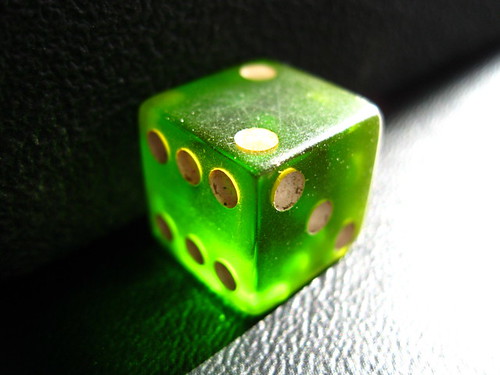
This macro shot of a die intentionally uses the imperfection of the lens. The edges of the die are not straight they curve illustration something called barrel distortion, if the curved inwards it would be pincushion distortion. These effects tend to happen when cheap lenses are used at there extreme settings (they tend to be optimized for average settings. This is where knowing your camera really comes in handy as sometimes these imperfections can be worked with rather than fought against.
Regarding the lighting, the eye doesn't see this shot like the camera does. The sharp divide between the light and the dark parts of the table does not look nearly so dramatic in real life because the eye sees a much greater dynamic range. Being able to mentally convert from 'actual view' to photographic outcome does take a little practice but practice is easy with the viewscreen. After a very short while it becomes second nature. Best practice is to look at a scene, make a mental note of how you think it will look as a photograph then take the photograph, look at the viewscreen and see how far off you were. No amount of words can substitute for practice on this one!

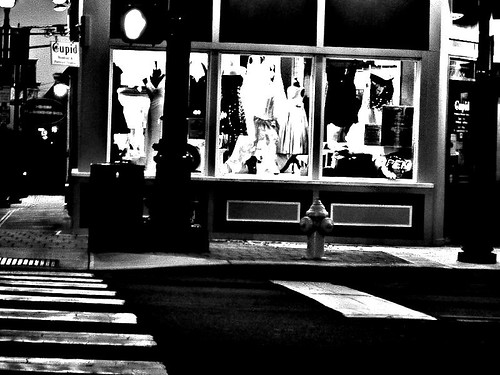
There is a tendency to assume that a dramatic shot must involve an expensive camera. Not so this is exacly what it seems, a fold up chair, on a table (not visible) in front of a window. Again it all comes back to the eye. One thing I've noticed watching other photographers and that is the tendency to walk up to an object put the camera to their eye (or look at the viewscreen) and fire, it is almost as if they have a gun and want to kill the subject and get off home as quickly as possible. I normally spend some time walking around an object, looking at it from on top and underneath if possible and really working to find the shot. Even after this I'll take pictures from a few different angles and only then decide on what is likely to work the best.
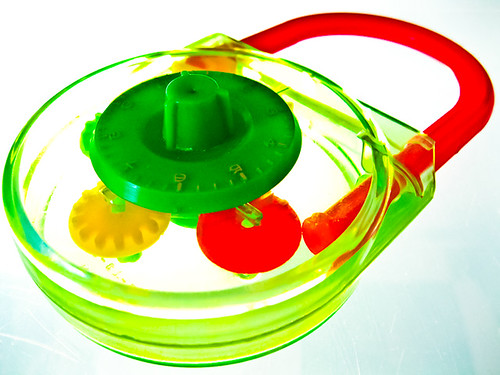
This is a 50 year old plastic padlock that is simply known as "Big Lock" My wife carried it around everywhere with her for years when she was growing up on here parents farm. She found it the other day while trawling through her old stuff still at said farm. Anyway she wanted a photo of it that showed it in all its plasticy see through glory. The problem with this type of shot is how to make the transparent layer completely see through and the answer is to back light. I placed a lamp under a glass desk and took the shot. There was just about enough natural light to illuminate the number ring. If there wasn't I would have just fired another desk lamp at the top.
I wanted to include a couple of what may be considered more 'arty' type shots just to show that a cheap camera is more than just a recording device and that interesting stuff can be done in camera. This night time shot is blurred as there was very little available light - I think the shutter was open for over a second and even leaning against a wall and using image stabilization won't compensate for that. I do believe in treating a camera, especially a compact, as I would a sketchbook though and there is enough here for me to go out when it warms up a bit and to recapture the scene using a tripod and more expensive equipment. I have a feeling though that I'll end up preferring this imperfect image to a sharp cleaned up version.
Quick note about portrait photography
I haven't included anything about photographing people in this piece but that is because I want to treat that as a separate subject and I've yet to decide how to illustrate that one. I am very wary about putting anyones likeness on line who isn't either a public figure or a professional model. I need more than someones permission I need to be sure in my own mind that they understand the ramifications of having their likeness on the public noticeboard forever. A couple of bits of general advice that can be applied to point and shoot portrait work:
Midrange zoom (80-100mm) is about the most flattering in the conventional beauty sense
For intensity/intimacy try widest (lowest) zoom and get in close i.e. about a foot
Lots more to come in the future on this subject
Limitations of a Point and Shoot
There are obviously some limitations with budget compact cameras:
These types of cameras have a much smaller sensor area than dSLRs and this does impact quality. There is less nuance in the tonal and luminosity changes. In Englsish that means that images from a cheaper camera will tend to be a bit more contrasty. Personally I think raising the contrast adds impact to an image so this is a fault that I am more than happy to live with. Saying that, if I was shooting landscapes at dawn for a high end magazine I would use a compact to get some quick test shots but the product i.e. photos that I submit will always be from the dSLR.
The lens quality is another issue. The cheaper the camera the smaller the distortion free sweet spot in this regard. A $4,000 zoom lens will be distortion free throughout it's range - the lens on a $150 compact is probably distortion free for just about the exact middle of its range. Again these distortions can actually be worked with to produce interesting shots but if absolute accuracy is required then this may not be the tool. I work on the basis that it is a 'feel' that is what is being conveyed and accuracy can work either way. My get out of jail free card is software that can very effectively remove distortion if I should need to.
Lighting is the biggie. Basically you will have to work with what is in front of you as most budget cameras do not have the facility for separate flash that can either be mounted on the camera or off camera. The built in flash can be used for a little fill lighting but never as the main source of light. Saying that it doesn't have to be a huge problem, many excellent photographers only shoot in available light and refuse to use any supplemental lighting. I work on the principle of available if possible, mixed as the next option and flash only as a last resort unless I'm doing recording type photography e.g. artwork for cataloging.
Concluding Thoughts
Firstly, if you have read this far through both diaries congratulations you deserve a medal.
Secondly, photography is never as complicated as it sounds on paper or screen, always treat these sort of articles as jumping off points for your own ideas and experiments. If something doesn't make sense don't worry about it, it may tomorrow or in six months time. Saying that, please get me to clarify anything that needs it. Technical to readable definitely isn't my forte.
Thirdly, take lots and lots of pictures and treat the camera and photography as a learning process. The best photographers are the curious ones who have a reasonably developed eye.
Link:
Higher resolution Photographs from this post, yesterday's post and some others that didn't quite make the cut.
Previous Diaries in this series:
Winter Photography; Fun in the snow
Photographing Everyday Objects
A Photography
Assignment and a Useful Macro Trick
Low Light Photography
Until next time...
