When I was six years old Dad took me on a trip to visit some of his family in West Virginia. We stayed the night at the little house of Aunt Nellie and Uncle Spurgen. First thing in the morning Dad, Spurgen and I went for a little walk up to Spurgen’s still. Yeah, he was a moonshiner. That should have been the high point of the trip for a little kid but it was the biscuits that we had when we got back that have stuck with me the most.
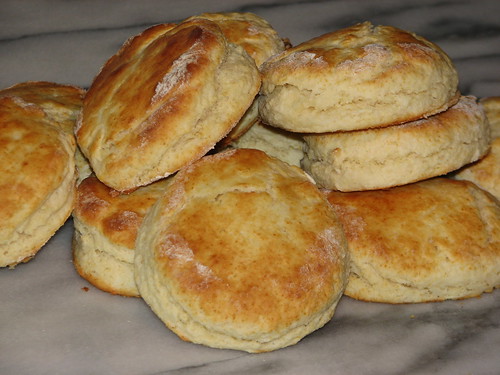
They were light and fluffy inside and had the most wonderful crisp brown crust on the outside. Served with sausage gravy and eggs over-easy cooked in a cast iron skillet it was one of the most memorable breakfasts of my entire life. When I was ten or twelve Mom and I asked her how she made these killer biscuits. Aunt Nellie was some kind of genius cook. She would leave milk out over night to sour. Then by tasting how sour the milk was she would know how much baking powder to use to get them to rise just right.
That is not a very helpful direction for a recipe. Over the years I have tried it dozens of times and always wound up with hockey pucks. This set me off on a search for a biscuit recipe that would provide something close to Aunt Nellie’s biscuits. In that time I have tried all kinds of variations and methods, but the one I will share with you today has the benefit of being easy, using ingredients that are almost always on hand and producing biscuits that are light and fluffy on the inside and crisp and brown on the outside.
This recipe can be made two ways, it can either be shaped by rolling and cutting or by dropping spoonfuls of batter directly onto the baking sheet. I like less free from biscuits (though Nellie’s were free from) but I will give you instructions for both, as not everyone has a biscuit cutter.
One note before we start; your baking powder has to be within the best used by date if it is going to give you the lift you need. Otherwise you will wind up with a hockey puck. To check just look on the bottom of the canister, it will be printed there. If you are past that date, no matter how much is left, throw it out and get a new can.
Best Biscuits
Ingredients:
2 to 2 ½ cups all purpose flour
1 teaspoon salt
1 table spoon sugar
4 teaspoons baking powder
1/3 cup shortening (you can use lard if you like, I use Crisco)
1 ¼ cup sweet milk (whole preferred but if you want a little less fat, go with 2%. Don’t use skim milk)
Equipment:
1 Baking sheet, covered parchment paper or greased.
1 3" biscuit cutter
1 Pastry Blender
Method:
Pre-heat your oven to 500 degrees. Yes this is a very high heat, but to get the combination of crisp on the outside and moist and tender on the inside high heat and a fast baking time are key.
Sift together 2 cups of flour, and the rest of the dry ingredients.
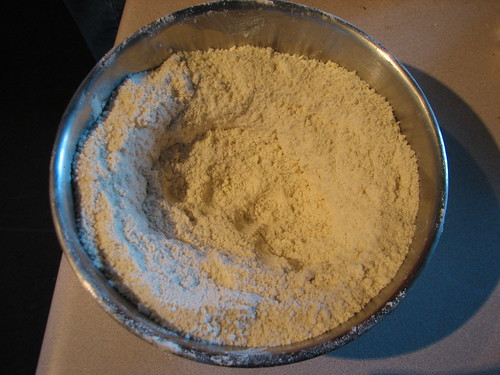
Using your hands or a pastry blender, cut in the shortening. To use your hands just rub the shortening with flour. It will break up, but keep rubbing the pieces until they are so small you can not tell the difference.
All recipes for biscuits will say something like it should look like corn meal or really small rice when you have mixed it correctly. This is true, but if you have never seen it you might be a little worried. The picture below shows what the flour and shortening mixture should look like when you are done.
Make a well in the flour, almost to the bottom of the bowl. Pour the milk into the well all at once. With a fork mix by running it around the sides of well to pull the flour into the milk. Do not over mix, the batter will be wet, and lumpy at this point. If you want free form biscuits use a large spoon to spoon out twelve biscuits onto the prepared pan.
If you want to from your biscuits, you will need to firm them up some more. This will require more flour. Add flour and mix with a fork just until the batter forms into a ball. It is going to still be fairly sticky but it will hold together.
Turn out onto a well floured work surface. I use the marble slab I was given for candy making, but a wooden cutting board works nearly as well. Sprinkle liberally with flour and roll into a rectangle, the dough should be about ½ to ¾ of an inch thick. Flour your cutter (if you don’t have a biscuit cutter a round rocks cocktail glass works quite well) and cut out 6 biscuits. Transfer them to the prepared baking pan.
Quickly knead the scraps back together and cut out more biscuits. This recipe will be just enough for twelve biscuits, but sometimes I just make eleven. Don’t get freaked out if you run out of dough.
Right before you slide them in the oven, brush the tops with a little bit of milk. This will help them brown.
Bake for 8 minutes and then check, visually for doneness. You are looking for the tops to be a dark golden brown. If they are not, giving them one more minute, then another if needed. In any case do not cook more than 10 minutes.
Remove from the oven, and using a spatula (they did just come out of a 500 degree oven) place the biscuits on a wire rack to cool for a couple of minutes. Serve hot with whatever you like, butter, jam, gravy, or as a dinner with chicken, peas, carrots and celery in a cream sauce.
Biscuits are best the day they are made, but you can re-heat left over biscuits in a 350 degree oven for 10 minutes. Keep them in a plastic bag for up to three days.
If you follow the instructions above you will be able to whip up a batch of biscuits in 30 minutes anytime you like. They are great comfort food and every home baker should be able to make them at the drop of a hat.
The flour is yours.
