Happy Sunday Bread Heads!
This week we are going to make something a little more challenging, but don’t let that freak you out. There is nothing in this recipe that any of you can’t do. The big thing to remember is not to panic or despair, just follow the instructions and you will wind up with a truly fabulous dessert!
What is this wondrous and scary thing? A Chocolate Pastry Cake! This recipe is what inspired the glopy and sticky mess that is often served at chain restaurants under a title like Genocide by Chocolate. Unlike its mass produced lesser siblings the Pastry Cake has real differences in texture and chocolate presentation.
Basically this is a cake made up of a Genoise cake, a chocolate cookie and Ganache (a chocolate frosting). The difference in textures is what give make it the delight it should be rather than the half-assed thing you might have a Chili’s or Applebee’s.
There are a lot of steps, but I will walk you through them all and when you get the end, you will not believe what you have made.
But enough of this, let’s bake!
Chocolate Pastry Cake
Ingredients:
For Chocolate Genoise Cake:
1/3 cup cake flour
1/3 cup corn starch
¼ cup unsweetened cocoa powder
3 eggs plus 3 egg yolks
¾ sugar
Pinch of salt
For Chocolate Pastry Dough:
3 cups all purpose flour
½ cup unsweetened cocoa powder
1/3 cup sugar
Pinch of salt
¼ teaspoon baking powder (don’t cut this down if you are baking over 5,000 feet)
3 sticks ( ¾ pound) butter
5 tablespoons cold water
For Orange Syrup:
2/3 cup sugar
1/3 cup water
1/3 cup orange liqueur
For Ganache:
30 oz semi-sweet chocolate
2 ¼ cups heavy cream
9 tablespoons butter
Equipment: At least 2 and preferably 6 sheet pans, 1 8” cake pan, flour sifter, spatula, cake or offset spatula, parchment paper, wire whisk, a bread knife,pastry cutter or pizza wheel, and a rolling pin.
Method:
The first thing to do is make the Genoise cake. It will need to bake and cool before you can use it, and can be make a couple days ahead if you like. Just be sure to double wrap it in plastic wrap and store it in the ‘fridge.
To make the cake start by buttering and flouring your cake pan. Just thoroughly cover the bottom and sides of the pan with butter. Then throw in 1 teaspoon (you really won’t need any more) of flour. Tilt the pan around until you have covered all the butter with flour. This will prevent sticking.
Set a rack in the middle of your oven and preheat to 350 degrees. Set a large pan with about 3 inches of water over medium high heat so it comes to a simmer.
Sift together the flour, corn starch and cocoa. Set aside.
In a metal mixing bowl or the work bowl of your stand mixer, beat the eggs together with a the whisk attachment or an electric hand mixer. Add the sugar in a stream as you are beating, and then add the salt.
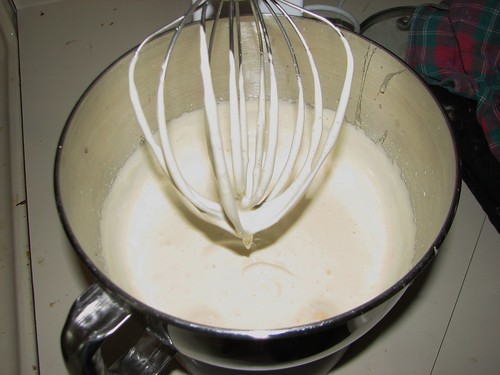
Place the whole bowl over the steaming water and hand whisk until the mixture is lukewarm (about 3 minutes should do it). Remove from the heat and beat at high speed until the mixture has cooled (about 5 minutes) and gained a lot of volume. It should look about like this:
Sift ¼ of the flour mixture over the beaten eggs. Using a spatula, fold the flour into the egg mixture. Just use the spatula to reach down to the middle of the bottom of the bowl and then bring turn the spatula so it is parallel to the bottom of the bowl, lift a good portion of the egg mixture and fold it over the top. See? Simple. Keep doing that until all the flour is mixed in (be sure to get to the sides a few times to make sure everything is evenly mixed in). Repeat three more times until all the flour is incorporated in the batter.
Don’t worry if your eggs deflate a little bit, they are going to spring back in the oven.
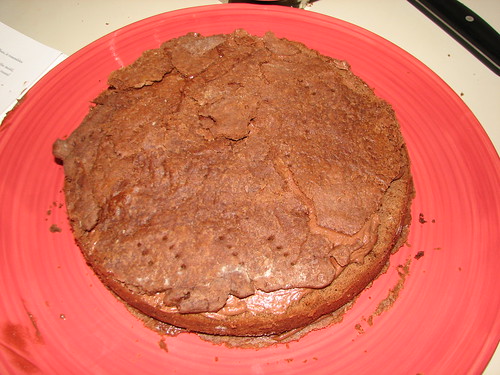
Pour all of the batter into your prepared pan and bake for 30 minutes. When the cake is done it should be well risen and firm. You can test with a toothpick to see if the middle is completely cooked.
Remove the cake from the oven and set on a wire rack for a couple of minutes. Use a knife to loosen the edges and then turn the cake out onto the wire rack to cool completely (about an hour or so should do it).
Next up: the pastry. This is going to be a little weird, but trust me it is the best way to get the crisp cookie we need for this recipe.
In a large mixing bowl, measure out the flour. Then sift the cocoa powder over it. Add the sugar, salt and baking soda. Whisk them together so they are well combined. Cut the butter into small pieces (about 12-14 per stick should do it) and toss them into the flour.
Now we are going to rub the butter into the flour, just like for scones. Just pick up a flour coated piece of butter between your thumb and forefinger and slide your thumb across it. Drop it back in the flour and get another. This will expose the fresh butter the flour and start to coat the flour granules with a layer of butter. This is what will make our cookie flaking and light.
Keep doing this until you don’t have any more obvious pieces of butter. The mix is going to look like soggy Grape Nuts and will be cool and dense.
Sprinkle the cold water over the top and using your hands, mix into a dough. Form the dough into a disk about 6 inches across and 3 inches tall. Wrap in plastic wrap and stash in the ‘fridge to chill.
Next is the Orange Syrup. This is super easy to make. In a small sauce pan combine the water and sugar and place over high heat until it comes to a boil. Let it boil for 5 minutes (this will split the sugars and make it extra sweet). Remove from the heat and allow to cool to room temperature. Stir in the orange liqueur. Bingo! You’re done!
Now for the Ganache. This is a great frosting and it is also super easy. In a large sauce pan bring the cream and butter to boil over medium high heat. When it starts to boil remover from the heat and add the chocolate. Let the mixture stand for 2 minutes then whisk until smooth. Set aside to cool.
About this time you’ll need a break. Go sit in the living room and put your feet up for about 20 minutes (you have down time anyway as you wait for things to cool, so if you are not a compulsive cleaner, go sit down!).
Now it is time to bake the cookie. If you are not like me and don’t have six sheet pans (I actually have 18, don’t ask), you’ll need to do this batches, but it will work just fine.
Preheat your oven to 325 degrees. Line 1-3 of your sheet pans with parchment paper.
Remove the pastry dough from the ‘fridge and divide it into 3 roughly equal portions (about 10 oz for the compulsive amongst you). Put two of them back in the chill chest.
Liberally flour the work surface and sprinkle some on the top of the dough. There is enough butter in this that more flour is not going to affect its final consistency and it really helps when rolling it out.
We are going to roll the dough out to roughly the size of the sheet pan. It will be really thin, but don’t make yourself crazy trying to get it exactly the size of the pan, as long as you are have the width right you can have a gap of an inch or two on the length without it being a problem.
Just roll back and forth over the dough, pausing to loosen it from the board and reflour as needed. To put it on the pan, fold the dough over itself and then using your hands and a spatula, pick up and put it on your sheet pan. Then unfold it. Don’t get freaked out if it tears or breaks. Just push it back together. It will not affect the end product at all.
Using a fork, poke holes in the dough, all over. Cover with another sheet of parchment paper and then one of the other sheet pans. Slip it into the oven for 30 minutes. I know, it is so thin that you feel like it is going to burn in that amount of time, but trust me, there is enough butter and the temperature is low enough that you will just get a well formed big flat cookie when you are done.
Remove the pan from the oven and allow the cookie to stand for a minute. Remove the upper pan and use the parchment paper to slide it onto a wire rack to cool while the other cookies bake.
When all the cookies are cool, use your 8” pan as a guide and using a pastry cutter or pizza wheel, cut out 3 8” circles from the cookie.
You will have a lot left over which is good because we are going to assemble a 4th 8” circle from pieces (no it will not matter at all that it is broken).
Now it is time to assemble the masterpiece!
Start by putting the Ganache in a bowl and whipping with an electric or stand mixer until it is light and fluffy. It will look like this:

Now get out your serving plate. Dot the center with a dollop of Ganache (this will keep things from sliding around). Place one of the cookies on the Ganache. When you are moving them, use a spatula to hold the middle up, but if they break, no big deal, just fit the piece together for the cake.
Cover the cookie with a thin layer of Ganache using your cake spatula. Using a bread knife cut the Genoise cake into three roughly equal layers. Place one layer on the Ganache. Then spread 1/3 of the syrup on top of the cake. Wait a moment for it to absorb then cover with Ganache.
Now it is time to use the pieces to make your 4th cookie. Just find big pieces and set them on the cake. Here is what my layer looked like:
See it does not have to be a big fat hairy deal.
Then keep building with the following, Ganache, cake, syrup, Ganache, cookie, Ganache, cake, syrup, Ganache, cookie, Ganache. Be sure to keep out about 1/3 of the Ganache since we are going to frost the sides with it.
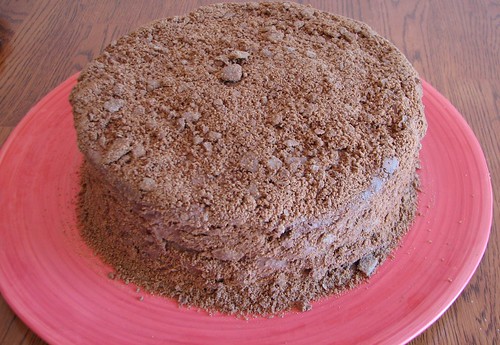
Once you have the top and sides covered with the rest of the Ganache, crumble up the rest of the cookie and gently press it onto the top and sides of the cake. It will be a little messy, but you want to cover all of the Ganache.
Clean off the serving plate with a damp towel and wrap the whole thing in plastic wrap. Chill for 30 minutes or up to two days, and then serve.
End to end this recipe takes about 3 hours (including wait and cleaning time) so plan accordingly.
Okay, I know this is a huge production number and it will intimidate some folks, but trust me you can do this and when you cut a big slice for your family or friends they are going to go crazy for it!
The flour is yours!
