This installment of the sampler quilt is all about the Mariner's Compass quilt block and how to make one. Mariner's Compass is one of the early quilting patterns in the 19th century. Maps were usually displayed at courthouses and businesses. So the compass that was usually on the maps became an inspiration for quilts. Some of those quilts now are displayed in museums. We still love this pattern and it is more popular then ever with quilters. Some have given it a modern look but it is always a show stopper at quilt shows. But with paper piecing the points on the rays are not as hard to do as they look.
Included is a lesson on how to make a Y-seam video and videos on foundation piecing and assembling the compass. You will see how a mini compass is put together using a Y-seam and how a standard compass is made. You are invited to come and join the Daily Kos Quilt Guild this evening as we learn how to make a Mariner's Compass.
DK Quilt Guild: A place for quilters to gather, share ideas, projects, and to make the world a better place, one quilt at a time. Join us and share your thoughts, projects, questions, and tips. Quilters here are at many different levels of skill. Beginners and non-quilters are welcome, too!
Camelia Elliott is going to demystify the Y-seam for you. This is a bran new you tube video just posted last week by blogger QuiltMouse.wordpress.com. QuiltMouse filmed the you tube video at a retreat a few weeks. You can read more about Camelia Elliott here: http://www.cameliaelliott.com/ or http://cameliaelliott.wordpress.com/
Mini Mariner's Compass
I have a work in progress (WIP) that needed a Mini Mariner’s Compass for a focus point in a medallion quilt. I thought I would do that before I make the Mariner’s Compass block for my Sampler Quilt. This medallion quilt was started 5 years ago. I won’t get it finished this year but probably next. I am in no hurry. So this little block was my warm up to the 12 1/2 inches block that will go in the Sampler Quilt.
The little pattern came from a 1989 Quilt Almanac. I kept all my Quilt magazines from the late 1980′s and early 1990′s. That particular magazine had a large section of patterns in the back. Many of them traditional block from the first half of the 20th century. I am an old school quilter from before there was rotary cutters and could figure out yardage on my own. All I needed was the pattern pieces. The magazine also had patterns that were popular at the time. Paper piecing mini quilts was very popular then. This little mariner’s compass was just what I needed. I copied the pattern on artist tracing paper and looked through my little scraps for mini prints from the 19th century. This quilt is also in reproduction fabrics.

I followed basic paper piecing techniques. And completed each section. Now it was time to put it together. This compass has several y-seams to do. They were pretty small and I was not sure if I was going to get my machine into the corners. I was able to and only had to a few stitches by hand.
I followed basic paper piecing techniques. And completed each section. Now it was time to put it together. This compass has several y-seams to do. They were pretty small and I was not sure if I was going to get my machine into the corners. I was able to and only had to a few stitches by hand.


You can see by my hand that this is quite little to be working with.


Here you can see the first Y-seam is completed and now the 2 sections are to be sewed together. Then the last 2 sections will be added by using a Y-seam.

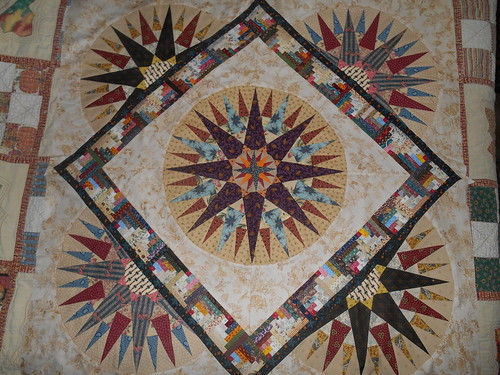
The finished block is 3 1/2 inches and I pinned it to the center of a large Mariner's Compass to be appliqued on.


Mariner's Compass
Now we move on to this week's quilt block Mariner's Compass. I found this video that gives some great techniques that will be useful in paper piecing this block.
It was hard to find a video on assembling the Mariner's Compass. Almost all the instructional information on it is behind pay walls. I did find this pair of videos on you tube that will help understand how to line up the pieces before you sew them. The little girl makes it fun to watch.
I did find a free pattern on line for a 12 1/2 inches Mariner's Compass.
http://trilliumdesign.blogspot.com/...
The pattern is a pdf file which you can down load and save.

I printed the pattern out on artist tracing paper to make 4 copies of each page. As you can see the paper is transparent and easy to see through. I then cut out all sections and picked out my fabrics. I used scraps I had for this. I decided that I did not want my little points to be in two colors. I took a pencil and drew a squiggly line over those seams that I was eliminating. These points were going to be just one fabric. I think it looks nicer that way and easier to do.

The large single pieces I made sure to lay them so the longest side is on the straight of the fabric so that you don't have a bias to deal with in the final seams. Also make sure your fabric the wrong side is facing up when you pin your pattern pieces down.

All the sections have been papered pieced and it is time to assemble the compass. I always finish all the sections first before putting the circle together. It is less confusing that way and you can lay it out to see how it looks. The instructions from the pattern assumes that you know how to put one together.

You assemble these 2 sections together first.

You now add the next section following the letters on the pattern. This is the brown piece to the section on the left. The other section on the right has already finished because it was paper pieced in.

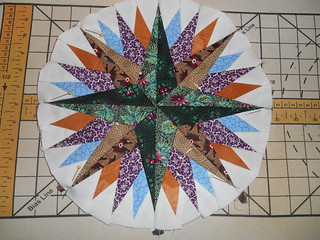
Lay out all 8 sections like the picture above. Now you will see how they all go together.

Here is the next set of seams.

Here is all 8 sections ready now to be sewn together. The next seams are the hardest to do because now you have to line up your intersections first. I line up the intersections then the ends of the seam. I used several pins to do it. I sew the intersection part first and then go back and finish the seam. You will need some patience and a seam ripper to get it right. It will slide around. I was able to get two sections together on the first try but two of them took some frog stitching and hand basting to get it right.

I finger pressed these seams open because you don't want all the bulk in the center.

I sewed the seam from the center out. I didn't sew over the intersection. I will secure the center by hand stitching after I pull the paper out. But I won't do that until the compass is sewn into it's square. I will be able to line up the center perfect by hand.
Next time we will be covering how to sew inside curves in a quilt block. I will finish the compass then and will also do Solomon's Trail.
