[Cross-posted at
My Left Wing]
Good morning, and may your seeds sprout splendidly! Welcome to Saturday Morning Garden Blogging.
Oh, jeez, did we get a surprise here last week. Two weeks ago I was bemoaning the record-breaking -13 degree cold that struck us. Well, this week we got record-breaking warmth. On Tuesday, it was 77 degrees -- I laid soaker hoses (more on that later), and dislodged allium from the front beds while wearing just a tank top, actually getting a bit of a sunburn on my shoulders. I mean, who expects a sunburn in February? The temperatures are going back down to more seasonable 50's and 60's, but it's still fine gardening weather.
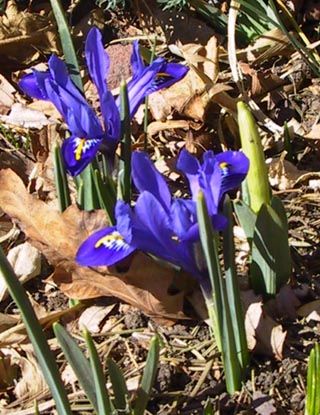
And a few more bulbs are blooming. These are iris reticulata ("rock garden iris") Harmony, which I planted last fall.
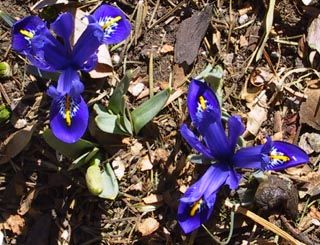
Pretty little things, huh? These are the first things to bloom after the very early crocus. Within a few days I'll have some early miniature narcissus to go with them.
But more about laying those soaker hoses. Eventually, Mr. Frankenoid and I are going to have to rip out the front beds, both to have the water line replaced (the water pressure in Our Old House is horrible), and to replace the railroad tie retaining walls. So we've never invested in an installed watering system. Because the front basically is a huuuge flowerbed, sprinklers that spray aren't an efficient way to water. So I use soaker hoses.
Last year I had problems with the hose in the main portion of the bed -- it would peter out before getting to the end. So this year I decided to put a double-head on it, and split the hose into two sections. On Sunday, I went out and laid the hose according to plan, tip-toeing among the emerging bulbs, starting with a 75 ft. length for each hose. Except that wasn't quite long enough.
No problem!. I had two 25 ft. lengths of soaker hose that would do the job. So, I slapped the extensions on the hoses I'd laid, turned on the water and....
The water would get to the end of the 75 ft. lengths, and stop. Not completely, mind you, but to the point where the middle portion of the beds were barely getting any water.
OK. Fine. On Tuesday I un-laid the hose, and started out with the 25 ft. lengths, then followed up with the 75 footers. And it worked like a charm. Of course, with the dual-session of trying to tip-toe through the tulips, I managed to step on a few, but I was early enough in doing the hoses this year that the damage will be minimal and, at least, I wasn't knocking over fully-bloomed daffodils.
Because of the lovely weather, and my Adventures with Hoses, I did not get seeds started. Oh well -- we can talk about it anyway. I'm always up for new ideas, and better to get them before I start, than after the deed is done.
First, we need a word about timing, and that will take us into a talking about lighting. What kind of lighting you need partly depends on how long you'll be keeping your seedlings inside.
If you look on your seed packet, it will tell you to start your seeds six to eight weeks before your last average frost date. That's important because, if you keep seedlings inside too long, without adequate light, they'll get very, very leggy. So you need to weigh how big you want your plants against how much light you can provide. If you can provide more intense light inside, you can start your plants earlier, and have larger plants to set out. You can also start your seeds somewhat earlier if you have a cold frame, which protect the plants from cold, while they get outdoor sunlight.
It is almost impossible to provide adequate light to seedlings relying just on the sun that shines through the window. Part of the reason is that during these pre- and early-Spring days, the day isn't long enough. Another reason is that windows filter out some of the sun. You can do it if you have a very large, southern-exposure window, and you don't start the seeds too early. But for the most part, just kind of count on needing to provide supplemental light.
There's been some back-and-forth about what kind of artificial light to use. And there's good news -- expensive "plant-light" fluorescents, with more red and blue spectrum light, are no better than standard shop lights for starting plants. The Oregon State Extension office gives the least-technical, and shortest, explanation.
Light quality refers to the color (wavelength) of light. Sunlight supplies the complete range of wavelengths and can be broken up by a prism into bands of red, orange, yellow, green, blue, indigo, and violet.
Blue and red light, which plants absorb, have the greatest effect on plant growth. Blue light is responsible primarily for vegetative (leaf) growth. Red light, when combined with blue light, encourages flowering. Plants look green to us because they reflect, rather than absorb, green light.
Knowing which light source to use is important for manipulating plant growth. For example, fluorescent (cool white) light is high in the blue wavelength. It encourages leafy growth and is excellent for starting seedlings. Incandescent light is high in the red or orange range, but generally produces too much heat to be a valuable light source for plants. Fluorescent grow-lights attempt to imitate sunlight with a mixture of red and blue wavelengths, but they are costly and generally no better than regular fluorescent lights.
In other words -- when starting our seedlings inside, we are not
trying to get the plants flowering. Indeed, it's best not to have any blossoms on plants when you transplant them, as the plants initially need to focus their energy on sending out roots, not maintaining flowers. Cheap shop lights have more of the blue-spectrum rays, which encourages leaf growth. And remember -- keep the light as close as possible to the plants, because the further away it is, the less intense it will be for your plants.
Of course, if you're starting your plants really early, with the idea of having larger plants to set out after last frost, you'll need more intense light than fluorescents can provide. I have a fluorescent light set-up with a heat mat for initially starting the seeds. Then I move the plants under a metal-halide light. It provides light of the correct red/blue spectrum, and of sufficient intensity, to allow me to start my plants 10 to 12 weeks -- in early to mid-March -- before our average last frost date of May 15.
Also, when using artificial lights, you'll need to turn the lights off and on. An inexpensive timer does the job. And to help compensate for the light being weaker than sunlight, keep the lights on for 14 or more hours per day.
I've never used a cold frame -- I'm hoping someone else can lend his or her expertise to that issue.
Now that we've figured out what kind light we're gonna provide these little buggers, let's move on to what to put them in. You can spend a fortune on seed cells, or jiffy pots, or flats, or what have you -- I know, I have. But I've settled on using Dixie cups for the initial growing.
What I like about Dixie cups are that they are cheap, flimsy, can be thrown out after one use so don't have to be cleaned, and they come in graduated sizes. I'm going to talk specifically about tomatoes now. Tomatoes are kind of weird -- all those little hairs that grow out of a tomato stem will form roots if they are buried. So, by planting tomatoes in successively larger cups, and burying all but the top set of leaves each time you re-pot, you'll get tomato plants with huge, healthy root systems -- which is what you want to plant outside.
So, I start with the little, teeny tiny bathroom cups, and poke a hole in the bottom. You can, if you want, buy "seed starting mixture" but, quite frankly, I don't think it's necessary. "Seed starting mixtures" generally are composed of vermiculite, perlite and/or peat -- no real soil. The advantage is that, because they have no soil, they can be sterile, which is a protection against damping-off disease, which is caused by a fungus. However, because they have no soil, they also have no nutrients, meaning you'll have to feed your seedlings after just a couple of weeks -- and, if you're using an organic fertilizer, you may be canceling out any advantage of having the sterile seed-starting mixture. Rather, I use standard potting soil, adding a little extra vermiculite to lighten it, and guard against damping off disease by making sure the plants have adequate ventilation.
My seed-starting set-up also has a heat mat; but you can make do without that -- it's just handy. Now, some seeds demand cool temperatures to germinate; others have to have that heat (it's almost impossible to start moonflowers without a source of warmth); most plants are in the middle and can really use the extra help. If you don't have a heat mat, you can use a heating pad set on low, or put your potted seeds on top of the refrigerator, or near a heating register.
But remember -- heated pots will dry out fast. Some recommend covering the seeds and seedlings with a plastic tent to retain moisture -- but then you're inviting damping off disease. Damping off disease can be almost completely avoided by making sure your seedlings have good ventilation. What I do is put the pots in a shallow tray, and night and morning add water to the tray to a level of ¼ to ½ inch. By adding water to the bottom, you allow the pot to draw up what moisture it needs, without compressing the soil, or knocking over your tiny seedlings, by watering from the top.
So, you've got your containers, and your potting mix. Dampen the mix well, then scoop into the pots. Pour water over to settle the soil, add 2 tomato seeds per pot (just in case one is a dud), then cover with more damp soil -- not too much (the package will tell you the correct depth; I just play it by ear anymore). Then put your pots under your grow lights, check the water level twice a day, and wait for the magic to happen. Most tomatoes sprout within a week.
Once the tomato seedlings have a set or two of true leaves, it will be time to transplant them into the next size Dixie cup -- I think they're six ounce size. Slip one of your seedlings -- still in its original cup -- inside an empty cup and, if the top leaves are poking their heads over the rim, it's time to re-pot. Put a little soil in the bottom of the new cup and, if you have two plants in your pot, keep the strongest one and pinch off the other one. Rip the old Dixie cup off your remaining seedling, set the whole shebang into the new cup and, if there will be leaves below the soil line, remove them. Add damp potting soil, tap the cup on the counter to settle, and return to it's space under the grow lights.
And that's about it. With the first repotting, you'll probably want to start giving your plants some very diluted fertilizer once a week; or just add a little compost to your potting mix when you repot them . And then, just keep moving the plants up to larger cups, and burying the stems. The last stop for my tomato plants is quart-sized milk cartons (well, actually cream cartons), that I start saving in January. I cut the tops off and poke a hole in the bottom, to get a nice, deep narrow container, which doesn't take up too much space under the metal halide light down in the basement. I also ensure good air circulation (and help strengthen the stems) by leaving a box fan, set a few feet away, blowing on the plants at a low level.
The final step is "hardening off". See, your little babies have been coddled, away from the cold, and away from the harshness of full sunlight. They need to be gradually acclimated. I'm always amused by narratives of how to harden off plants -- like, how many people are around to move their plants out of the sun after 2 hours on the first day, and 3 hours on the second day? You can accomplish the same thing by making use of shade. I set my plants out on the back lawn, which is northern exposure. The first day they stay close to the deck, where they'll only get a an hour or two of sunlight, and I bring them in an hour before sundown. Then I move them away from the house a few feet at a time, and leave them out a little longer each evening, until by the end of a week, they're spending the day out in the veggie patch where they'll make their final homes, and, if the weather isn't expected to get too cold, they can stay out all night.
I'm feeling very long-winded, so I'm going to stop. When it gets closer to the proper time -- near last frost date -- I'll talk about starting cucumber, squash and corn inside. But see, there really is a daffodil getting ready to bloom next to the rock garden iris.
Before I get too excited, I have to remember that Denver is bi-polar in March and April. In 2003, a storm started on St. Patrick's day -- my birthday! -- which left the city looking like this

So, what's happening in your garden this weekend?
