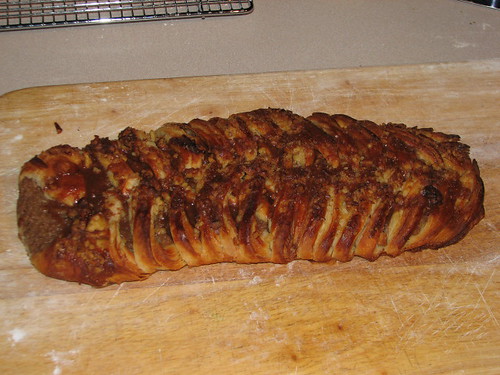
Happy Mothers Day Bread Heads! This week we’ll be making one of the best brunch foods you can possibly have the Danish Walnut Braid. Yeah, I know, you won’t be able to whip it up for Mom for this Sunday, but you will be able to make it for next week and keep the appreciation of your mom going for that much longer.
This recipe makes enough dough for three of these braids, but don’t try to cut it down for just the one, you will not like the result! Once you have the butter layers incorporated this dough freezes quite well, so if you don’t want to make three braids, then just freeze the rest of the dough. When you want to use it again, just let it thaw in the refrigerator. Be sure to double wrap the dough, it can be frozen for up to 4 months without losing any of its lovely flaky goodness.
This dough is very much like the croissant recipe we made a couple of months ago. One of the commenter’s on the thread said they found the directions confusing so I have added more pictures to try to make it clearer.
Danish Pastry Dough
Ingredients:
Dough
1 cup whole milk
2 packages dry yeast (4 ½ teaspoons)
4 ½ cups all purpose flour
½ cup sugar
1 teaspoon salt
½ ground cinnamon
4 tablespoons cold unsalted butter
3 eggs
Butter layer
1/3 cup all purpose flour
3 ½ sticks cold unsalted butter
Method
In a small sauce pan heat the milk on low heat until it warm but not hot (110 to 120 degrees). Pour into a small bowl and whisk in the yeast. Set aside for later.
In a large bowl combine the dry ingredients. Cut the butter into about 8 pieces and place in the bowl. Like with the scones we made a couple of weeks ago, we are going to rub the butter pieces, gently, flour. It will take about five minutes for to get the dry ingredients and the butter incorporated, so don’t rush. Just keep rubbing flour on the butter until all looks crumbly like corn meal.
Whisk the eggs into the milk/yeast mixture. Don’t worry about bringing the eggs to room temperature; this recipe does not need that. Using a wooden spoon, stir the milk mixture into the flour mixture. This recipe tends to have just enough liquid so if you find as you stir that there is some flour on the bottom that is not getting incinerated, switch to using your hands to mix it all in. This will not do any harm to the layered affect of the final product, so just keep working the dough with your hands until all ingredients are in one ball.
Turn the dough out on to a floured work surface and fold it over itself five or six times. If you have a really sticky dough you can add up to 3 tablespoons of flour. Wrap the dough in a layer of plastic wrap and then put in a large plastic bag. Refrigerate for at least one hour and as long as over night.
To make the butter layer spread the 1/3 cup of flour on your work surface. Roll your sticks of butter in the flour and then using a floured rolling pin lightly pound on along the top of the sticks. Then turn them all ¼ turn and do it again. Keep repeating this until the butter becomes pliable and soft, but does not melt. It is best to make this recipe on a kind of cool rainy day. Once the sticks really start to lose their shape, flour your hands and then knead the butter into a mass. It should be cool and pliable to the touch. Wrap the butter and put it back the refrigerator until you are ready with the dough layer.

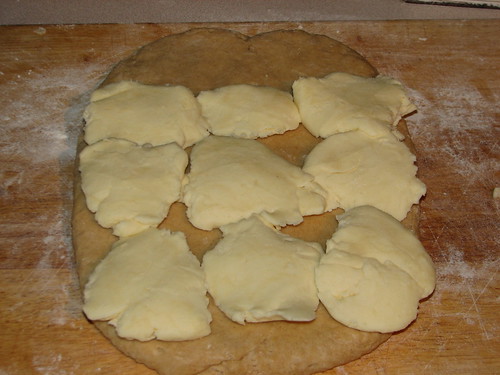
Scrape any butter off your work surface and lightly flour it. Remove your dough from the refrigerator and turn it out on the work surface. Using your palm and fingers push and pull your dough until it is a 12" by 6" rectangle. Divide your butter up into 8 pieces and flatten them with between your palms. Arrange them on the lower 8 inches of your dough ( see the picture below)
Fold the top third, the part with no butter on it, over the middle third. Then fold the other third up over the first two, to make a five layered package. Position the dough on the work surface so the narrow side is facing you. Using your rolling pin press a series of horizontal lines in the dough. (See picture)
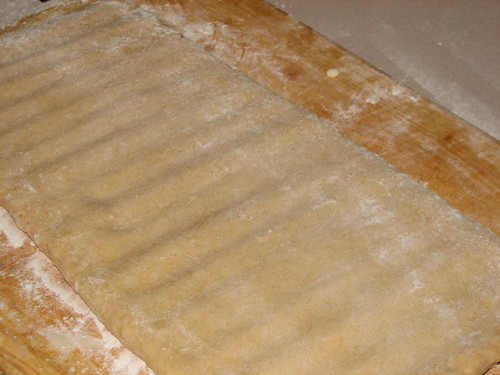
Keep doing this, going up the dough in a series of horizontal lines until the dough is about ½ inch thick. Now roll the dough out, without going over the edges and pushing your butter out, to a 12" by 24" rectangle.
Fold one of the narrow (12") sides almost to the middle of the dough. Fold the other side so there is a 1" gap between their edges. Fold the dough in half so ther are now four layers. Turn the dough so the narrow edge is facing you and repeat the process of pressing lines in the dough until it is again ½" thick. Roll out to 12" by 24".
At this point you can place the whole thing in a large plastic bag (it is okay to gently fold it to fit) and refrigerate for at least 2 hours or divide it in thirds to use or freeze.
Danish Braid
To make the filling I use a food processor. You don’t have to have one, though it makes things easier. You can grind the nuts in a batches in a coffee grinder or a blender. Or you can chop them up yourself by hand with a sharp knife.
Ingredients:
Filling
1 ½ cups walnuts
2/3 cup whole milk
¼ cup sugar
1 tablespoon butter
¼ dry bread crumbs (you can make them yourself or buy them)
2 teaspoons vanilla extract (don’t use vanilla flavor! I know it costs a little more but good vanilla makes a huge difference!)
½ teaspoon ground cinnamon
1/3 recipe of Danish pastry dough
Egg wash (1 egg beaten with a pinch of salt)
Cinnamon Icing
¾ cup confectioners sugar
1 teaspoon ground cinnamon
1 tablespoon whole milk
1 teaspoon vanilla extract
Method
Filling:
In the food processor pulse the nuts five or six times for one second each. Remove ¼ cup of the nuts for the top, and then process the rest until they are ground by not into a paste. If you are doing this by hand you want to get the point where the pieces are very small and do roundish. About like a fine dice.
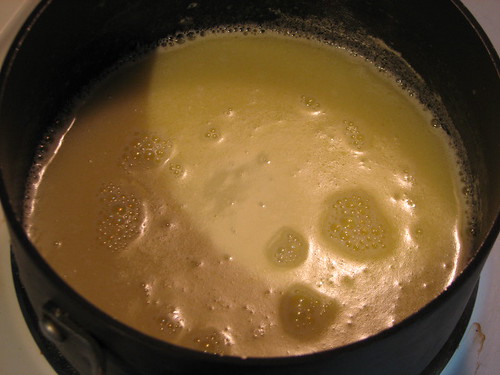
Combine the milk, butter and sugar in a sauce pan and heat over low heat until it just gets to a simmer. You will be able to tell because the milk will just be starting to foam. (See picture).
Add in the ground nuts and the bread crumbs and cook, stirring constantly, for about 2 minutes. The mixture is done when it thickens. You will not be able to miss the difference between the unthickened mixture and the thickened one, so don’t panic.
Remove from the heat and stir in the cinnamon and vanilla. Scrape into a bowl to cool and set aside.
Lightly flour the work surface and turn out your Danish pastry dough onto it. Roll the dough into a 12" square. Slide it onto a sheet pan covered with parchment paper. Usually I say you can use a greased pan, but for this recipe you really need the parchment paper.
Cover with plastic wrap and slide back into the refrigerator until the filling has cooled to room temperature, about an hour.
Remove the dough from the ‘fridge and mark, but don’t cut it into three sections that are 4" wide and 12" long. Then using a pastry wheel or a pizza cutter or a sharp knife cut about 15 doward facing slices on each of the outer sections.

Spoon the filling over the middle section and then alternate folding the one of the slashed cut pieces over the middle. If you look at the picture below you will see what I mean.
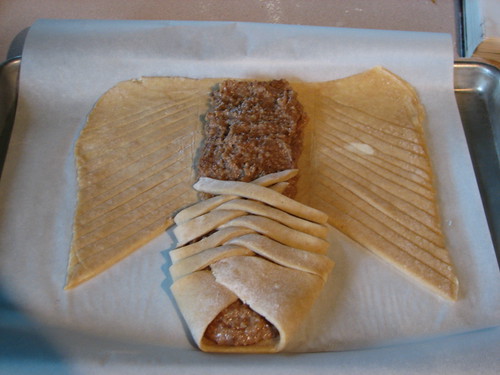
Keep doing this until you have covered all the filling. Cut off any extra dough and discard (there will always be some).
Cover with a dry towel and allow to rise for 30 minutes or until the dough looks a little puffy.
Pre-heat your oven 20 minutes before baking to 400 degrees.
Brush the top of the dough with the egg wash. You want to have kind of a dry brush with this; it is really bad news if the egg wash runs down the sides and puddles at the bottom, so think less is more when loading up that pastry brush!
Sprinkle the remaining nuts on the top of the braid and slip into the oven. Bake for 20 minutes or until the braid is well risen and browned.
Remove from oven and then slide both braid and parchment paper onto a wire rack to cool.
When the braid is cool, mix the ingredients’ for the icing in a bowl. Using the point of a spoon make irregular lines along the top of the braid. Slide on to a serving plate or slice up and serve.
This is a bunch of work there is no doubt. This is also an incredibly rich dessert, but it is all worth it in the end. The finished braid also freezes well. Just don’t ice it, and double wrap it in plastic wrap. To revive allow to come to room temperature in the wrapping then reheat in a 325 degree oven for 15 minutes. Allow to cool then ice and serve.
So, now you can make an incredibly impressive dessert to wow and impress any Mom.
The flour is yours.
