DK Quilt Guild: A place for quilters to gather, share ideas, projects, and to make the world a better place, one quilt at a time. Join us and share your thoughts, projects, questions, and tips. Quilters here are at many different levels of skill. Beginners and non-quilters are welcome, too!
A little about me. I did crewel embroidery for twenty five years and then one day some bead fairies flew by and settled in my mind. They told me it was time to start beading. So I did. I learned how to make a simple beaded ornament net and produced four beaded ornament books.
http://www.beadecked.com/... (Don't forget to right click on the links to open in a new tab or window!) Due to all that needle work, Art-Rhitis came to hang out in my right thumb, so no more embroidery, beadwork or even hand stitching the binding on my quilts.
Having to do something creative or go bonkers, I took up piecing quilts six years ago. No one warned me that it would become such an obsession to purchase fabrics!
Why did I start longarm quilting? I took a quilt to someone and she made such a mess of it I ended up ripping out all the stitching and took the quilt to someone else to fix. That's when I decided I wanted to complete the whole quilting process myself and the journey to longarming began.
Below, I'll be sharing different aspects of longarm quilting, showing pictures on how many items are used in the quilting process. I'll also share the full quilt for some eye candy. Most were pieced by customers and I did the quilting.
The bead fairies blessed me with enough income to purchase my first longarm machine three years ago. That machine didn't work well for me so I sold it to get the one I have now, a 26" ABM Innova with Lightening Stitch. http://innovalongarm.com/... I purchased the AutoPilot computer system a year later. I spent enough for a down payment on a house, but it's well worth it as I wanted a system I could dance with and was easy to maintain. Even having the computer system, I prefer to free-hand or mix the computer with free-hand quilting.
It's really intimidating when starting out. Looking at the machine and thinking, I'm going to quilt on that?! I had a white board and practiced drawing at night while the t.v. was on. (One hint: you don't hold the pen like you would when normally drawing - you have to hold it like you'd hold the handle on the machine - straight up and down.) I purchased many dvd's and books. I also traveled to some quilt shows to take hands-on longarm quilting classes. There are many more books and dvds than are listed below.
The Pajama Quilter: http://www.pajamaquilter.com/
Kimmy Brunner DVDs: https://kimmyquilt.danemcoweb.com/...
Myrna Ficken: http://aquilterschoice.danemcoweb.com/...
Darlene Epp - background fillers: http://www.lovetoquilt.com/...
Sherry Rogers Harrison - feathers: http://sewfarsewgood.danemcoweb.com/...
Pam Clarke - Quilting Inside the Lines: http://homestitches.com/...
Once I got the feel of the machine, then came the tools! Everyone has to have a little ruler to "stitch in the ditch." Here's my Itty Bitty from Off the Edge. You can see how it guides the hopping foot to stitch right in the seam (most of the time!)

Curved cross-hatching rulers: http://www.deloasquiltshop.com/...
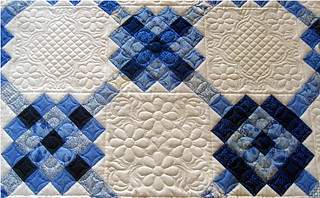
They need to be curved the same on both sides and have good markings. I did the curved crosshatching in the corners of this quilt:

Completed square
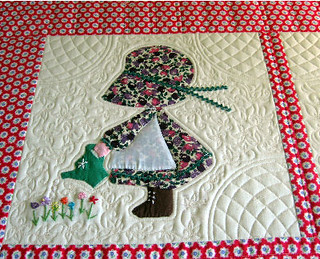
Full quilt that was hand appliqued and hand embroidered by customers mother-in-law who had passed. A family keeper!
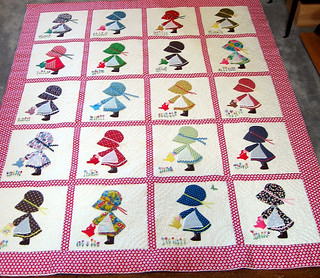
Another challenge is how to stitch around applique. I have a ruler that saves my sanity! It's called the Appliguide and has a beveled edge that allows the ruler to go over the applique while stitching along the edge. http://deloasquiltshop.com/... It fits around the hopping foot allowing me to guide the hopping foot with my left hand and the machine with my right hand. Here are some clouds where I stitched right up against the applique and then 1/4" away.


Full quilt going to the customer's baby nephew. All hand applique following the pattern "in her mind!"
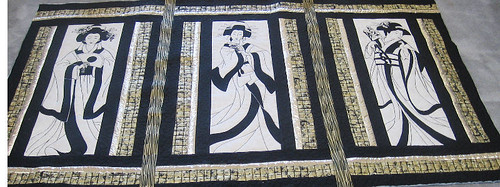
I also use it when I outline or follow specific lines in a panel, etc. I did the outline of the geisha and all the black lines inside using this ruler. I did micro-stippling in all the solid black areas.
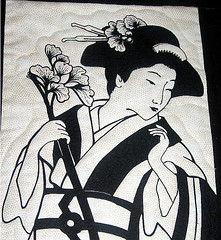
Full quilt - it's a wall hanging.
Here are some flowers in an oriental quilt that I also outlined using the Appliguide.
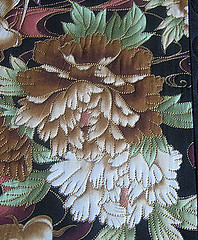
The full quilt.
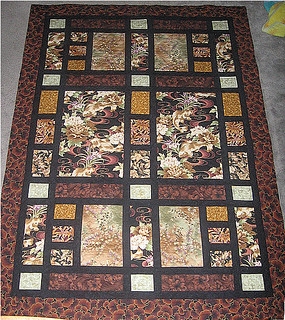
More outlining with gold thread on a wild and crazy Laurel Burch panel quilt. Had to show this one! Anything that is gold in the panel, I stitched over it to make it pop even more.

The full quilt.

A few more rulers that I use. Left one is the Line Tamer and I use that to put binding on with the longarm. Curved one on the bottom is used for continuous curves in squares. Top one is a boomerang for curved cross-hatching. The red one is The Key and I use that one for larger/smaller curves:

Here's a border design that I used one of my round rulers on. I used the ruler and white chalk to mark the outline and then used the same ruler to guide the hopping foot around it. My favorite marking tools are regular chalk that can be brushed way and the purple Marvy Marker that is air erasable.
Below is the Line Tamer on the hopping foot to put on the binding. Once I get the binding stitched onto the quilt and trim the quilt, I then use the "Binding Thingy" ruler to miter the corners of the binding. It makes a perfect mitered corner if there is such a thing as perfect.

The "Binding Thingy" ruler on the edges of the border ready to be marked. To explain how I do the binding would take a whole other diary!

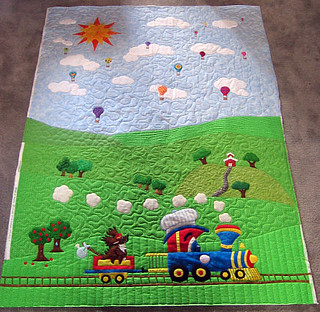
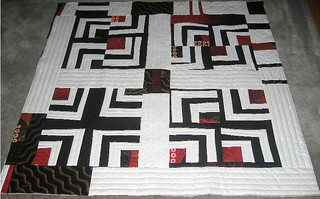
Continuous curves are arcs stitched in squares. It makes the seams sort of pop up and give depth. Here's a picture of one quilt that had quite a few of these squares that I did continuous curve in along with computer quilting and straight ruler stitching. I used the funky ruler in the bottom of the picture above to guide the hopping foot around each side of each square.

Full quilt - it's too hard to see the line quilting in the dark squares.

Let's talk about thread! For longarm quilting there are way too many threads to choose from. I've been told to NEVER use rayon thread as it disintegrates quickly. Here are a couple I like to use:
Aurifil Cotton 50/2: 50 weight/2 ply (two threads twisted together) More a matte color on the quilts.
Superior So Fine Polyester 50/3 ply (three thin threads twisted together) Matte color: I use this one a lot in both the bobbin and top thread.
Metro Embroidery Poly: 40/3 (the price on this thread can't be beat and my machine loves it!) Very shiny thread on the top of quilts.
Glide Poly 40/3: another shiny one
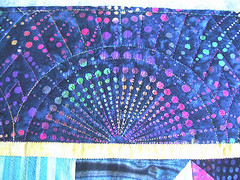
Superior Rainbow Poly 40/3: A variegated with 1" color changes. Some variegated threads change color every 4" to 6" or less.
Here's a picture of a quilt using Rainbow thread. So many colors in the fabric that using only one color thread, it would have faded into the areas the thread color matched. Using Rainbows made it possible for the stitching to pop on the whole quilt.

This was an antique hand made quilt made out of dupioni silk. I used the Metro Embroidery shiny polyester thread on it.

I wanted the quilting to blend in more with the matte fabrics used in this quilt and used Aurifil cotton thread.
Here are a couple pictures of some of my thread collection. Thank goodness I have a resale license and can purchase thread at a less expensive price!
Superior So Fine Thread. I think I have every color they make "just in case."

Some of my Metro Embroidery Polyester Thread

Don't forget, for every thread used in the top and bobbin, tension always has to be checked at the beginning of quilting and after every bobbin change. I wind my own bobbins because a bobbin winder came with my Innova system and it's much less expensive than to purchase prewound bobbins. Also, needle sizes have to be changed depending on the thickness of the top thread. To be a really good longarm quilter, I believe it's imperative that the longarmer know the different threads, how they'll work and look on the quilt, and what is best for what the customer wants.
Batting I'll cover this breifly. Most quilters give me Warm & Natural as that used to be the "go to" batting. For me, it's too tight and doesn't show much definition in quilting. It also makes quilts heavy if they are going to be constantly used. My favorite "go to" batting is Hobbs 80/20. 80% cotton and 20% polyester. It quilts up well, shows great definition in the quilt and isn't super heavy if it's going to be used on a bed. I do carry Warm & Natural for those that want it, 100% cotton, 100% polyester, Hobbs 80/20 and my ultimate favorite, Legacy WOOL! It's like quilting through butter. It may surprise some, but wool is great for a lightweight quilt. It drapes beautifully. It's been recommended that quilters use two battings for quilts that will be displayed in quilt shows, or hang on the customers wall. A thin batting like Hobbs 80/20 and then wool on the top.
I always discuss with the quilter what the quilt usage will be and advise the best batting according to that need.
Here's a customer quilt using wool batting as it's going to be a wall hanging (she didn't want a double batt.) It makes the seams deeper and the fabric puff up more.
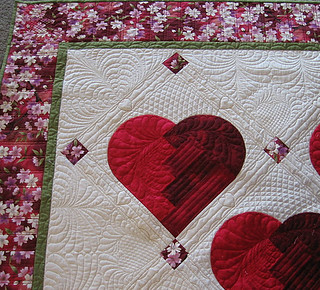
Here's my own Broken Heart quilt that used Hobbs 80/20. It hasn't been washed and one can still see lots of definition in the quilting.
Once I gained enough confidence after practicing many hours and doing many of my own quilts, I started my "professional" quilting business in January, 2011. There are at least six or more longarm quilters in my area and most do edge to edge quilting (one pattern over the whole quilt.) To start my business, I brought my own quilts in to show the owners of the local quilt shop. They liked what I did and asked for my business cards. They have been promoting me as a "specialty" quilter doing custom work and it's been going great guns ever since.
The cost of having a longarmer quilt the quilt varies depending on where one lives. I charge $.015-$.018 per square inch (psi) for an all-over pattern, depending on how much stitching and thread that will be used. $.03 psi starting price for Light Custom which can include "stitch in the ditch", computer and free-motion quilting, and feathers. $.05 psi starting for heirloom quilting, which is lots of micro-stitching and tons of custom quilting. I haven't charged that much yet! Being honest, I don't make much money with the quilting, usually $10.00 or less an hour. But for me it's not about the money. Every customer and every quilt I do I count as a blessing!
I hope this has given you a view of my longarm quilting journey so far, and a little bit of information on what is used by longarm quilters to take care of their customers' quilts.
I'm working on another diary on how I learned what to quilt, where and why. Stay tuned!

