Welcome to DK Quilt Guild's first group “quilt together” class. We will be making a sampler quilt this year from start to finish. This will include quilt as you go technique, that can be done on your sewing machine. This way you can learn to quilt or sharpen your skills with out a lot of expense. The idea of this class is to take the intimation out of quilting. There are many who would like to quilt but with all the quilt shows and books, it looks so complicated and hard. Don't be afraid of all the rules and stuff out there manufactured for quilting.
DK Quilt Guild: A place for quilters to gather, share ideas, projects, and to make the world a better place, one quilt at a time. Join us and share your thoughts, projects, questions, and tips. Quilters here are at many different levels of skill. Beginners and non-quilters are welcome, too!
When I was taught as a kid to quilt, all we had was scissors and a sewing machine. We drew lines with a ruler and used cereal boxes for templates to trace the block to cut out. The only rules in those days was to make it as nice as your skills will let you. It was OK not to match intersections and not have sharp points on every day quilts. You just didn't put that quilt in the local church's quilt show. Quilting was a thrifty way of using up scraps from making cloths. It was also a way of being creative and making something for the home and family. Warm blankets were always needed. Quilting also led to new friendships in local sewing groups. I also want to point out that quilting was never a dirt cheap project but was affordable for most to do when using scraps of fabric from other project. There was many quilts made from lightly used fabric from out grown or out of fashion clothing then. But you still needed to invest in some batting if you were not covering and old blanket. Many just bought muslin that was inexpensive to use with the scraps and for the back of the quilt. Most cloths then was made from cotton so there was always plenty of left over fabric and scraps.
This class will stretch over many months so you can work on it between work and other projects you are working on. It is something that you can work on at your own speed. You have the option of making as many of these blocks you want. It is your choice to the size of quilt you want to make. I will be making a bed size quilt because that is my default size. I am not a quilter of show quilts or art quilts, but I love to sleep under and cuddle up in a quilt. I want my family to enjoy that also. Each diary will have blocks for the beginner, intermediate, and experienced quilter. You chose the ones you want to try. Don't be afraid to challenge yourself.
The equipment you will need is a sewing machine, rotary cutter, cutting mat and quilters ruler at least 16 inches long. The reason for the 16 inch ruler is your quilted unfinished block is going to be 15 ½ inches square. You will be attaching a sashing around 12 ½ inch pieced blocks to make a 15 ½ inch block to machine quilt. This is a nice manageable size to quilt with on a domestic machine. Many of you already have the basic equipment but for the new quilter this is the minimum amount of items needed to start with. You can go to your local fabric or quilt shop and find them. Quilt rulers are usually 4 to 6 inches wide but get the one that is at least 16 inches long. Actually this ruler turns out to be the most used ruler by quilters for rotary cutting. Make sure your mat is large enough to cut a 15 ½ by 15 ½ inches block.
The fabric that you will be using is 100% cotton and this quilt will be fat quarter friendly. For you that are starting out a fat quarter is a 18 inches by 22 inches cut of fabric that is sold in most fabric shops as pre-cuts called fat quarters. Quilters buy these to build up the variety of fabric that they have on had to quilt with. You can use what ever cotton scraps you have or fat quarters. This will be a stash busting quilt for those who have fabric stashed away. We are not going to worry about color theory in this quilt. Just choose the fabrics in colors and prints that make a pleasing combinations that appeal to you. This is your quilt so enjoy playing with color and prints. The only directions I will be giving to you on the block if it is made from light, medium or dark fabric to bring out the traditional pattern. Even then you can change that, just that it may change how the eye sees the block. I have to confess that I don't pre-wash my fabrics. I stopped doing that decades ago because colors are now color fast and cottons usually shrink about 7%. I just make my quilts bigger for the shrinkage. Why do all that work for a every day quilt. I also like the bumpy and fluffy look of a quilt after it is washed. You can pre-wash if that is what you are used to doing. I use 80% cotton and 20% polyester for my batting because I live in the tropics and cotton breaths and the polyester makes it needle better when sewing. Polyester batting is the least expensive and very comfortable to quilt with and it also comes in various lofts (thickness) so you can choose what fluffiness you want.
January is usually a good month for sales in the fabric stores. You should be able to find batting on sale in the size you want to make your quilt. Also I suggest that you watch for a sale on muslin or quilters cotton in a plain color for the sashing and border. I am going to use unbleached muslin because it is easy to match up if I don't have enough. It also shows up good in demonstration pictures. So what ever you decide to use buy at least 3 yards. The backing is going to be scrappy and the quilt is reversible. You can use several different fabrics in the back if you want. I will get into the batting and sashing in the next diary. For the ones who have fabric stuffed away, this is the opportunity to stash bust and use down some fabrics.
First off, here are some links to videos for you to watch on basic quilting techniques. This will help the new quilter as well review for experienced quilters. There are some great tips in these videos and I thought they were helpful to know.
How sew a quarter inch seam.
How to sew blocks together and nest seams.
https://www.youtube.com/...
How to make half square blocks.
The video is from McCall's Quilting. She explains how to figure out the size formula for a half square block. When I make half square blocks I add 1 inch instead of 7/8 inch to the finished block size I want. I do this because most quilt rulers don't have 1/8 markings. Plus it gives me a little extra as insurance so I can square up a perfect block. Sewing on the bias can be a little wonky because the fabric can stretch. Also in the video, you will learn how to use a square up ruler.
https://www.youtube.com/...
Here is another technique for half square blocks from Missouri Quilt Co.
https://www.youtube.com/...
I seem to be unable to embed my pictures from Flicker now. So I have given links to the pictures until I am able to post pictures.
Monkey Wrench Block
The first block is and easy block and very traditional.
Cut two of 5 inch square of light color. This is for the half square block.
Cut two of 5 inch square of dark color. This is for the half square block,
Cut one of 4 1/2 inch square of medium color. This is for center of the block.
Cut four of 4 1/2 inch square of light color.
http://www.flickr.com/...
Make the half squares and square up to 4 1/2 inch square. Sew together like this in 3 strips.
http://www.flickr.com/...
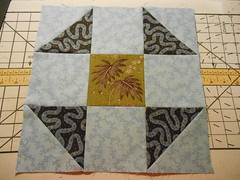
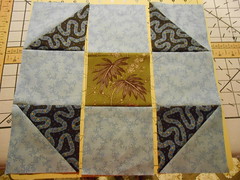
Churn Dash Block
This looks the best in 3 different fabrics of light, medium, and dark color. This is based on 9 square block of 4 ½ inch unfinished squares. It is a traditional block from the second half of the nineteenth century. It has a half square block in each corner that makes this a good practice block for beginner quilters. It is also a very attractive block in a sampler quilt that quilters enjoy adding to their quilts. It is easier to 5 inch square block and then cut down to 4 ½ inch half square block.
Cut:
Two of 5 inches square blocks from both dark and light fabrics.
One of 2 ½ inches by 18 inches strip from both dark and medium fabrics. Or four each of light and medium fabrics 2 ½ inches by 4 ½ inches.
One of 4 ½ inches square block from light fabric
http://www.flickr.com/...
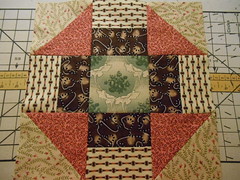
Lover's Knot Block
Made from 3 different fabrics, light, medium and dark. I like this block and it makes a very interesting scrappy quilt that looks harder then it is. Cutting a block on the eighth inch is hard. So for the that block I would use a 6 inch square and trim back to 5 ½ inch half square block.
Cut 4 of 2 ½ inch square in dark.
Cut 1 of 2 ½ inch square in light
Cut 4 of 2 ½ inches by 3 ½ inches rectangle in light
Cut 2 of 6 inches square in light. Half square block will square up to 5 12 inches.
Cut 2 of 6 inches square in medium. Half square block will square up to 5 1/2 inches.
Put 2 of 6 inches square of one each the light and dark right sides together. Draw a line with a pencil from corner to corner on the light side. Sew a quarter inch from the line. Do this on each side of the line and repeat on the second two 6 inches square. Open and press to the dark side. Square up to 5 1/2 inches.
Follow the picture to sew the block together.
http://www.flickr.com/...

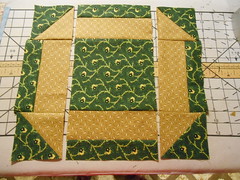
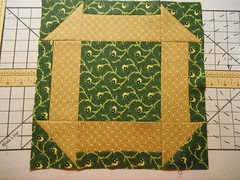
Hole in the Barn Door
I did this in 2 colors.
Cut two of 4 1/2 inches square dark color. This is for half square that squares up to 3 12 inch square
Cut two of 4 1/2 inches square light color. This is for half square that squares up to 3 1/2 inch square
Cut four of 1 1/2 inches by 6 1/2 inches rectangle dark color.
Cut four of 2 1/2 inches by 6 1/2 inches rectangle light color.
Cut one of 6 1/2 inches square of dark.
Follow pictures to sew together.
http://www.flickr.com/...
http://www.flickr.com/...
Next week the block will be Fly Dutchman and You will be introduced to machine quilting as you go.
