Last week I promised to introduce you to quilting as you go this week. This is going to be the most important skill you will learn in quilting, "how to quilt and finish the quilt yourself." It is very do able and was once the norm for quilters. We think of grandma sitting in front of a large frame and hand stitching for hours, but there was other ways that was also practiced then. Also there will be information on how to make flying geese blocks and more block patterns for our sampler quilt.

DK Quilt Guild: A place for quilters to gather, share ideas, projects, and to make the world a better place, one quilt at a time. Join us and share your thoughts, projects, questions, and tips. Quilters here are at many different levels of skill. Beginners and non-quilters are welcome, too!
Not every one had the space to set up a quilt frame. Others didn't want to drag around a large quilt while lap quilting in a large hoop. No one had air conditioning in the summer and a large quilt on your lap would be very hot. The myth is that all quilts were hand quilted in the past, no, they were also hand tied and machine quilted. Hand tied quilts was called comforters and machine quilted quilts were mostly every day utility quilts. It was the good quilts that always got hand quilted. My 1893 Singer fiddle base treadle has attachments for machine quilting in it's puzzle box. It has a quilting foot and guide. I fact all domestic machines had quilting attachments. Those who were lucky enough to have a sewing machine used all of the attachments. Dealers would give weekly lessons in detail to everyone that bought a machine.
In 1979 Georgia Bonesteel began her quilting show on PBS called Lap Quilting with Georgia Bonesteel. Lap quilting was something she perfected and taught at a local community college. She improved and made it her own the method of quilting in a hoop sections of the quilt and then easily sewing them together. She solved many problems that quilters run into sewing sections together. I must of watched all her programs at first because my local PBS showed her on Saturday. Later I would record her after I got a VCR. Her later shows are still being shown today. In my opinion her early years were the best because it was all about basics and anyone could quilt with out a big out lay of money for tools and gadgets.
Here is Georgia explaining how to join quilted blocks in 3 parts.
Part one: (embed is disable for these)
http://www.youtube.com/...
Part 2:
http://www.youtube.com/...
Part 3:
http://www.youtube.com/...
This is the technique I will be using to make this quilt. I will add a boarder around each block that is 1 3/4 inches wide so in the end I will have a 2 1/2 inch sashing. I will go into it more next month after everyone has had a chance to make some blocks. She does show how to bring the backing forward to bind the edges of the quilt. This is a good way to finish a quilt if you can't do bindings. I will be doing a double fold binding on mine. But that is for a discussion much later in the quilt along.
How to make flying geese the easy way.
Eleanor Burns Flying geese template is the one I used for the flying Dutchman block. There are 3 different sets of them. I used the medium size set that includes the 3 1/3 inches by 6 1/2 inches block. You can find it in most fabric and quilt shops. Her sister Patty used to go on quilt lecture tours and sell Quilt in a Day books and templates. She came every year to the the town that I lived in and I would always buy an item that I thought I would use. She doesn't tour any more now that her husband has died. She told us on the last visit that she found it too hard to do it by herself lifting all the boxes. I thought she was more interesting then Eleanor and just as much fun. I think this was the most popular template she has and I like using it. I have all three sets. Here is her demonstration on how to use the template
Here is a second video that gives the measurements for making the size of flying geese that is needed for a Dutchmen Puzzle that it 12 1/2 inch square block.
This is the Dutchmen Puzzle Block
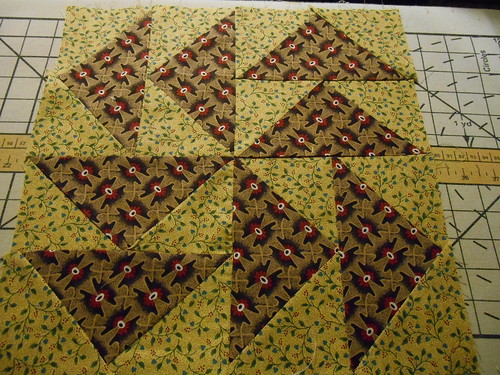
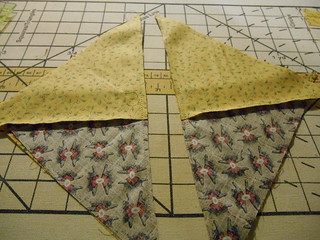
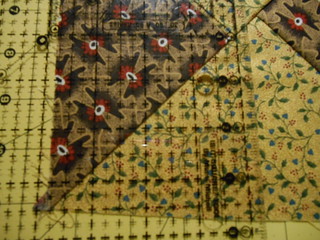
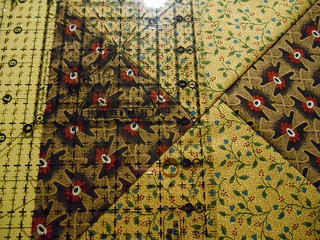
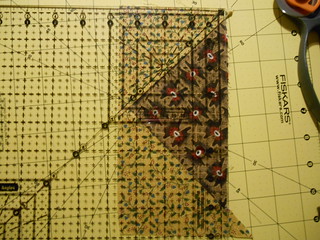
You can follow the same method of the Eleanor Burns ruler with out her ruler. You will need a square ruler at least 6 1/2 inches. I was using a 10 1/2 inch square ruler that I have had for at least 25 years. I don't think they make a 10 1/2 anymore. I think they come in 9 1/2 and 12 1/2 inches now. The 6 1/2 inches square would be the easiest to use for this but I am used to my old ruler because my 6 1/2 square up don't have the lines. I used the 10 1/2 inch in these pictures to show you. The close ups show how to line up the 1/4 inch seam allowance. The pictures are easy to understand when you have watched the videos. I am just showing how to use the lines on the ruler to line up to square up. You are working from the point out. The diagonal line is important to keep your point straight.


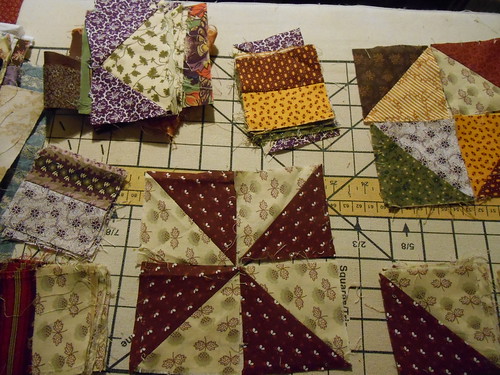
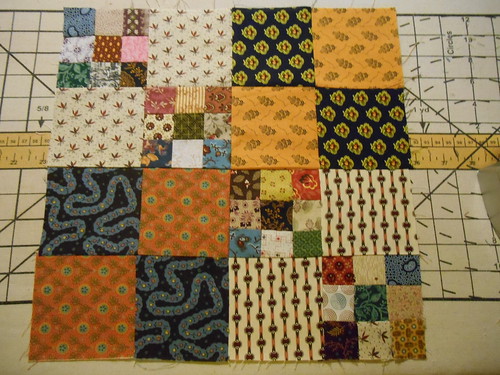
I was busy making some other blocks from small scraps that I had hoarded. Some of these scraps were given to me by quilting friends. I have been known to pull other people scraps out of the trash can at quilting classes and group get together quilting retreats. Good quilting cotton is expensive and you pay for every inch of it. I was taught to try to use every inch of it in scrap quilting. There is many scrappy blocks you can create from small scraps. I hoard reproduction scraps from different era's and keep the scraps in shoe boxes. Here is a picture of a pile of small scraps I used for the three blocks I made this week.

I had some left over half squares and flying geese blocks that were a little wonky from a quilt project from years ago. I spent a little time and fiddled with them and used some of them in the scrappy blocks.
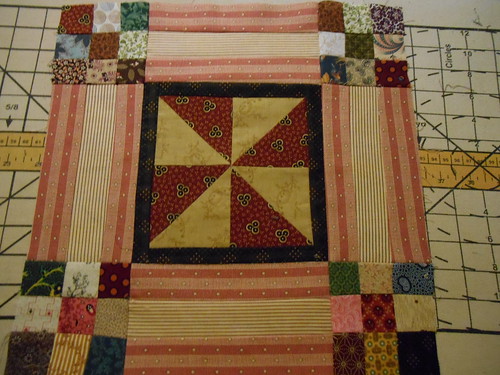
This block idea came from a block called Morning Sun in the 1898 Ladies Arts Catalog. I took the flying geese blocks and pointed the point out instead of pointing it in to make a star. I thought it look better so it don't look like a star but the rest of it is just like that pattern. All the fabric in this block came from the pile of small scraps. The fabric in the corners was not large enough for 4 1/2 inches square block so I had a strip of brown that was the right shade that was 1 1/2 wide that I used to make that block the right size. The Morning Sun block also framed the corners like this.
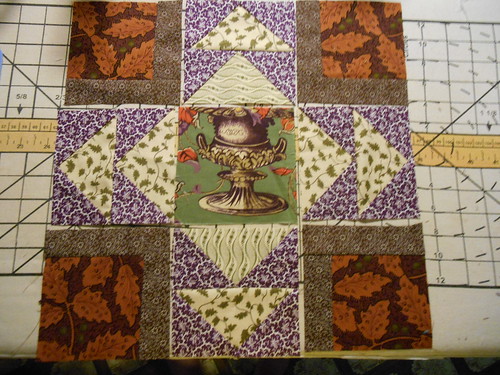
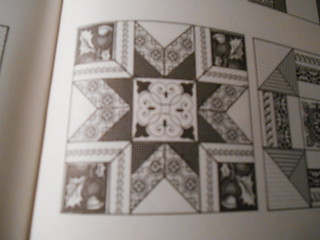
Illustration from The Quilter's Album of Blocks & Borders by Jinny Beyer
I had some really small pieces I wanted to use up. I made small nine square blocks that were 3 1/2 inch square when the block was completed. I wanted to make a block that is common and usually makes it way into a scrappy quilt. It is usually referred to as "four and nine square block or four patch nine." I will bring this block back later in this series on how to draft a block. To make this block you need to make the nine square you use 1 1/2 square pieces to make the 3 1/2 inch block. The other pieces are 3 1/2 inches. It is easy to put together by following this picture.
I had 4 extra little nine squares left. So I looked through Jinny Beyer book and found this block called Mother's Fancy. Only the block has a Ohio star in the center. I decided to use some of the half squares I had and make a pin wheel in the center. The pin wheel was an inch too short to make a 6 1/2 inch square. I added a boarder from some fabric that was in the pile of scraps and squared it up to 6.1/2 block. If you look close you will see that this pin wheel is a little wonky. But that is ok because this is not a show quilt and the only people that will see it up close in my family.
<
a href="http://www.flickr.com/... title="DSCN0505 by trkingmomoe, on Flickr">
Illustration from The Quilter's Album of Blocks & Borders by Jinny Beyer
Now that I have confused you. I will explain that these are 12 inch finished blocks and 12 1/2 unfinished blocks. You have to do a little math to figure out how big you should make your parts. Three goes into 12 four times. So if you are dividing it up into 3 sections you will need to make the parts 4 1/2 inches this includes the 1/4 inch seam allowance. This is why I picked the 12 inch block to work with because it is easy to divide up into sections and parts. You always add the 1/2 inch for the 1/4 inch seam allowance that you use to sew it together with. It helps to draw it out on paper and figure out what size and seam allowance before you try to put a block together from just a picture with out instructions. I will explain this better in my next post but I wanted you to see what cool designs that you do on your own.
~~~~~~~~~~~~~~~~~~~~~~~~~~~~~~~~~~~~~~~~~~~~~~~~~~~~~
Writers Needed
After doing quite well with scheduling for awhile, there are now lots of open dates. Would you like to write a future DK Quilt Guild diary? Please join in! Please volunteer within the comments. Thanks
The schedule:
01/26 -- Sara R
02/02 -- trkingmomoe
02/09 -- trkingmomoe
02/16 -- wininfred3
02/23 -- Sara R
