Today I have 4 more quilt blocks for you to add to your quilt with some quilt history to go with it. Also I am going to introduce you to Amy Johnson, who is an expert in free motion quilting. Her you tube videos and blog site is a must see for free motion quilters. We are going to be covering a lot of ground today so come and join us below the orange squiggle.

DK Quilt Guild: A place for quilters to gather, share ideas, projects, and to make the world a better place, one quilt at a time. Join us and share your thoughts, projects, questions, and tips. Quilters here are at many different levels of skill. Beginners and non-quilters are welcome, too!
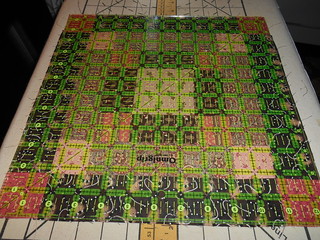
I have finally selected the backing for my quilt and the binding fabric last week. When working with a sampler quilt blocks that doesn't have a color theme, you sometimes don't find a backing print or color that will complement the sampler until you have finish half of the blocks. This is the case with this quilt because I am working with bits and pieces of fabric that I am randomly picking out. I found both fabrics all on sale for $3 a yard. The local fabric shops have completely gone to a new fashion trend that is like modern art or something from the late 1960's and early 1970's. I found some mark down in a fabric that will go well with the 19th century theme. I am still trying to decide if I should go with a cream or white for my sashing. I tend to change my mind as I work on a quilt, but that is the creative process of quilting. I was originally just going to use large scraps and fat quarters from my reproduction stash. I have started to make 2 blocks of the same pattern and fabric so I can make a second sampler quilt with the reproduction fabrics. When I was going through my UFO's (unfinished objects) this past month I found more reproduction fabric scraps. There is plenty to make a second bed quilt.
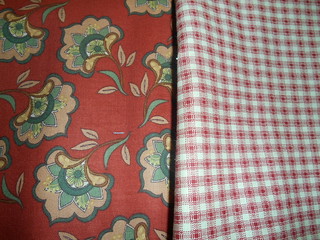
Madder red, beige, mustard yellow and green print for backing. Madder red and beige woven check for back binding.
I will be using a low loft 80% cotton and 20% polyester batting that l like to machine quilt with. It is also ideal for Florida climate that I live in because cotton breaths well. So when choosing a batting keep in mind how it is going to be used. I once bought some Warm and Natural cotton batting with a scrim because I wanted to be authentic with a reproduction quilt from a on line shop. When it came it was real heavy and too heavy for my needs. Polyester is nice if you are wanting a soft or some loft to the quilt. It is easy to work with as you quilt. There are some new battings made from bamboo fiber but I have not tried any of them.
I will be using a cream colored thread for my quilting because antique quilts were quilted with white thread. They just didn't have many colors available to them in thread. Cream or light beige will give it that antique look of aged cotton thread. Back in the 1980's, the quilt industry was recommending clear polyester thread for quilters who were learning to machine quilt. I discovered my machine at the time did not work well with it. I think I have only used it a couple of times on small projects. The point in using the clear thread was that your mistakes didn't show. The truth is nobody notices your mistakes except other quilters who have an eye for them. I have a large box of thread from all the sewing I have done so I have sewing my blocks together with what I have on hand to use it up. I know they tell you on all the quilt shows and quilt shop classes to use grey or cream thread to piece with multi colored blocks. This is a rule that comes up when they are talking about high quality thread but for every day quilting on none heirloom quilts you can use your own judgement on color. Thread is expensive and by all means use up what you have if it works with the project. In a scrap quilt I just match up the thread I have that won't show. I have been doing that for a long time and I still haven't made a big dent in my box of thread.
We have all seen the wonderful quilting that is being done with long arm quilters. If you piece several quilts a year, having all your quilts done professionally by a skilled long arm artist can be too expensive for your budget. Learning to quilt on your machine is quite doable. It takes patience and practice. By the time you have made a few quilts you will be comfortable at doing your own quilting. When you have made a special quilt you can send it out for professional quilting without feeling guilty about the cost. With all the new quilt videos and internet quilt shows, you can learn at home when you are ready to give it a try. Amy Johnson has a great site and videos that is very interesting. She take some of the mystery out of machine quilting that can be done on a domestic household machine. It is well worth the time to watch because of the easy instructions and methods that she uses.
Here the link to Amy Johnson's Free Motion Adventures Blog:
http://freemotionquiltingadventures.blogspot.com/
This month she is having a quilt along in McTavishing every Monday. Just scroll down the page and you will see her last week project and video. I have watched this past week over and over because there is so much to learn from her. Below is her latest video on you tube. It went up last week. There are 34 videos that you can watch. She makes it look easy and after you have done a few quilts it will be easy for you to do also.
Today I am presenting four new quilt blocks for you to choose from. The first one is The Ladies Art Co. Mosaic #6 block.
Ladies Art Company started publishing a catalog of quilt blocks patterns in 1895. It was a collection of 400 patterns that could be purchased. The influence of that catalog is still with us today in the naming of many of these blocks. The catalog listed this block as #334 and the name in the index in mosaic #6. They had a series of these half square blocks that they called mosaic and numbered them. Here is a link to the 1922 Ladies Art Company Catalog. Copy of the pages that can be clicked on for a closer look is at the bottom of the page. This is a great page of other information on fabrics also.
http://hartcottagequilts.com/...
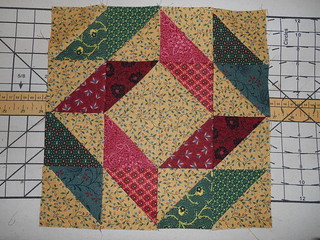
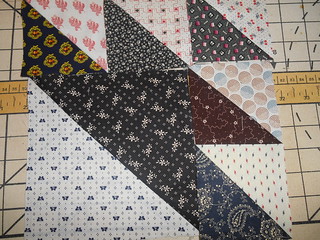
It’s most common name today is Sea Glass, Wind Blown Star and Balkan Puzzle . Quilt -it Magazine has it on their cover of the March/April issue that is out right now. This is a fun block to make for a scrap quilt because it is very forgiving with the points. The quilt block gives the quilter a nice area to quilt in. The name Wind Blown Star was given by Nancy Cabot in Feb 15, 1933 syndicated newspaper column. The story that went with it was that it could be traced to a sea side town. Hence the name Sea Glass came following that depression pattern. Also Jenny Beyer Studio has a down load able pattern for this block that is 12 inches finishes. She has combined some of the blocks to save stitches and time.
http://www.jinnybeyer.com/...
http://www.jinnybeyer.com/...
It goes together quickly. It is based on a 16 square grid. For a 12 1/2 unfinished block, you will be working with 3 1/2 half square blocks. I chose 8 different fabrics for the darks and one fabric for the light to make the same back ground.
You will need:
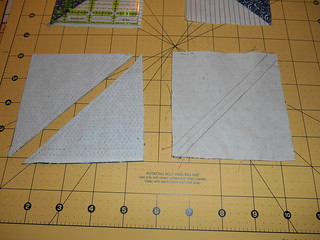
Eight dark 4 inches square.
Eight light 4 inches square.
To make it you will put rights sides, one light and one dark. Draw a line from corner to corner and sew a quarter inch from the line on both sides of the line. Cut in half and press open.
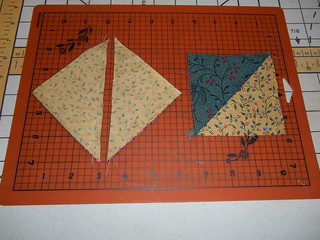
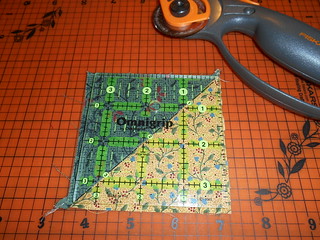
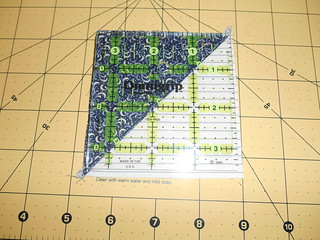
Now you will need to square up the half squares to 3 1/2 inches using a square up ruler.
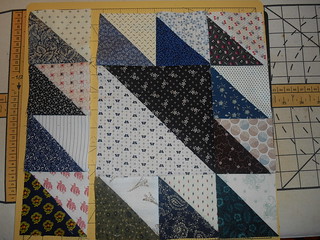
Follow the picture below in laying out and constructing the block.

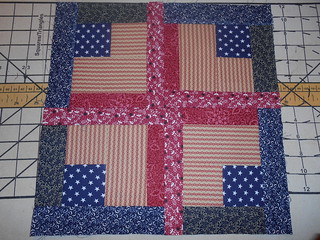
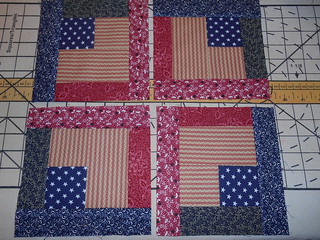
During the second have of the 19th century, patriotic fabric was printed. Some of it was for political campaigns and some was for the celebration of July 4th. People were given printed neckerchiefs and handkerchiefs at campaigns rallies to wear and use. These fabrics would make their way into quilts. I decided to add a patriotic block to the sampler quilt. In 1876 the country celebrated the 100th anniversary of the country. Philadelphia had an Exposition that summer and the country needed to start feeling good about themselves. After the suffering from the Civil War and the reconstruction the country was ready to celebrate. Fabrics with flags and lady liberty was manufactured by the yard and people bought it for table cloths. shirts, and costumes. The country had parades and fairs on July 4th. There were even quilts made to commemorate the event.
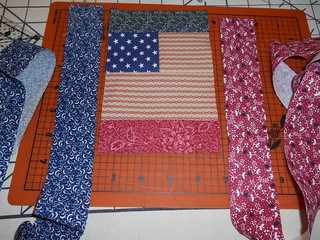
I didn’t have any reproduction fabric that was patriotic but I did look for a flag block. I found this block in an issue from April 2002 McCalls Quilting from a time that we were trying to come to terms with 911. The pattern was designed around a Moda flag fabric. So I partially redesigned the block to fit 12 1/2 inches square and to use some reproduction striped fabric I had.
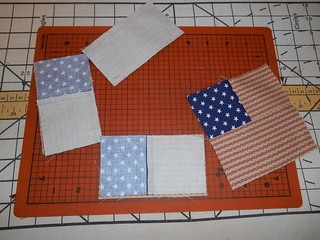
To make this block you will need:
Four 2 1/2 inches square of navy blue star fabric.
Four 2 1/2 inches square of red striped fabric.
Four 4 1/2 inches by 2 1/2 inches rectangle of striped fabric.
Four 1 1/2 inches by 4 1/2 inches strips of red print fabric.
Four 2 inches by 4 1/2 inches strips of navy blue print fabric.
Four 1 1/2 inches by 7 inches strip of red print fabric.
Four 2 inches by 7 inches strip of navy blue print fabric.
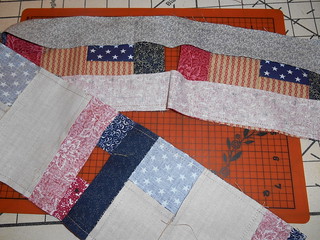
Follow the pictures to construct the block.
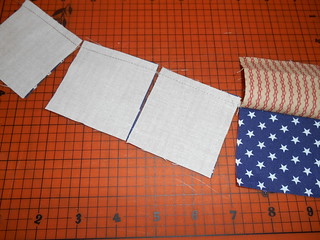
I channeled my inner Eleanor Burns and sewed the 2 1/2 inches red strip to the blue star fabric being careful to line them up so the strip was the right direction for a flag. I chained pieced them together. Pressed open. Then the next strep is to chain piece the 4 1/2 inches of striped fabric to the bottom of the stars being careful to have them all going the correct direction.
Press open and sew the 4 1/2 inches red strip to the bottom and the 4 1/2 inches blue strip to the top .
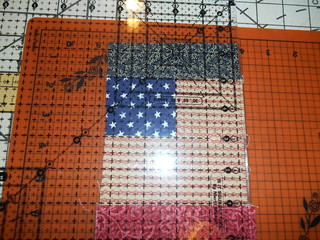
Square the two sides that did not get a strip. Pay attention to the size of the flag making sure that it is 4 inches between the 2 strips. Make adjustments if needed before squaring up. You should square up to 4 1/2 inches wide. Don’t worry about the top and bottom at this time. You are going to add the final 2 strips to the block next.
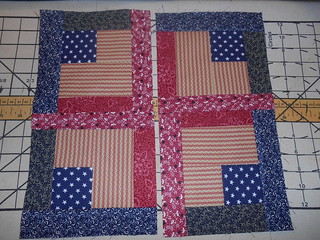
I was using scraps and just had some narrow strips from the end of strip cutting fabric that was in my scrap container. I didn’t cut them because I was not sure how long my block was when I was cutting parts out. The original block the flag was already made and you fussy cut it out. Also the block was 15 1/2 inches in the McCall’s pattern. So at that point I was flying a little by the seat of my pants. I continued to channel my inner E. Burns and chained sewed the strips on being careful to sew them on the side that they should be.
I cut them a part and pressed them open.
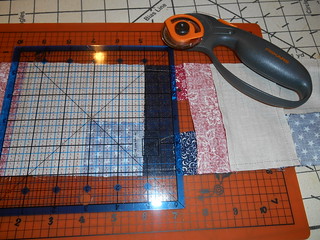
Now I squared the whole block up to 6 1/2 inch square using a square up ruler. But before I trim I checked to make sure that my flag was a perfect 4 inch finished square. If adjustment were needed you should do them now. I lined it up so I only trimmed down the size on the red side. Leaving all the blue I could.
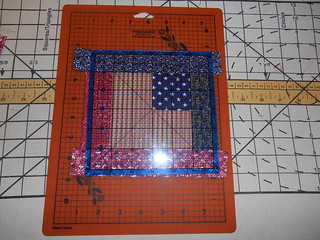
Arrange the block like this and sew together the same way you would a four square patch.
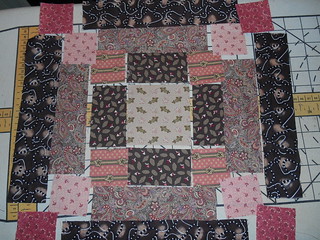
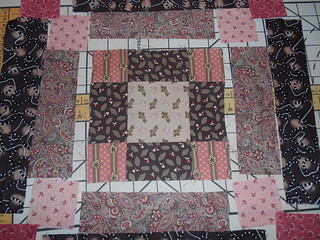
I found this block pattern in Barbara Brackman’s book, America’s Printed Fabrics 1770-1890. The block pattern is called Lost Ship.
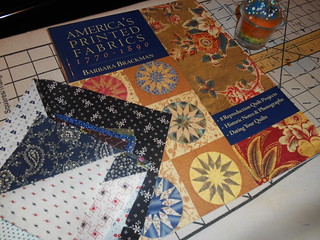
It is a pattern that shows up in quilts from the 1870′s and 1880′s. It was given the name Lost Ships by Ladies Art Co. catalog block #318 in 1898. You can see the dark ship and then the ghost ship below it.
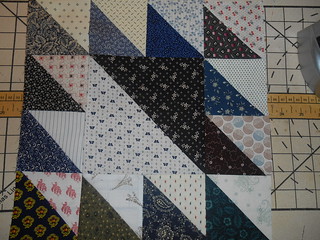
The block is an 8 1/2 inches unfinished block but I just added half square blocks on the other 2 sides to make it into a 12 1/2 inches unfinished block for the sampler quilt.
To make this block you will need:
Six 4 inches square dark print fabric.
Six 4 inches square light print fabric.
One 7 inches square dark fabric and light. You are only going to use one half square of each cut from corner to corner. I just put right sides together and drew a line. This was faster then hunting down my ruler to cut a 7 inches triangle. Plus, if you sew them a quarter inch from the center line on one side, you won’t be in danger of stretching the bias and ending with a wonky block. But if you do have a ruler template for cutting triangles by all means cut a 7 inch triangle from both light and dark fabric. I actually made two of these blocks. One for another quilt.

When you sew your center half square block from the 7 inch cut fabrics you will need to square it up to 6 1/2 inches square. I used a 6 1/2 square up ruler for this. Having different sizes of small square rulers really helps to make things move along faster.
Put your 6 light and dark 4 inches squares right sides together and draw a line. Then sew a quarter inch seam from the center line on both sides. Cut on center line to make two half square blocks.
Press open with the seam to the dark side. Then square up to 3 1/2 inches square.
Lay out block like the picture above. Sew them together in strips. The center strip you will have to sew the 2 on the top and bottom first together then sew them to the center block. Sew all three strips being careful to pin the points and seams into place first. Press in one direction as you sew to make flat seams. This is really an easy block to do and very forgiving with the points. I had no trouble lining up the points and everything seemed to fit nicely together with out having to go back and adjusting seams again. I did not have to use the seam ripper on this one. I really like this block and will use it again for a scrappy quilt.
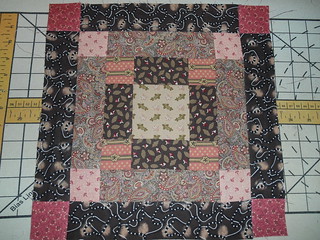
I also made another block from Barbara Brackman’s book American Printed Fabrics 1770-1890. This block also came from the same book. She calls it Triple Nine Patch. We also know this block as a Single Irish Chain.
I have a link a quilt that was made in 1900 in browns and pinks. There was probably other colors that was fugitive which means faded because they were not stable even if the quilt had never been washed. The dyes were a vegetable dye called madder. Madder grew well here in North America and different medal salts call mordants could
change the color of the madder. Madder could be dyed into pinks, red, browns, almost a black, green and lavender.
http://www.pinterest.com/...
This is not a difficult block to make but you do have to keep checking your size as you sew. I watched my quarter inch seam allowance real close and didn’t run into any problems. In fact it came out 12 1/2 inches. I only need to neaten it up a little with a square up ruler. I like it when a block comes out good with as many pieces as this one had.
I chose the same colors that was featured in Barbara Brackman’s quilt. The fashion in the last half of the 19th century was for mothers to wear brown madder calico and little girls were dressed in pinks. Usually the pinks were double pinks. Double pinks were printed in little tiny dots. The closer the dots the darker the color and the farther apart the dots the lighter in color. By the time the 1890′s rolled around madder brown prints were out of fashion. The fabric still made it into quilts until around WWI.
To make this block you will need to cut:
One 3 1/2 inches square of light fabric for center of the block.
Twelve 2 inches squares of light fabric. Cut 4 each from 3 different light prints. They will be corner stones in the block.
Four 2 inches by 3 1/2 inches rectangles from one dark print.
Four 2 inches by 6 1/2 inches rectangle from a medium print.
Four 2 inches by 9 1/2 inches rectangle from a different dark print.
It actually takes more time to cut out the fabric than to sew it together. It goes together quickly. Just remember to press as you go and check your quarter inch seam allowance each time. To make this quilt, lay out your pieces in the order you want them.
Starting in the center, sew the 2 x 3 1/2 inches rectangle to opposite sides of the center block. The sew on each end of the remaining two rectangles 2 x 3 1/2 inches the four 2 inch square corner stones.
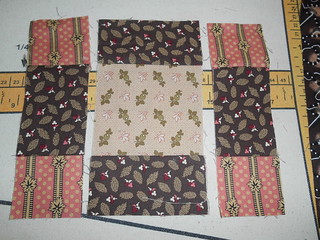
Now sew all three pieces together with the center block in the middle.
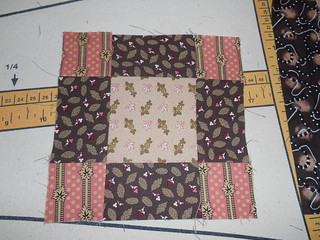
Now continue to sew from the center out the same way you did the center until you have completed all the rounds. The block should measure very close to 12 1/2 inches. Mine was just a tiny bit over so I can neaten it up.
I now have 17 blocks finished for this sampler quilt. I am making a bed size quilt so I will need 30 or 36 blocks to do that.
In my next post there is going to be some fun novelty blocks of baskets and trees. These will be a little more challenging but the results are very attractive.
~~~~~~~~~~~~~~~~~~~~~~~~~~~~~~~~~~~~~~~~~~~~~~~~~~~~~
Would you like to write a future DK Quilt Guild diary? Please join in! Please volunteer within the comments. Thanks
DKQG Diary Schedule
03/16 -- Ninepatch
03/23 -- trkingmomoe~Sampler Quilt Along
03/30 -- Sara R on the DK VA Hospital Service Project
04/06 -- OPEN
04/13 -- trkingmomoe~Sampler Quilt Along
04/20 -- winifred3
04/27 -- trkingmomoe~Sampler Quilt Along
05/04 -- OPEN
