The last diary I introduced you to the history of English quilt piecing. You normally think that you have to hand piece or English paper piece hexagon blocks. You can actually make them with your machine. It is much faster and easier. So we are going to take a close look at how to work with hexagons. I have some great videos that will show you how to English paper piece and machine sew this difficult looking block. Please join us below the fold.
DK Quilt Guild: A place for quilters to gather, share ideas, projects, and to make the world a better place, one quilt at a time. Join us and share your thoughts, projects, questions, and tips. Quilters here are at many different levels of skill. Beginners and non-quilters are welcome, too!
The past few weeks, my family has been passing around a summer cold that has slowed me down some. I only have this one block this week.
Hexagons was one of the earliest patterns that the ladies brought with them from Europe. They would make their hexagons by folding paper and cutting. Once they had their hexagon that they liked from that, then they would trace and cut the amount they would need. Scissors were an expensive item and so were needles and pins. Paper was always saved for reuse. Women in England was given money to purchase small items like pins from their husbands, fathers, and boy friends as an allowance or gift. That is where we get the term "pin money." Women was expected to keep their hands busy so they would carry these small needle craft projects with them to work on even when visiting others.
There is a wonderful story about Martha Washington. Instead of the President and the First Lady staying in Virginia, they stayed for a while in New York City. The First Lady would have open visit afternoons a couple of times a week, so ladies could call on her. It was found in a diary that a couple of ladies was not sure if it would be proper to bring their needle work with them on a visit to the First Lady. They were sure it would not be proper but kept the small projects in their pockets. After the tea was served, Martha brought out her mending and started to work on that. The First Lady was not going to behave like royalty and the visitors were so relieved that they had something to work on too, so that they would not appear to lack proper social graces.
The Gourmet Quilter has a great video tutorial on English paper piecing. It is eleven minutes long but I think it is one of the better ones offered and well worth watching.
Now we are going to move on to machine sewing hexagons. I like doing them this way. It may seem a little fussy with picking out stitches. There is a solution to this in the second video with marking your stopping points with tape on your sewing machine. I normally stay away from videos that promote gadgets and precuts for my diaries. This one has a great solution and time saver that works wonderfully for machine piecing hexagons.
Here is how it is done.
McCall's on line pattern file has a pattern using hexagons for a 12 inch block. The templates from the 12 inch block PDF not the 13 inch block is what is going to be used for the hexagons to make my rosette. I am not following their pattern but doing a traditional pattern.
http://www.mccallsquilting.com/...
PDF down load for the templates.
http://www.mccallsquilting.com/...
I printed the template on card stock. This was because I had decided to scissor cut the hexagons from an assortment of small scraps from the 19th century print fabrics I had. The card stock would hold up well for me to trace with a pencil enough pieces for this one block.
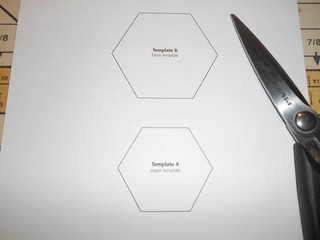
I used a pair of kitchen scissors to cut the templates out.
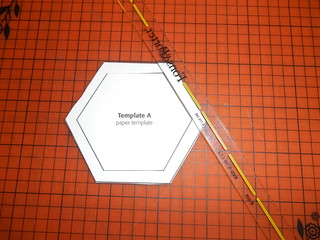
Using my quarter inch seam allowance ruler I checked to see if the smaller template was the correct seam width. It was so it would be perfect for checking out my seams as I sewed. I was going to sew this on the machine like the first video using my seam ripper as I go.

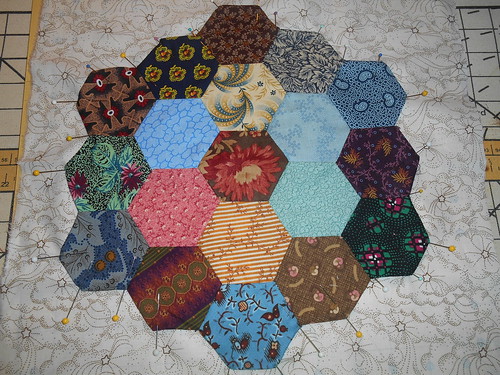
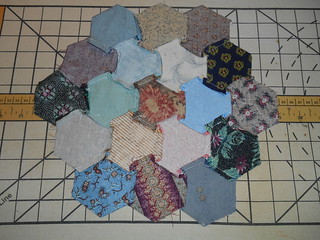
I cut all my hexagons out to use in a Grandmothers Flower Garden layout. I am sewing them together then will only have to applique them down on the background fabric.
Time to get started sewing.
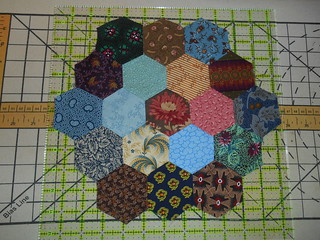
It took me about an hour and half to make this. It is always slow with a new sewing technique or the first block of a quilt. I am still getting used to my new machine and quarter inch foot. Lining up to sew the pieces took me a couple of hexagons to keep from drifting off to the right with my seam. I solved that by putting a pin to hold the finger pressed seam down. I made sure it became my point to aim for. After that it went smoothly. I kept checking my size of the hexagon with the smaller template. One of the things that can go wrong with hexagons, they can get wonky and out of shape. That will throw your whole rosette off. Placing the small template in the sewed hexagon you will be able to see if it is out of shape.
It worked out just fine in size. As you can see in the picture above that is fits into a 12 1/2 template. I haven't folded in the quarter inch yet for to applique.
Pressing takes a little time. I didn't press it until I was done with the second row. I made the center in the same steps and direction that was done in to tutorial. I just added the second round the same way. I picked my seam endings out after sewing the seam. After I was done my wrong side looked a little rough and I wasn't sure I would get nice little twirls. The intersections did twirl and laid nice and flat. I pressed from the outside to the inside using the tip of my iron at first with steam. I followed the pressing instruction on which way to press the seams.
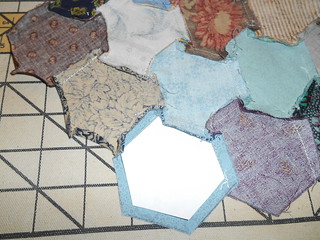
On the close up you can see that the hexagons where scissor cut so it don't have the professional look to it from the back side. I used the card stock small template to fold and press the edges over. I used a stiletto to hold the edges down so I would not burn my fingers with steam. Now I had fold lines in the right size to pin in place.
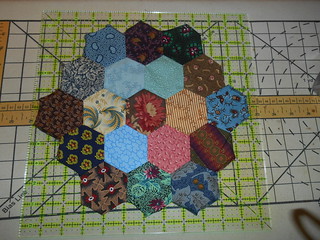
One last check to make sure that the rosette is going to be inside the 12 inch line. The template in the picture is 12 1/2 inches. It fall just in side which is where I want it. The hexagon is never a good fit from all four sides in a square block. The trick is to check the long side which is the two sides with one hexagon.

Here it is ready to be appliqued down. I made sure I had extra inches in the size of the background block. I will be able to center it after I am done with the template and have that insurance that I don't fall short on one of the sides. The shirting fabric really frames the rosette. I thought it looked dull and boring on just muslin. I will take my time and carefully hand applique it down. The color of the thread will be grey and I will use a size 10 between needle. I like the little needles and tiny pins to applique with.
I have a set of plastic rotary hexagon templates but chose to use a paper template so you could see how it can be done with out a lot of expensive tools. Also at the same time can be sewn by machine. I remember several quilts that were made using that rosette to applique on a large white muslin block. Black embroidery floss in a blanket stitch edged the rosette. This is a wonderful block to learn to sew and that is why the Grandmother's Flower Garden was one of the most popular quilt patterns in the 20th century.
Next time I will make the Carolina Lilly block in reds and greens. I needed more novelty blocks to balance out the basket and tree blocks in the layout. I found this free PDF pattern on the internet that was for a 12 1/2 inches unfinished block. It is a challenging block to do but well worth it.
