Welcome to New Diarists, a group of community members and volunteer mentors whose mission is to help relatively inexperienced Daily Kos bloggers who want to post a diary story. Way back in 2011 when we established this group, stories were known as diaries, but they’re usually the equivalent of brief articles or blog posts elsewhere. At this site, most successful stories are more substantive than most comments, without being long-winded.
The basics of posting a story here are relatively straightforward: Click on the orange Blog It! tool (look at the top of the DailyKos.com main page), then type or copy-and-paste your text in the Write your story section while periodically saving your draft. Add a descriptive title for your story in the Write a headline section (above the huge gray box for an image). Add an image if you have a relevant one. Then just add a tag, click on the white Publish button, and you’re done. You’ve published a story.
That being said, those who are accustomed to writing using different platforms might have a few questions, so what follows are more detailed instructions for basic formatting (links, blockquotes, story breaks, horizontal line breaks), as well as saving drafts, adding tags, publishing, and editing after publication.
FORMATTING OPTIONS FOR DRAFTING
When drafting your new story, you’ll see tool buttons in a row that begins with an H (for Header). Just hover over each button to display a clue about what that Formatting Option tool does as well as a keyboard shortcut (Ctrl+something). For now, let’s take a look at just a few of those tools:
ADDING LINKS:
The convention practically everywhere online is to link to any source that you quote. You may be able to just copy-and-paste a hyperlink (text that already has a link embedded in it). You could also just copy-and-paste the source’s URL (unless it’s a video) before or after the quotation, but many writers prefer to link text — frequently the article’s title, but sometimes key words — to the source’s URL.
- Links to text: Highlight the text (ideally, a key word or phrase) in your draft that you want to use as a link.
 Both rows of story editor toolbar
- Click on the Insert Link tool button in the story editor toolbar (Insert Link is 5th from left and looks like a chain link) or use keyboard shortcut Ctrl+k to open that toolbox.
- The cursor defaults to the top rectangular box, so just copy-and-paste (or type) the URL for your source in that top box.
- Because you had highlighted the text you want linked, you’ll see that the bottom rectangular box for Display Text is grayed-out and already contains your highlighted word or phrase, so you don’t need to do anything else on that row.
- Click on the orange Insert Link button at the bottom, and your linked text will turn orange, which should make it easier for you and readers to see where your links are.
- Before you publish, it’s a good idea to test each link in your draft to make sure that it works. If you right-click on the linked text (Ctrl-click on a Mac), you can open the link in a new tab or window. If you hover over the link, a little "speech balloon” will appear above it where you can also click to test the link. That is not how it will look once you’ve published — it’s a patch to the editor because links in drafts didn’t initially work in DK5, making testing impossible.
- Links to videos: Just pasting a URL for a video will embed the video itself, rather than link to it. (This is true in both stories and comments.) So if you want to link to a video rather than post the video, then you need to follow the instructions above for Insert Link tool button (type then highlight the word video or the name of the video, click the Link button, copy-and-paste the video’s URL, click Insert Link, then test the link).
ADDING BLOCKQUOTES:
The convention at Daily Kos is to use blockquotes when quoting from sources so as to clearly distinguish your writing from your source’s writing.
Blockquotes enclose material in a gray box, as seen here.
- Highlight the text—phrase, sentence, or paragraph—that you’re quoting in your draft.
- Click on the Block Quote tool button (which is next to the Insert Link button and looks like a quotation mark [ “ ]) or use keyboard shortcut Ctrl+’.
- Doublecheck that the correct text is in the blockquote (gray box), and you’re done!
- If you want to embed a blockquote within a blockquote, first click the Block Quote tool button so that the gray box appears, then add the text with the embedded blockquote.
- Note: You cannot blockquote just part of a bullet list. That may be a glitch, but we’ll see.
ADDING A DIARY STORY BREAK:
In DK4, our beloved orange divider-doodle was automatically inserted between the introductory content box (usually just a few paragraphs and perhaps an image) and the body content box to break up our diaries into two parts. The divider-doodle was left behind in DK4, though, so now we have to insert a Story Break ourselves.
- Click in the space where you want to Insert the Story Break (usually after a few paragraphs).
- Click on the Insert/Remove Story Break tool button (which is between the Right Indent and the Bullet List tool buttons and looks like a dog-eared page).
- The Story Break—a
boring thin, gray, horizontal line—will appear in roughly the center third of the page (width depends on the device you’re using). The Story Break in this story is located above the Formatting Options for Drafting header (scroll up to see).
- If you change your mind, it’s easy to remove an unwanted Story Break: Just click on the Story Break tool button again, and the horizontal line will disappear. (Note that this tool will add only one Story Break to a story; for additional breaks, you may want to use Horizontal Lines.) To move the Story Break, click the Story Break tool button to remove it (wherever it is), then position the cursor where you want the Story Break instead and click the tool button again to add your new one.
- Tip: Any story longer than 3-4 brief paragraphs probably needs a Story Break. Its function is to break up a story into two parts — a top portion that should introduce your story and interest people in reading more, and a bottom portion that contains the rest of your content. In Blog View, which is how this site presents Daily Kos front page stories as well as group home pages (like New Diarists’), only the portion above the break will appear if a Story Break is included. If your top section runs on forever or if a Story Break is not included, then that’s potentially inconsiderate of both the readers who will have to scroll past your story and the writers whose stories will be way down the group’s page beneath yours.
INSERTING A HORIZONTAL LINE:
Since we can use the Story Break tool just once to break up sections of text, you may want to insert one or more Horizontal Lines if you want to unobtrusively break up sections of text beyond that (as I’ve done in this story with each section of instructions). This thin, pale gray Horizontal Line will be as wide as the text of your story and is suitable for dividing your text, images, and videos into sections.
- Click in the space where you want the line break to appear (usually below some text).
- On the far right side of the tool button row, you’ll see an arrowhead pointing down. Click on that arrow, and you’ll then be able to see Additional Formatting Options in a second row of tool buttons.
- Just click on the Insert Horizontal Line button (which is between the Subscript and Numbered List tool buttons and looks kinda like a sandwich) in that second row, and the line will appear.
- To remove an unwanted Horizontal Line, just click below it, then click Delete on your keyboard. (If you hover over the Insert Horizontal Line tool button, you’ll notice it doesn’t say Remove, which is a clue that you have to use your keyboard instead.)
- Warning: If you try to add extra line breaks to create additional space between lines of text, it might look okay in your draft, but that extra blank space will disappear when your story is published.
WYSIWYG, SAVING, TAGGING, & PUBLISHING YOUR STORY
The Saving and Publishing tools are located in an orange-&-black sidebar to the right of your draft. Tags are added below your draft.
WYSIWYG:
There isn’t a Preview button like the one we have in comments. Instead, DK5 is supposed to work so that “what you see is what you get” (WYSIWYG); in other words, your posted story should look like your draft. (Sometimes, it does; oftentimes, it doesn’t, but that’s another story.)
SAVING:
When you’re in draft or edit mode, the orange Save Draft button is in the top right corner. Just remember to click the button periodically while drafting, and when you’re done.
TAGGING:
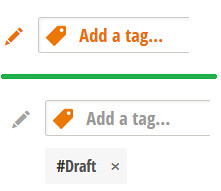 Top: before adding / bottom: with tag
To be published or added to a group queue, every story must have at least one tag, because tags are one tool that the site uses for organizing content. Writers use tags to identify topics of their story, and many Daily Kos users follow tags of interest to them.
- When your draft is complete, click Add a tag (in a rectangular box below your draft).
- Type a relevant tag, then click Enter:
- One-word tags, such as Environment: Just type the word, click Enter, and that word will appear in a gray box with a hashtag like so: #Environment
- Multi-word tags, such as Global Warming: Type the tag as one word, not as separate words. So you will type GlobalWarming, click Enter, and that tag will appear in a gray box like so: #GlobalWarming (If you try to type a space in a tag, nothing will happen, so you can’t mess this up.)
- Add additional relevant tags as needed, but avoid adding tags that are irrelevant to your story as this can annoy site users.
- Tips: For a person, don’t use just their first or last name. Use #DavidBowie (NOT #David or #Bowie). And although it isn’t required, using capital letters to begin each word helps with readability of tags.
PUBLISHING:
Using the white Publish button (in the black portion of the sidebar to the right of your draft) will publish your story immediately if it has tags. So do NOT click that tempting white Publish button unless you’re ready for your story to be posted.
When you’re in draft mode, you have three options for publishing your story: 1) Publish immediately from your own queue; 2) Schedule to publish later out of your own queue; or 3) Schedule to publish out of a group queue:
- Publish immediately: When you’re ready to post your story to the main site, look for the white Publish button (in right sidebar). When you click the Publish button, it will ask, “Are you sure you want to publish this story now?” Then you’ll click on either an orange Publish button, or on Cancel if you made a mistake.
- Schedule to publish later: Click on Schedule for later (gray text below the white Publish button) if you want to schedule your story to post from your own queue at a later day/time. This is convenient if you want to wait to post until you can be around to recommend comments (when appropriate) and to reply to your readers, which is usually best.
- Schedule through a group queue: Click on Add a publish group (above the white Publish button) if you want to schedule your draft to post from a group queue. (Note that you must be a member of a group to publish from that group.) Then either send a message to the group to let them know that your draft is in the group queue and needs to be scheduled or published or, if you have publishing privileges for that group, go to the group queue to schedule or to publish your story immediately. (Note: If you schedule while in your own queue, your story will publish from there, not from the group.)
Reminder: Clicking the white Publish button will publish your story immediately. So if you’re posting through a group or scheduling to post later, don’t click that white button!
EDITING YOUR STORY AFTER POSTING
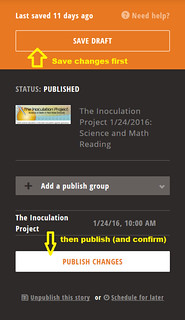 Publish Changes to a story
Should you need to edit your story after it has been published to the main site, the Edit Story tool is in a sidebar to the left of your published story:
- Click on Edit (above the Reblogged by section of the left sidebar) to go into Edit Story mode.
- Make changes to your story, then click the orange Save Draft button (now, we’re back in the orange-&-black right sidebar, pictured somewhere at right).
- Next, click on the white Publish Changes button (which has replaced the white Publish button).
- A dialogue box will open up asking, “Are you sure you want to publish this story now?” Go ahead and live dangerously and click the orange Publish Changes button, and you’re done.
Before anyone asks: No, we still cannot edit our comments!
That’s it for now because this diary story is already quite lengthy. If you’re looking for additional instructions, site staff has posted tutorials, and belinda ridgewood and I are in the process of updating our other New Diarists resources diaries as well. Stay tuned.
Questions? Other helpful tips?
Community helping community is the heart of Daily Kos for so many of us. So feel free to ask questions and to pass along other helpful tips in the comments (while the comment period remains open) or to send our group a message!

