Happy Sunday Bread Heads!
“It’s the Hap-Hap-Happiest Time of the Year” – Okay, enough of that. For the bakers and candy makers it is the busiest time of the year, what with all the special things that folks make only at this time of year.
But even if you are not a designated baker it is often the time of year when people feel like they want to make some cookies, and I have just the recipe for you!
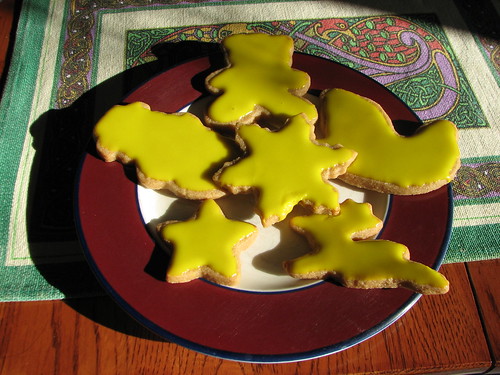
This week we’ll be making Lemon Cutout Cookies. While mint is really the de rigor flavor of the season, I think that there is nothing better than a bright citrus flavored cookie as the perfect complement.
This particular recipe is based on a standard refrigerator cookie recipe but adds brown sugar for an extra richness of flavor. This means that the cookies are a lot browner than the normal white of a ‘fridge cookies, but I think they have a rustic look that offsets that concern.
Let’s talk about that icing for a minute. The classic icing for this time of year is Royal Icing. Personally I’d rather eat cardboard than anything topped with this icing. Sure it looks great but sacrifices flavor for appearance.
Frankly it does not have to be that way. The icing we’ll be using it one of Mrs. Dog’s invention. It gives you a lovely shiny and hard crust without giving up anything in the flavor department.
But enough teasing, let’s make some cookies!
Iced Lemon Cutout Cookies (about 50 cookies)
Ingredients:
For Cookies:
½ cup (1 stick) butter
1 teaspoon lemon extract (as always don’t use the flavor, use the extract!)
2/3 cup brown sugar (light preferred but either will do)
1/3 cup sugar
1 egg
1 ½ cups flour
¼ teaspoon cream of tartar
¼ teaspoon salt
For Icing:
2 cups powdered sugar
2 teaspoon lemon extract
2 tablespoon light corn syrup
4 tablespoons milk (whole is preferred here, but whatever you have on hand will work)
¼ teaspoon yellow food coloring
Equipment:
2 sheet pans, lined with parchment paper
Assorted cookie cutters in the 2” to 4” range
Method:
In your large mixing bowl or the work bowl of your stand mixer, cream the butter with the lemon extract. When it is light and fluffy (about 5 minutes, don’t scrimp on the time!) add in both sugars and the egg, beat for another 3 minutes.
In a small bowl mix together the flour, cream of tartar and the salt. Add the dry ingredients to the wet ingredients and mix for about 3 minutes to combine thoroughly.
Divide the dough into two roughly equal portions, flatten into discs about 1 inch thick and wrap with plastic wrap. Refrigerate for at least 2 hours and up to 3 days.
Before rolling out the cookies, set a rack in the middle of your oven and preheat it to 400 degrees (yes it is hot but it will give you a crisp yet chewy cookie, trust me).
Flour your work surface and bring out one of the dough disks. I have you divide this so that the dough stays cool while you are working with it. If it starts to get sticky at any point, return it to the ‘fridge and work with the other disk.
Using your rolling pin, gently roll back and forth over the dough. You don’t need to push down hard or anything like that. When you have a long oval, turn it 90 degrees and roll away from yourself so you have a roughly square dough about ¼ inch in height. Don’t roll these cookies too thin! They will get too crisp if you do!
Cut out the cookies. Knead the scraps back together and roll out again until you’ve used up all the dough.
Place them about 1” apart on the sheet pan. When you have a full sheet pan slip them into the hot oven and bake for 8 minutes. They should just have a thin slightly darker brown rim around them when they are done.
Remove them form the oven and place the whole sheet pan on the cooling rack. Allow the cookies to sit on the hot sheet pan for another 2 minutes to finish cooking all the way through. Remove them from the sheet pan with a spatula and allow to cool completely on the rack before frosting.
To make the frosting, combine the ingredients in a small bowl. Whisk briskly to mix, you are looking for a smooth and rather thin frosting.
If you really want to have a great looking cookie you should invest in an small offset spatula. It looks just like a big cake decorating one, but is small enough to use in the tight confines of cookie.
To ice, take small dabs of icing and smooth evenly over the top of the cookie. Take your time and get as close the edges as you can. Set aside to dry (about 2 hours) and then complete the rest of the cookies.
When they dry they will have a very shiny and inviting shell that is al dente and wonderfully flavored, much better than nasty Royal Icing.
Store your cookies in an air tight container. Now for a trick that you’re mother and grandmother knew but most folks have forgotten. You can store these cookies for up to a month, if you put a piece of wax paper over the top and then put a piece of white bread on the wax paper. There is something in the white bread that keeps the cookies at a perfect, but not too hard crispness.
It seems that the white bread gives off just enough moisture to keep them perfect.
So there you have it, one of the perfect Christmas (or Solstice, or Chanukah or Kwanza) cookies of all time.
Next week we’ll make Gingerbread.
The flour is yours!
Oh! PS - If you missed the candy making miniseries you can find the recipes at the links below!
Chocolate Covered Butter Creams
Perfect Peanut Brittle
Chocolate Covered Caramels
Orange Pralines
Chocolate Dipped Peanut Butter Fudge
Chocolate Covered Marshmallows
